If you’re like most photographers, you have a lot of photos that you want to keep, but don’t have enough storage space for them all. And if you want to edit and organize your photos, that takes up even more room. So what can you do? The answer is simple: stack them.
By stacking your photos in Lightroom, you can free up valuable hard drive space while still having easy access to all of your images. In this article, we will show you how to stack photos in Lightroom and some tips for doing it effectively.
How to Stack Photos In Lightroom
Photo stacks group images together as a unit. When you stack images, you only see the top picture. The others are hidden underneath. You can reveal the hidden pictures, then collapse the group. You can stack together as many shots as you want and make unlimited stacks. The only limitation is that the image files must be located on the same disk and in the same folder.
You might stack photos if you have similar images. Or you can stack several virtual copies of one photograph. If you use burst mode, you can organize each burst as a group. Stacks are a good way to organize bracketed photos or panorama cuts. But be creative! You can stack images any way you want. You can group images by topic, place, time of day, or model.
How to Group Photos into Stacks
Stacking works with the filmstrip at the bottom of the Lightroom workspace. If you do not see it, go to the Windows drop-down menu. Select Windows > Panels > Show Filmstrip. The shortcut key to toggle the filmstrip off and on is F6. You can stack photos in either the Library or Develop modules.
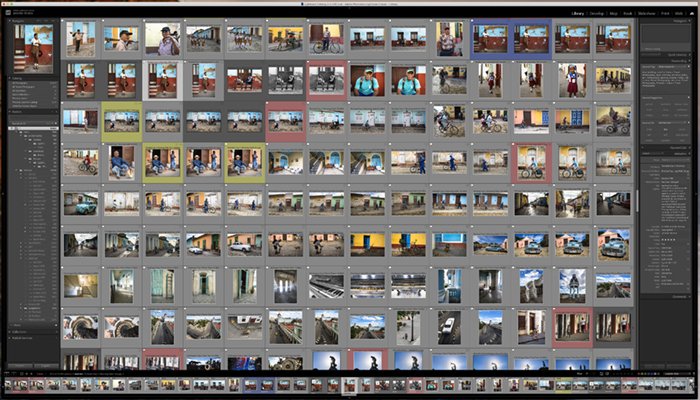
To stack photos, highlight the images you want to group in the filmstrip or Grid view. The thumbnails do not need to be next to each other. Hold down the shift key to select many images in a row. Use the Command or Control key to click on individual photos.

Go to the Photo drop-down menu and select Photo > Stacking > Group into Stack (or use the hotkey Ctrl or ⌘G). The look of your filmstrip will change. The top thumbnail appears with a number in the upper left corner. This tells you how many images are in the group. If you do not see a number on the first stacked image, go to the Lightroom Classic drop-down menu and select Preferences. Then go to the Interface tab and tick the box next to ‘Show stack counts’.

The stack is only identified by a number in the filmstrip. In Grid view, you will only see the top image without any sign that this photo is part of a stack.
Click on the number to show all images. When you expand a stack, notice that each thumbnail has two numbers. The first is the image’s position in the stack. The second is the total number of images. To collapse the stack again, click on the number in the first image. When you expand a stack, the photos are still organised as a group. You can collapse the group again. To get rid of the stack, select Unstack (or use the hotkey Shift + Ctrl or ⌘G).
You can also expand a stack by highlighting the top image and selecting Photo > Stacking > Expand Stack. To collapse a stack, highlight any photo in the stack and click Photo > Stacking > Collapse Stack. You can also access the menu by right-clicking on an image in the stack. The ‘S’ key toggles between expanding and collapsing a stack.
In the stacking menu, you have the option to expand or collapse all stacks in your catalog. Expanding and collapsing a stack is different from removing images from a stack or unstacking images.
How to Add and Remove Images from a Stack
You can easily add or remove images from a stack. You can also split a stack in two. To remove images from a stack, expand the stack and highlight the picture or pictures you want to remove either in the filmstrip or Grid view. From the menu, select ‘Remove from Stack’.
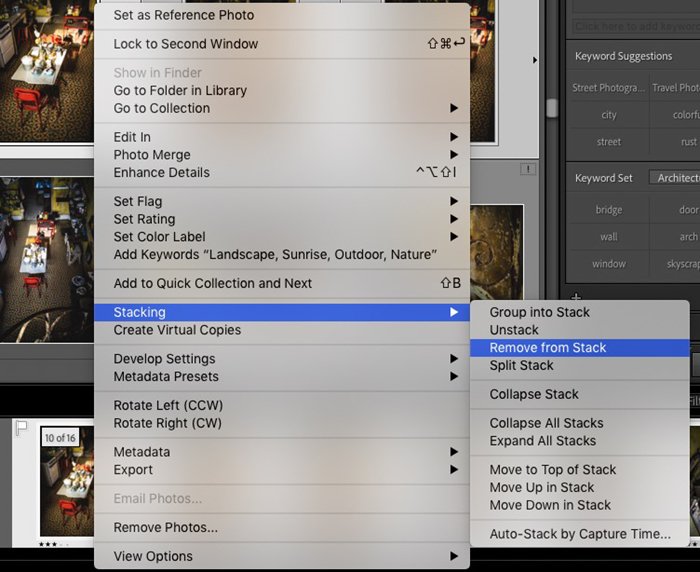
The other option is to split the stack into two groups. Highlight the image that you want on top of the second stack. In the menu, select ‘Split Stack’. The photos before the highlighted one will be in one stack. The highlighted photo and those that follow will create a second stack.
If you want to add images to a stack, highlight the stack and the image or images you want to add. Go to the stacking menu and select ‘Group as Stack’ (or use the hotkey Ctrl or ⌘G). This adds the new images to the original stack. You can even group stacks. Highlight two or more stacks and select ‘Group into Stacks’ in the menu. The stacks combine into one larger group.
How to Re-Order Stacks in Lightroom
The top picture in the stack is the one you see. The others hide underneath. Any changes you make affect only this photo. Changes do not apply to the entire stack. This includes adding keywords, stars, or colors. This also includes post-processing edits. To apply changes to all photos, expand the stack and sync the changes.
But you can re-order the stack and change the top photo. When creating a stack, highlight the images you want to include. Then, use your arrow keys to select the image you want to be on top. This does not have to be the first image in the sequence. Notice that the area around the chosen image is slightly brighter than the other selected images.

If you want to change the top image in a stack, expand the stack and select the image you want to at the top. In the stacking menu, click ‘Move to Top of Stack’. When you collapse the stack, this becomes the first image. You also have the option of moving images up or down the stack.
Auto-Stack by Capture Time
Another feature is the ability to stack photos automatically based on capture time. This is useful when grouping images created in burst mode, bracketed, or panoramic images. You might also find it useful to group events that happened during a set period.
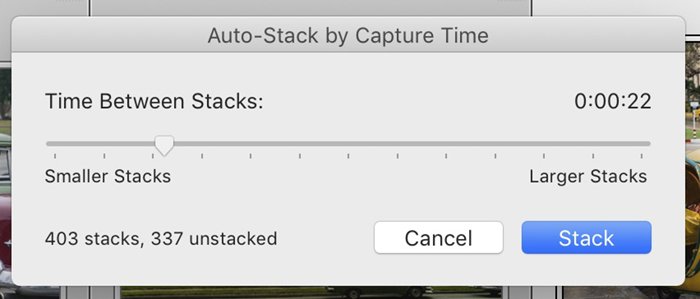
In the stacking menu, select ‘Auto-Stack by Capture Time.’ Choose a time between stacks. The shortest time is zero seconds; the longest is one hour. Shorter the time between stacks will create smaller ones. The program estimates how many stacks will be created before you click the Stack button.
How to Photo Stack in Lightroom CC
The stacks function in Lightroom CC works similarly to Classic. The feature is simplified, and the menu is in a different location.
To stack photos, highlight the photos you want to group and go to the Edit drop-down menu. Select Edit > Stacks > Group into Stacks (Ctrl or ⌘G). You can also right-click on the selected images and select ‘Group into Stacks’. The stack number is in the upper right-hand corner of the top image. Clicking the number expands the stack in a filmstrip at the bottom of the workspace.
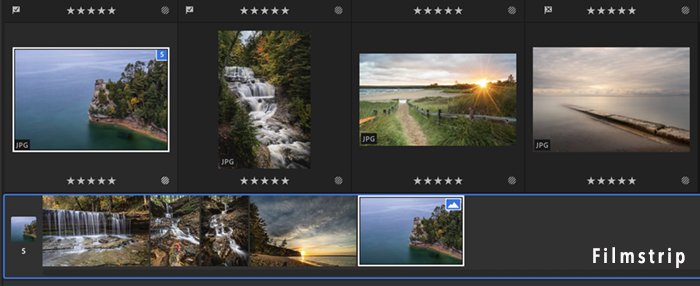
There are fewer grouping options in Lightroom CC. You have the option to group, ungroup, or set a selected image as the cover photo. Setting an image as the cover moves it to the top of the stack. In CC, you do not have the option of splitting stacks or auto-stack by capture time.
Stacking vs Focus Stacking in Photoshop
Before we get into stacking photos in Lightroom, we must first clear up a common confusion. Stacking is an organisational tool that is different from focus stacking. As the names are similar, they can be confused.
Macro and landscape photography use focus stacking to increase focus throughout the frame. Photographers take several photos of a scene with the focus point set differently in each.
In post-processing, the images are blended to combine the sharpest points from each frame. This creates a deep depth of field.
It is not possible to do focus stacking in Lightroom. This process is done in Photoshop. Lightroom will only merge HDR and panorama images. If you want to learn how to focus stack in Photoshop, see ‘How to Use Focus Stacking for Sharper Photos’.
Conclusion
The stack feature is very flexible in Lightroom Classic and CC. Unfortunately, there is currently no way to create stacks in Lightroom mobile.
Stacking your photos is a great way to clean off your workspace. You can group like-photos or make as many virtual copies as you like and stack them under the original image. Lightroom Classic gives you the most options. The program will even automatically stack images for you based on capture time.
Try out our Effortless Editing course to master all the secrets of professional editing in Lightroom.

