Most cameras today come with one, but finding the best wide-angle lens isn’t that easy. The old “standard” lens fell out of favor, and many mirrorless cameras and DSLRs come with a wide-to-standard zoom. Although a 50mm lens gives the same sort of perspective as our eyes, our peripheral vision allows roughly 150 degrees of vision. And that’s more like a 16mm lens.
We’ve also become accustomed to the fairly wide angle of smartphone cameras. The iPhone’s default lens is equivalent to a 26mm lens. So finding the best wide-angle lens is an important and, at times, confusing task.
To help you, we’ve rounded up the best wide-angle lenses, both prime and zoom, for a number of different lens mounts. You’ll find recommendations for Canon RF, Canon EF-M, Canon EF, Fujifilm XF, Nikon AF, Nikon Z, and Micro Four Thirds.
The Best Wide-Angle Lens for Canon RF-Mount
Our top three picks for the Canon mirrorless RF-Mount include a couple of wide-angle zooms and a super-wide prime lens. They are all excellent choices, and the best one for you will depend on your needs and budget.
1. Canon RF 15-30mm f/4.5-6.3 IS STM
| Brand |
Brand
Canon
|
| Lens Mount |
Lens Mount
Canon RF
|
| Maximum Aperture |
Maximum Aperture
f/ 6.3
|
| Focal Length Range |
Focal Length Range
15-30 mm
|
| Image Stabilization |
Image Stabilization
|
| Key Features |
Key Features
Excellent value for a wide-angle zoom with IS
|
| Best For |
Best For
Anyone looking for a great-quality, great-value wide-angle zoom
|
The Canon RF 15-30mm f/4.5-6.3 IS STM delivers crisp, punchy, and rich images on any Canon RF-Mount camera. It is exceptional value for money. The maximum aperture might give you pause, as it’s quite slow. And zoomed in to 30mm, the f/6.3 seems underwhelming. But the built-in image stabilization gives you up to three extra stops. And this helps compensate for that slow aperture.
Unless you really need the extra speed of a more expensive lens, you’ll find it hard to beat the value for money from this one. Canon RF cameras will automatically correct any distortion present. So in effect, you have a super-wide lens with zero distortion. It’s amazing!
Physically, it’s a neat little lens with a lovely big rubberized zoom ring that takes up most of the length of the lens. At the front of the lens is a smaller ring. This can be programmed into your camera as a manual focus ring. Or you can use it for setting aperture or exposure compensation, for example. It has a different texture, so you can feel it easily. There is a Focus/Control switch just above the IS switch for easy control.
All this is of limited use if the lens isn’t up to standard. But this one is a beauty. The images are beautifully sharp. The world, as seen through a 15mm lens, is an intoxicating place. And with this lens, you’ll see it in crisp, glorious detail. The colors are rich, the contrast is superb, and there are no discernible aberrations to detract from the image.
Other positives include incredibly close focusing, especially at 15mm, and no focus breathing. There’s little that’s out of focus with a lens this wide. But when it is, the bokeh on this lens is very pleasant.
The Canon RF 15-30mm f/4.5-6.3 IS STM is our top pick for an RF-mount wide-angle lens because it delivers excellent performance at a great price. It gives you a specialist lens at 15mm and a “standard” wide-angle one at 30mm. And it does it all at a fairly ordinary price. It’s hard to beat for a Canon RF camera.
2. Canon RF 15-35mm f/2.8L IS USM Zoom Lens
| Brand |
Brand
Canon
|
| Lens Mount |
Lens Mount
Canon RF
|
| Maximum Aperture |
Maximum Aperture
f/ 2.8
|
| Focal Length Range |
Focal Length Range
15-35 mm
|
| Image Stabilization |
Image Stabilization
|
| Key Features |
Key Features
Very fast maximum aperture
|
| Best For |
Best For
Demanding users who need a fast ultra-wide lens
|
The Canon RF 15-35mm f/2.8L IS USM Zoom Lens is one of the best ultra-wide zooms money can buy. As you’d expect from a Canon L-Series lens, it’s a long way from cheap. But these lenses are designed for pros who want top-quality and rock-solid reliability. And you pay for that constant f/2.8 maximum aperture.
One thing that IS can’t do is stop motion blur. Low-light shots of moving objects will need the extra speed. And for added measure, this zoom also has IS, so it’s the best of both worlds. Real estate photography usually requires super-wide angles. But they also need a tripod and at least f/8. A slower lens is fine in those circumstances. But for dramatic wedding shots in low light, this f/2.8 lens will outperform a slower lens.
Ergonomically, this is a well-thought-out lens. It has three rings. There’s a big knurled zoom ring closest to the camera. Then you have a manual focus (MF) ring. Depending on the camera settings, this can give you always-on MF. There’s a final ring at the front of the lens. This clicks, as it is mainly used for aperture control. But it can be programmed to your needs in the camera settings. It’s the sort of customizability that professional photographers love.
There is no distortion or aberration worth mentioning, as Canon RF cameras correct for it automatically. The sophisticated coatings and careful construction mean that flare is not a problem either. If you need the extra speed and want a super-sharp ultra-wide zoom lens for your Canon RF, we think you’ll love the Canon RF 15-35mm f/2.8L IS USM Zoom Lens.
3. Canon RF 16mm f/2.8 STM Prime Lens
| Brand |
Brand
Canon
|
| Lens Mount |
Lens Mount
Canon RF
|
| Maximum Aperture |
Maximum Aperture
f/ 2.8
|
| Focal Length Range |
Focal Length Range
16 mm
|
| Image Stabilization |
Image Stabilization
|
| Key Features |
Key Features
Very compact, fast max aperture
|
| Best For |
Best For
Anyone looking for a bargain super-wide lens
|
It looks more like a nifty-fifty, but the Canon RF 16mm f/2.8 STM Prime Lens is a super-wide-angle lens. And it really is super! The RF camera’s automatic corrections mean you get the stunning breadth of view that a super-wide lens gives without any distracting distortions.
The images this lens provides are full of contrast and fantastically detailed. They maintain their sharpness pretty much edge to edge. And any fall-off is corrected for by the camera. The single control ring is programmable in the camera, so you can have manual focus if you choose.
That being said, the autofocus is decently quick. And Canon’s STM motors are impressively quiet. This lens also focuses very close. The biggest challenge will be potentially blocking your own light as it gets so close. But the images are sharp and clear.
There’s nothing quite like the sweeping majesty of a sky or landscape taken with a super-wide lens. It seemed that they were only available to professionals with deep pockets. But the Canon RF 16mm f/2.8 STM Prime Lens gives you a compact, impressive lens at an incredible price.
The Best Wide-Angle Lens for Canon EF-M Mount
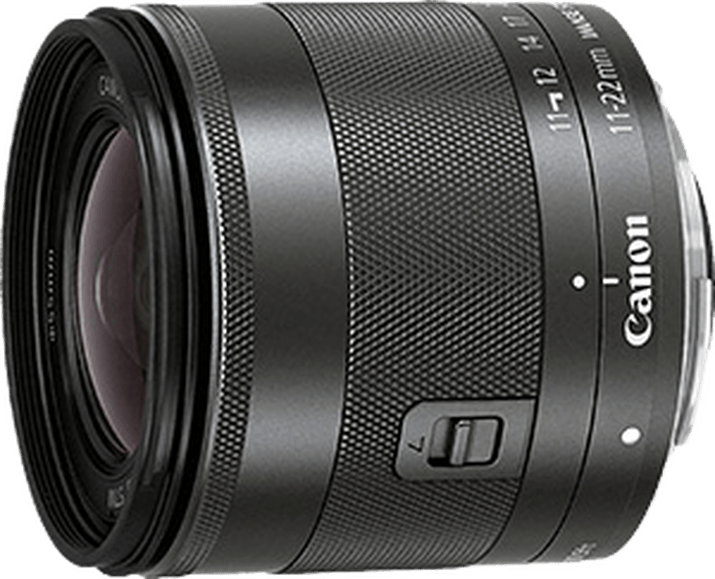
4. Canon EF-M 11-22mm f/4-5.6 STM Zoom Lens
| Brand |
Brand
Canon
|
| Lens Mount |
Lens Mount
Canon EF-M
|
| Maximum Aperture |
Maximum Aperture
f/ 5.6
|
| Focal Length Range |
Focal Length Range
11-22 mm
|
| Image Stabilization |
Image Stabilization
|
| Key Features |
Key Features
Telescoping lens body for easy transportation
|
| Best For |
Best For
Anyone looking for a workhorse wide-angle zoom for the Canon M-Mount
|
The Canon EF-M 11-22mm f/4-5.6 STM Zoom Lens is the best wide-angle zoom lens for Canon EOS M-Series cameras. These APS-C cameras have proved successful as the EOS R range. But they offer a quality compact body for anyone looking for an easily carried interchangeable lens camera.
The 11-22mm focal length is equivalent to a full frame 18-35mm lens. So it gives you ultra-wide to wide-angle shots. The 35mm lens was a long-established favorite among photojournalists. It gives you much more coverage than a 50mm but keeps you close enough to the action. With this lens, you get that, plus the other favorite wide angles—28 and 24mm—and nudging the ultra-wide at 18mm.
You pay a slight penalty with the speed of the lens. At 35mm, f/5.6 is a little slow. But the three stops of IS will help you with camera shake. There’s no penalty, however, with sharpness. This is a beautifully sharp little lens. Both test data and real-world examples show that you get very pleasing, crisp images from edge to edge.
Given the slow maximum aperture, the image stabilization is an added bonus. Image stabilization is an obvious choice with telephoto lenses. The longer the focal length, the more you need it. I was surprised that my 16-35mm lens came with IS. But there’s no denying it’s a bonus. As we’ve said before, IS won’t stop motion blur. But it buys you some leeway in many circumstances.
One of the selling points of the EOS M cameras is their size, and you can actually shrink the length of this lens when not in use. Don’t worry, it won’t let you take a photo with it like that. It’s a useful feature, given the appeal of the camera range. It’s easy to imagine heading out for a day’s sightseeing with just this Canon EF-M 11-22mm f/4-5.6 STM Zoom Lens on your Canon. It’s a good pairing for your Canon EF-M camera.
The Best Wide-Angle Lens for Canon EF-Mount
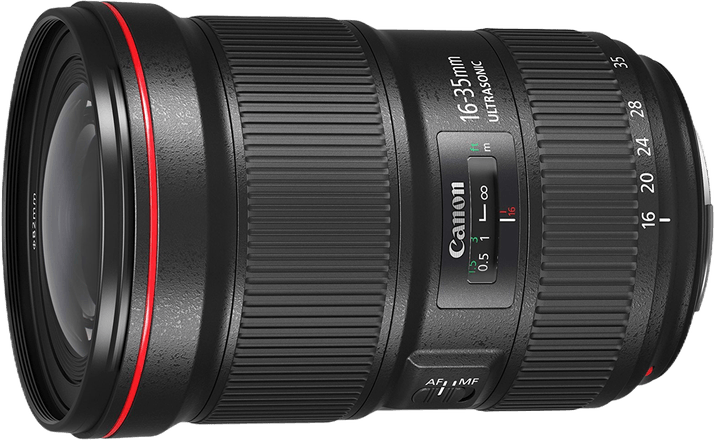
5. Canon EF 16-35mm f/2.8L III USM Zoom Lens
| Brand |
Brand
Canon
|
| Lens Mount |
Lens Mount
Canon EF
|
| Maximum Aperture |
Maximum Aperture
f/ 2.8
|
| Focal Length Range |
Focal Length Range
16-35 mm
|
| Image Stabilization |
Image Stabilization
|
| Key Features |
Key Features
Very fast ultra-wide zoom lens
|
| Best For |
Best For
Anyone looking for a top-quality ultra-wide zoom lens with a fast aperture
|
The Canon EF 16-35mm f/2.8L III USM Zoom Lens is probably the ultimate super-wide zoom for the Canon EF-Mount. As you’d expect from an L-Series lens, it’s a substantial beast. That’s because the constant f/2.8 maximum aperture needs a lot of glass. But this is meant for the rough-and-tumble of daily use, whatever the weather.
All that protection is pointless if the pictures are poor. But there are no worries on this front. This third iteration of this lens delivers outstanding pictures. You’ll get superbly sharp images from corner to corner. They’re lovely and contrasty with plenty of punch. There is some barrel and pincushion distortion appropriate to the focal length. But it is free from aberrations and falloff. It really is an outstanding lens.
It’s got everything where you’d like to find it too. There’s a nice-sized zoom ring near the camera body. It’s marked with 16, 20, 24, 28, and 35mm focal lengths. At the front of the lens is an easy-to-find large manual focus ring. It’s always available or switchable with the AF/MF slider just by the left thumb. Ergonomics are almost always spot on with Canon lenses, and this wide-angle lens proves that.
Perhaps the biggest omission with this lens, especially given its price tag, is IS. It’s not such a big deal with the fast maximum aperture, but it would be nice to have. Other than that, the Canon EF 16-35mm f/2.8L III USM Zoom Lens is an absolutely top-quality lens.
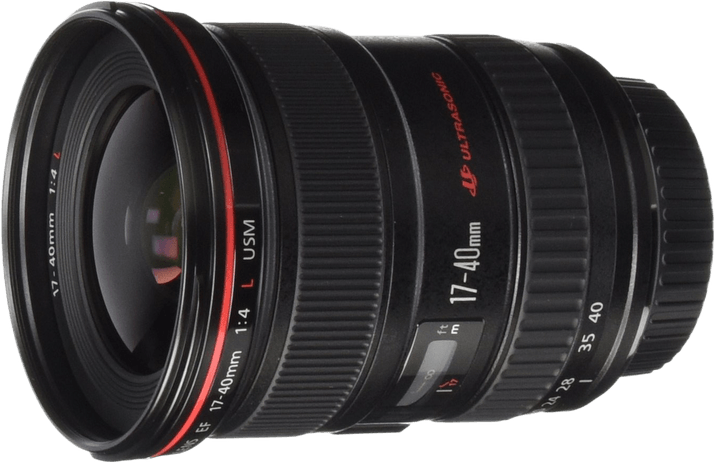
6. Canon EF 17-40mm f/4.0L USM Zoom Lens
| Brand |
Brand
Canon
|
| Lens Mount |
Lens Mount
Canon EF
|
| Maximum Aperture |
Maximum Aperture
f/ 4.0
|
| Focal Length Range |
Focal Length Range
17-40 mm
|
| Image Stabilization |
Image Stabilization
|
| Key Features |
Key Features
Excellent value and a useful zoom range
|
| Best For |
Best For
Anyone who needs an excellent wide-angle lens at an attractive price
|
The Canon EF 17-40mm f/4.0L USM Zoom Lens is a few degrees less wide but gets you closer than the much more expensive 16-35mm f/2.8. And it does it for about one-third of the price. Despite this, it’s still an L-Series lens with the build quality you’d expect from a lens with the distinctive red ring.
The strengths of the lens lie in its excellent optics and consistency. Autofocus is quick and very quiet. And you can focus manually anytime you want. If you don’t want AF, then the AF/MF switch is exactly where you’d expect (under your left thumb).
There is some of the distortion you would expect to find. One thing about EF lenses, compared with their modern RF siblings, is that the latter’s distortions tend to be dealt with in-camera. With an older lens like this one, you can still fix any issues with lens profiles like the ones you find in DxO PhotoLab.
The Canon EF 17-40mm f/4.0L USM Zoom Lens is a top-quality wide-angle lens that will save you money over faster ultra-wide alternatives. It’s reliable, relatively small, and built for heavy use.
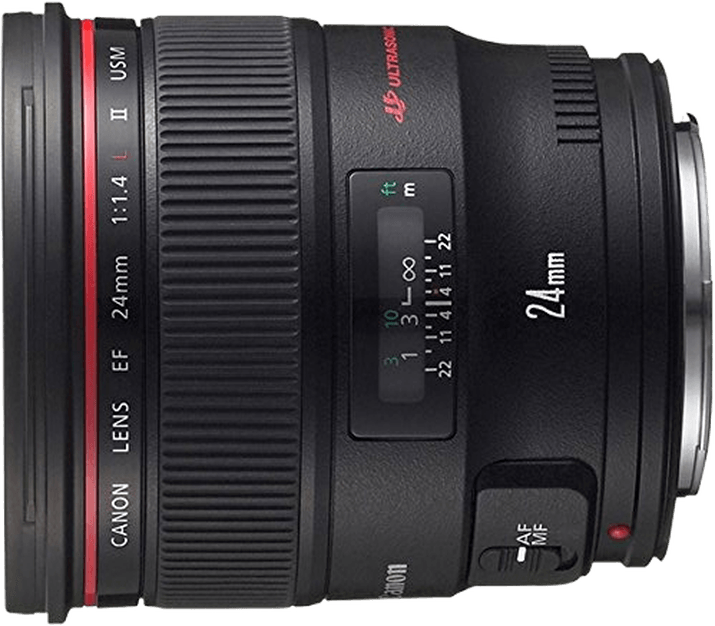
7. Canon EF 24mm f/1.4L II USM Prime Lens
| Brand |
Brand
Canon
|
| Lens Mount |
Lens Mount
Canon EF
|
| Maximum Aperture |
Maximum Aperture
f/ 1.4
|
| Focal Length Range |
Focal Length Range
24 mm
|
| Image Stabilization |
Image Stabilization
|
| Key Features |
Key Features
Very fast maximum aperture
|
| Best For |
Best For
Anyone who needs an excellent wide-angle lens with a fast aperture
|
The impressive Canon EF 24mm f/1.4L II USM Prime Lens is a specialist and rather expensive wide-angle lens. But what you get for your money is one of the fastest Canon wide-angle lenses. You also get exceptional optics and L-Series build quality.
There’s little to speak of in terms of distortion. The lens is sharp from edge to edge. The multi-coatings and construction are so good that you won’t be troubled by flare or ghosts.
Of course, the reason you might buy this lens is because you need a fast wide-angle lens. Not so much for camera shake, but rather motion blur. Cheaper lenses will give you IS to overcome camera shake. But in situations where you need a wide-angle lens to capture moving subjects, this is where you turn. It’s great for indoor events or sports where you want a dramatic wide-angle shot.
The Canon EF 24mm f/1.4L II USM Prime Lens is an impressive lens. And if you need its blend of speed and focal length, it might be worth the hefty price tag. And it’s unlikely you’d be disappointed with any of the results.
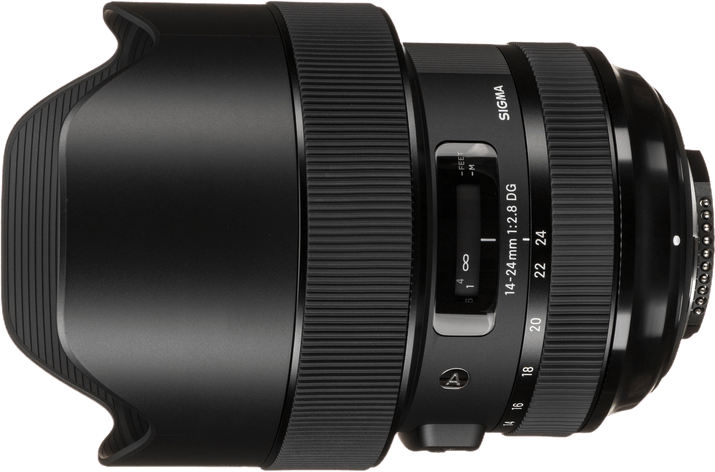
8. Sigma 14-24mm f/2.8 DG HSM Zoom Lens for Canon EF-Mount
| Brand |
Brand
Sigma
|
| Lens Mount |
Lens Mount
Sigma SA
|
| Maximum Aperture |
Maximum Aperture
f/ 2.8
|
| Focal Length Range |
Focal Length Range
14-24 mm
|
| Image Stabilization |
Image Stabilization
|
| Key Features |
Key Features
Fast maximum aperture and ultra-wide focal length
|
| Best For |
Best For
Anyone looking for a cheaper rival to an L-Series lens
|
The Sigma 14-24mm f/2.8 DG HSM Zoom Lens is part of Sigma’s Art range of lenses. Aimed at the prosumer, they combine superb optics with pro features like weather sealing. They aren’t cheap, but they tend to be less money than the camera manufacturer’s own brand of pro-level lenses.
This ultra-wide zoom lens lives up to expectations. It is solidly made, using metal and Sigma’s own composite plastic. That, and all the glass, adds up to nearly 2 lbs (1.1 kg) of lens. It’s not a lens you forget is on the end of your camera! The attention to quality shows in the images too.
There’s no doubt that this focal length range can be a challenging one. Getting the optics right on a prime 14mm lens is not easy. Turn it into a zoom, and it’s a challenge. But Sigma has answered the challenge well. The lens is edge-to-edge sharp across most of the zoom range.
There’s some vignetting at wider lengths and apertures. But it’s nothing that can’t be easily corrected in post-production. And the same goes for the distortion. You expect barrel distortion at 14mm, and that’s what you get. But it’s not distracting, and again, it can be addressed in post.
Sigma Art lenses can produce stunning images, and the Sigma 14-24mm f/2.8 DG HSM Zoom Lens is no exception. And it does it at a decent price.
The Best Wide-Angle Lens for Fujifilm X-Mount
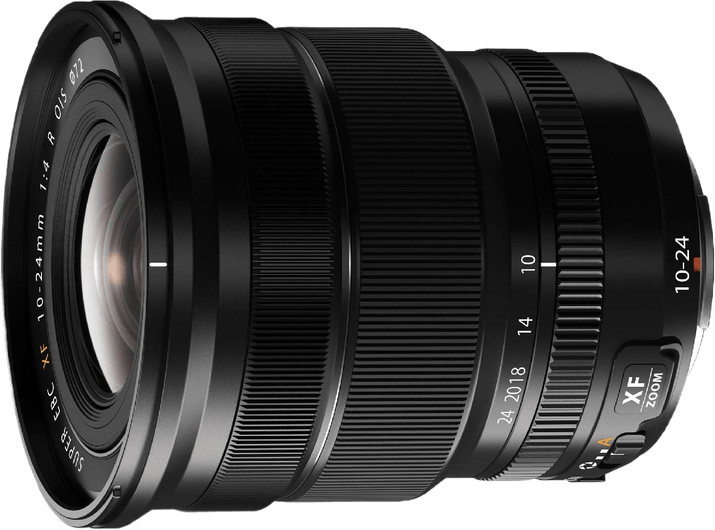
9. Fujifilm XF 10-24mm f/4.0R OIS WR Zoom Lens
| Brand |
Brand
Fujifilm
|
| Lens Mount |
Lens Mount
Fujifilm X
|
| Maximum Aperture |
Maximum Aperture
f/ 4.0
|
| Focal Length Range |
Focal Length Range
10-24 mm
|
| Image Stabilization |
Image Stabilization
|
| Key Features |
Key Features
Metal lens body and an aperture ring
|
| Best For |
Best For
Anyone looking for an ultra-wide workhorse for Fujifilm X-Mount cameras
|
The Fujifilm XF 10-24mm f/4.0R OIS WR Zoom Lens stands out for its quality—both in build and optics. The body is made of metal, which gives it a reassuring professional feel. And the images it produces are very fine indeed.
This lens is equivalent to 15-35mm on a full frame camera. So that’s ultra-wide, plus all the most popular wide-angle focal lengths as well. It does this with a constant f/4 aperture, which is reasonably fast. But this is also backed up with IS, which will help with low-light shooting of stationary objects.
There are three rings on the lens. Nearest to the camera is an aperture ring. This can be turned on with the aperture switch. In most circumstances, automatic will do. But if you are running in aperture priority, then it’s a nice addition. Then you have the large zoom ring, and at the front of the camera, the manual focus. But this isn’t always on and has to be switched on in-camera.
Fujifilm cameras and their lenses work beautifully together. So much so that it’s difficult to tell if the lens is free of distortion and falloff or if the camera is just correcting for it perfectly. But it doesn’t really matter because the end result is images free from aberrations.
All of this means that the Fujifilm XF 10-24mm f/4.0R OIS WR Zoom Lens is the perfect complement to your Fujifilm camera if you’re looking for a top-quality wide-angle zoom.
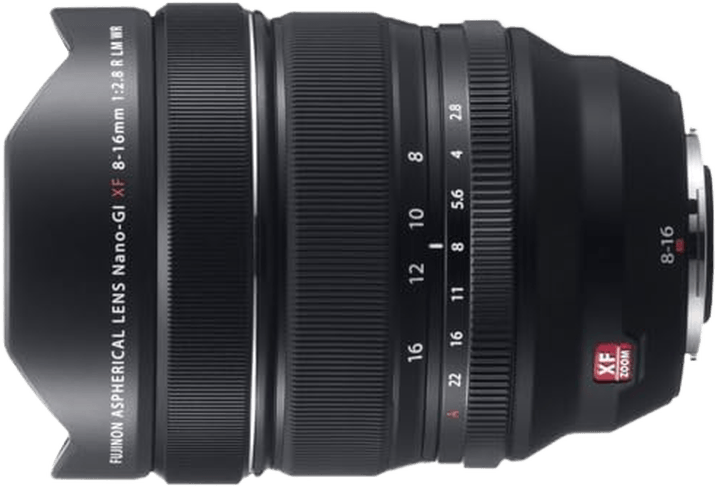
10. Fujifilm XF 8-16mm f/2.8 LM WR Zoom Lens
| Brand |
Brand
Fujifilm
|
| Lens Mount |
Lens Mount
Fujifilm X
|
| Maximum Aperture |
Maximum Aperture
f/ 2.8
|
| Focal Length Range |
Focal Length Range
8-16 mm
|
| Image Stabilization |
Image Stabilization
|
| Key Features |
Key Features
Ultra-wide maximum zoom, constant f/2.8 aperture
|
| Best For |
Best For
Anyone looking for a high-quality flexible ultra-wide zoom
|
If the 10-24mm isn’t wide enough for you, then the Fujifilm XF 8-16mm f/2.8 LM WR Zoom Lens might fit the bill. This is equivalent to a 12-24mm on full frame. When the longest focal length is as wide as most people’s widest wide-angle lens, you know you’re in specialist territory.
Like the 10-24mm, there are three rings. The aperture has an “A” setting rather than a separate switch. I think this is a better arrangement. The ring has clicks that are more pronounced at the full stops, which is very helpful. The quality of construction shows in how smoothly everything works.
A problem with ultra-wide lenses is often that of flare and ghosting. It’s tricky to make a lens hood that will shield the lens without appearing in the shot. And the light is gathered from such a wide area that avoiding direct sources can be tricky. Remarkably, this Fujifilm lens suffers very little from flare or ghosts, presumably due to the quality of the multicoating and lens manufacturing. It really is quite an achievement.
It’s hard to imagine that you won’t be pleased with the quality of the images either. The lens is pin-sharp, with bags of contrast. It shows little (if any) distortion, and there are no aberrations (or the camera is correcting for them). The Fujifilm XF 8-16mm f/2.8 LM WR Zoom Lens is a superb specialist lens. It’s not cheap, but it is a solid, reliable, and optically superb piece of glass.
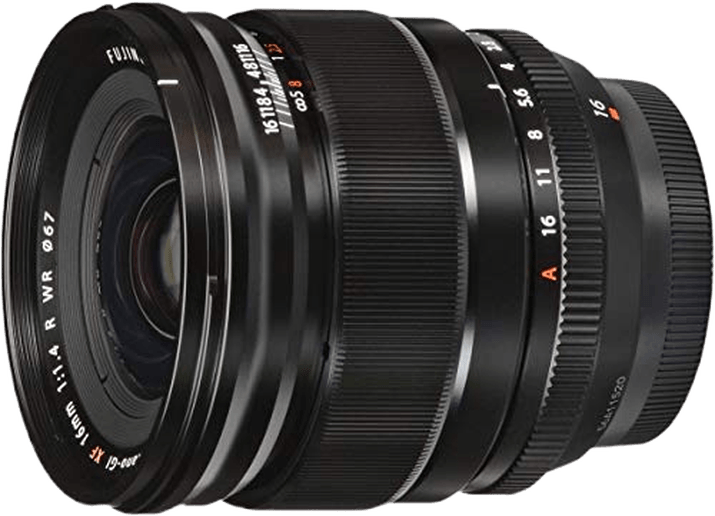
11. Fujifilm XF 16mm f/1.4R WR Prime Lens
| Brand |
Brand
Fujifilm
|
| Lens Mount |
Lens Mount
Fujifilm X
|
| Maximum Aperture |
Maximum Aperture
f/ 1.4
|
| Focal Length Range |
Focal Length Range
16 mm
|
| Image Stabilization |
Image Stabilization
|
| Key Features |
Key Features
Metal body and fast maximum aperture
|
| Best For |
Best For
Anyone who needs a fast, crisp 24mm lens
|
The Fujifilm XF 16mm f/1.4R WR Prime Lens is equivalent to a full frame 24mm lens. This is perhaps the most popular wide-angle lens. It gives a wonderful breadth and sweep to images without warping the view of the world as some ultra-wide lenses can. And this particular Fujifilm lens is a very fast f/1.4.
This means that you can get pictures that might otherwise be spoiled by motion blur. Wedding photos, especially inside, often look stunning with a 24mm lens. But they are often not static. Here, the extra speed of the f/1.4 aperture is a real bonus for two reasons. It helps prevent motion blur, but it also means you don’t need to crank the ISO up so high and introduce lots of noise.
Optically, this prime lens is very sharp. And as we have come to expect from Fujifilm, any aberrations seem to be absent or dealt with by the camera. Whatever the cause, the end result is that the Fujifilm XF 16mm f/1.4R WR delivers punchy, crisp images of the highest quality.
The Best Wide-Angle Lens for Nikon F-Mount
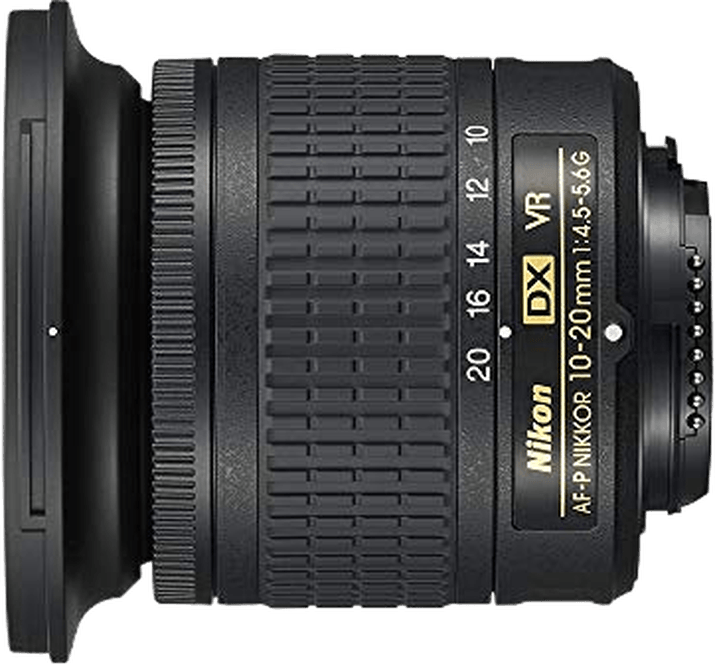
12. Nikon AF-P DX 10-20mm f/4.5-5.6 VR Zoom Lens
| Brand |
Brand
Nikon
|
| Lens Mount |
Lens Mount
Nikon F
|
| Maximum Aperture |
Maximum Aperture
f/ 5.6
|
| Focal Length Range |
Focal Length Range
10-20 mm
|
| Image Stabilization |
Image Stabilization
|
| Key Features |
Key Features
Excellent optics and affordable price
|
| Best For |
Best For
Anyone looking for a bargain-priced high-quality lens
|
The Nikon AF-P DX 10-20mm f/4.5-5.6 VR Zoom Lens offers an excellent wide-angle lens at a great price. It’s designed for Nikon’s APS-C DX cameras and is equivalent to a 15-30mm lens on a full frame. That means you get an ultra-wide, plus the benefit of 24mm, 28mm, and more. It’s a gem of a bargain.
Whole articles have been written about Nikon lens and camera compatibility. This will only work on cameras introduced in the last 10 years or so. So it’s important to check. If it does work on your Nikon, then you can expect gloriously sharp and rich photos from it.
Unlike Canon cameras, Nikon’s APS-C lenses will physically fit on their full frame bodies. And they can be usable. You just have to watch for vignetting on the full frame sensors. However, this lens is mainly meant for APS-C sensors. And it delivers amazingly sharp images.
There is barrel distortion at the wider focal lengths, but when corrected in post-processing, it leaves no trace or oddness in the image. And the lens shows its quality in resisting flare, even when there is a strong light source. It’s a clear sign of quality coatings and construction.
There is little doubt that the Nikon AF-P DX 10-20mm f/4.5-5.6 VR Zoom Lens is one of the best-value wide-angle zoom lenses around. If you are a Nikon DX user, it’s an absolute gem to have in your bag (or, more likely, permanently mounted on your camera).
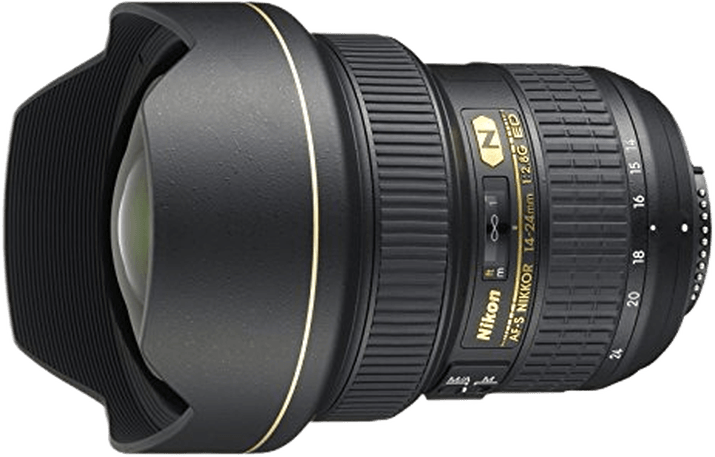
13. Nikon AF-S FX 14-24mm f/2.8 ED Zoom Lens
| Brand |
Brand
Nikon
|
| Lens Mount |
Lens Mount
Nikon F
|
| Maximum Aperture |
Maximum Aperture
f/ 2.8
|
| Focal Length Range |
Focal Length Range
14-24 mm
|
| Image Stabilization |
Image Stabilization
|
| Key Features |
Key Features
Ultra-wide 14mm and fast f/2.8 maximum aperture
|
| Best For |
Best For
Anyone looking for a specialist lens with a fast maximum aperture
|
The Nikon AF-S FX 14-24mm f/2.8 ED Zoom Lens demonstrates the decades of experience and research that Nikon has accumulated. The optical quality of the lens is remarkable. This is an ultra-wide lens designed for full frame cameras. And even on those big-sensor beasts, you’ll struggle to find imperfections in the lens.
Among the remarkable things about the lens is that it is very fast, with a constant f/2.8 across all focal lengths. Now, f/2.8 is all well and good, but we all know that wide apertures mean softer images. Except that this lens manages to be sharp wide open, even at the edges.
This is an expensive lens meant for fairly niche uses. Even real estate photography rarely needs a 14mm lens. And it is a big, heavy lens. So the chances are that it will appeal to interior photographers, Milky Way shooters, and other specialists. And those people are likely to feel that the hefty price tag is worth it.
The image quality, autofocus speed, and build standard make the Nikon AF-S FX 14-24mm f/2.8 ED Zoom Lens a worthwhile option for anyone needing its specific combination of speed and focal length.
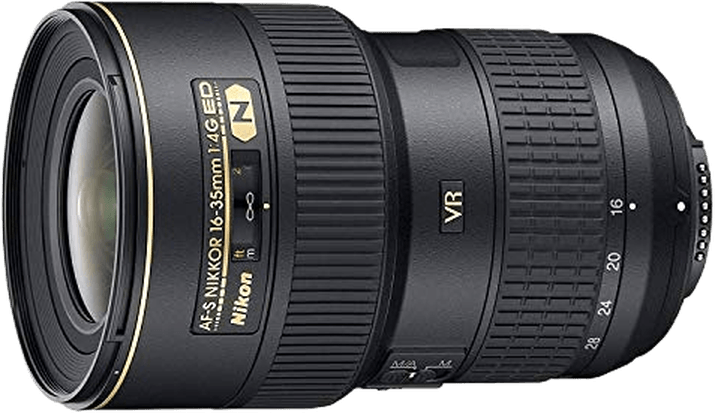
14. Nikon AF-S FX 16-35mm f/4.0 ED VR Zoom Lens
| Brand |
Brand
Nikon
|
| Lens Mount |
Lens Mount
Nikon F
|
| Maximum Aperture |
Maximum Aperture
f/ 4.0
|
| Focal Length Range |
Focal Length Range
16-35 mm
|
| Image Stabilization |
Image Stabilization
|
| Key Features |
Key Features
An impressive zoom range and image stabilization
|
| Best For |
Best For
Anyone looking for super quality at an attractive price
|
The Nikon AF-S FX 16-35mm f/4.0 ED VR Zoom Lens is probably just as sharp as the 14-24mm, but less than half the price. This is probably for two reasons. It doesn’t go as wide and is more than a full stop slower.
However, it’s likely that for most users, neither of those things is an issue. And that makes this an ideal choice if you’re looking for an ultra-wide zoom. Because 16mm is not at all shabby for those dramatic landscapes. And it’s more than adequate for most real estate or architecture photo shoots. In both those circumstances, you can use a tripod to make up for the slower speed. Or you can use the image stabilization if you’re going handheld.
The Nikon AF-S FX 16-35mm f/4.0 ED VR Zoom Lens delivers image quality that probably equals its more expensive stablemate. And it does it at a price that leaves enough leftover to buy another good-quality lens. For almost every user, this lens delivers outstanding performance at a very decent price.
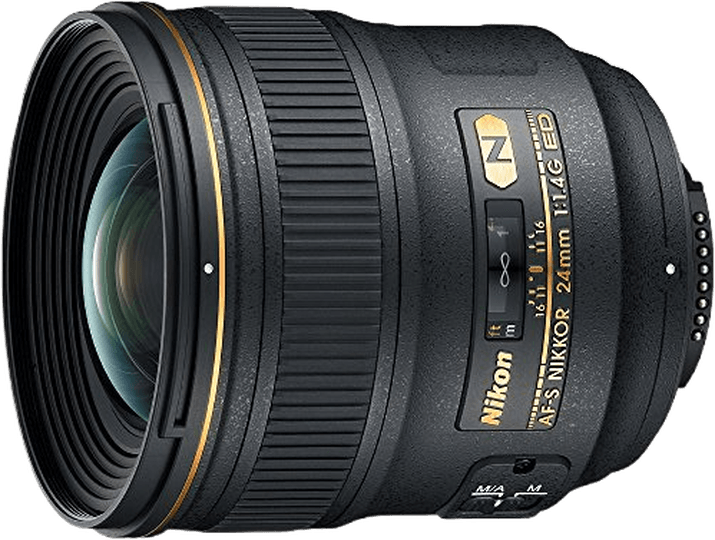
15. Nikon AF-S FX 24mm f/1.4 ED Prime Lens
| Brand |
Brand
Nikon
|
| Lens Mount |
Lens Mount
Nikon F
|
| Maximum Aperture |
Maximum Aperture
f/ 1.4
|
| Focal Length Range |
Focal Length Range
24 mm
|
| Key Features |
Key Features
Fast prime lens with excellent optics
|
| Best For |
Best For
Anyone who needs a specialist, fast, wide-angle lens
|
The Nikon AF-S FX 24mm f/1.4 ED Prime Lens is a very fast prime lens that allows you to capture scenes in extremely low light. It’s a full frame lens, so it will work with film as well as digital cameras. It will work on APS-C sensors, but it’s wasted on such a small sensor.
The optical quality is simply excellent. The images are rich and crisp, with no distracting aberrations or falloff. The lens has Nikon’s impressive SWM AF motor. This is quick and nearly silent. You’ll find it more than enough for most circumstances. But when it’s not enough, manual focus is always available.
A 24mm lens is a wonderful addition to any camera bag. And you’d be hard-pressed to find a better one than this one. It’s sharp and contrasty across the whole frame. And any distortion is almost negligible (and easily corrected in post-processing).
The Nikon AF-S FX 24mm f/1.4 ED isn’t cheap. But it isn’t outrageously expensive, either. And if you want a fabulous wide-angle prime lens with a fast maximum aperture, it’s hard to beat.
16. Sigma 14-24mm f/2.8 DG HSM Zoom Lens for Nikon F-Mount
| Brand |
Brand
Sigma
|
| Lens Mount |
Lens Mount
Nikon F
|
| Maximum Aperture |
Maximum Aperture
f/ 2.8
|
| Focal Length Range |
Focal Length Range
14-24 mm
|
| Image Stabilization |
Image Stabilization
|
| Key Features |
Key Features
Fast maximum aperture and ultra-wide focal length
|
| Best For |
Best For
Anyone looking for an alternative to Nikon's own lens
|
The Sigma 14-24mm f/2.8 DG HSM Zoom Lens for Nikon F-Mount is the Nikon F-Mount version of the lovely Sigma Art lens reviewed in the Canon EF-Mount section of this review.
This lens is part of Sigma’s Art range of lenses. Aimed at the prosumer, they combine superb optics with pro features like weather sealing. They aren’t cheap, but they tend to be less money than the camera manufacturer’s own brand of pro-level lenses.
This ultra-wide zoom lens lives up to expectations. It is solidly made, using metal and Sigma’s own composite plastic. That, and all the glass, adds up to nearly 2 lbs (1.1 kg) of lens. It’s not a lens you forget is on the end of your camera! The attention to quality shows in the images too.
There’s no doubt that this focal length range can be a challenging one. Getting the optics right on a prime 14mm lens is not easy. Turn it into a zoom, and it’s a challenge. But Sigma has answered the challenge well. The lens is edge-to-edge sharp across most of the zoom range.
There’s some vignetting at wider lengths and apertures. But it’s nothing that can’t be easily corrected in post-production. And the same goes for the distortion. You expect barrel distortion at 14mm, and that’s what you get. But it’s not distracting, and again, it can be addressed in post.
Sigma Art lenses can produce stunning images, and the Sigma 14-24mm f/2.8 DG HSM Zoom Lens for Nikon F-Mount is no exception. And it does it at a decent price.
The Best Wide-Angle Lens for Nikon Z-Mount
17. Nikon Z 14-30mm f/4.0 Zoom Lens
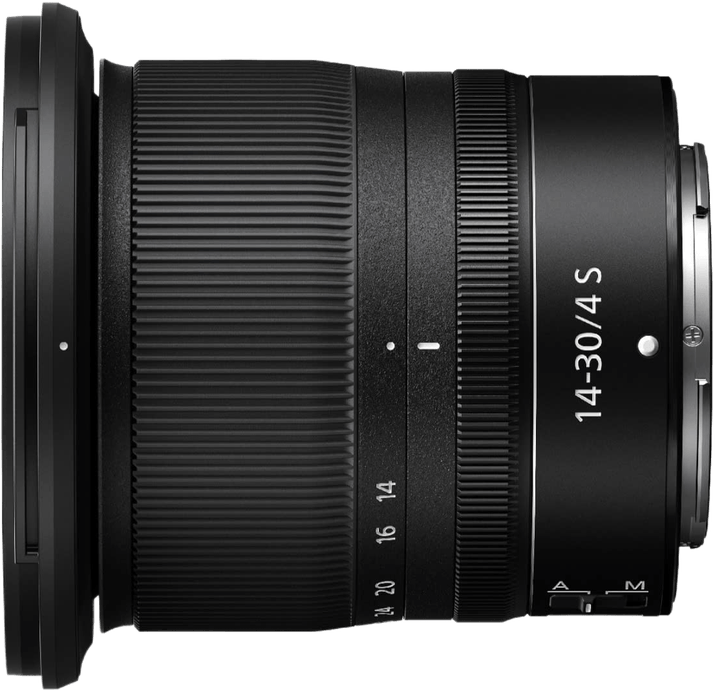
| Brand |
Brand
Nikon
|
| Lens Mount |
Lens Mount
Nikon Z
|
| Maximum Aperture |
Maximum Aperture
f/ 4.0
|
| Focal Length Range |
Focal Length Range
14-30 mm
|
| Image Stabilization |
Image Stabilization
|
| Key Features |
Key Features
Superb optics and a constant f/4
|
| Best For |
Best For
Z-Mount users looking for an excellent wide-angle lens
|
The Nikon Z 14-30mm f/4.0 Zoom Lens is the best wide-angle zoom for Nikon’s mirrorless cameras. It will work on any Z-Mount camera, but it’s best suited to their full frame cameras. The constant f/4 maximum aperture is one of the benefits of the lens. It’s not the fastest, but for an ultra-wide zoom, it is not bad at all.
The lens doesn’t disappoint when it comes to performance. The images are beautifully sharp across the whole frame and zoom range. They are also punchy and have excellent contrast. And as is becoming the norm with modern mirrorless cameras, any distortion or aberration seems to be dealt with in-camera. This means a lot less work on the computer.
One advantage of this—again, a feature of mirrorless cameras—is that these corrections happen before you take the photo. The image, as you see it in the viewfinder or on the screen, is as it is recorded in the camera. This reduces any nasty surprises when you start to download to your computer.
With a fast aperture, very quiet AF, and an easy-to-use design, there’s every reason to love the Nikon Z 14-30mm f/4.0 Zoom Lens if you’re looking for a Nikon Z-Mount wide-angle lens.
Buyer’s Guide—Best Wide-Angle Lenses
What Is a Wide-Angle Lens?
Everything we talk about with regard to wide-angle and telephoto lenses is based on the old 35mm film format. This happens to be the same size as a full frame digital camera.
On this size sensor, a 50mm lens is known as a “standard lens.” This is because it was the standard lens supplied with old SLR cameras. It was popular because it roughly mimics the way things look to the human eye. Except it is much narrower than our field of view when we include our peripheral vision.
This means that although the 50mm lens gives us a reassuringly “normal” view, it can feel a little restrictive. That is why many old-school photographers swore by their 35mm lenses. This was a wider view without introducing too many weird distortions.
Improved manufacturing techniques gradually led to manufacturers introducing “standard zooms” with their SLRs. My much-loved and much-missed Canon EOS 50-E came with a 35-80mm zoom. This gave the popular 35mm wide-angle and a useful 80mm. That’s just about enough for some portrait work.
As DSLRs gradually took over from the film SLR, the zoom was everywhere. So much so that people are now charmed when they discover the joys of the “nifty-fifty.”
All of this is to say that any lens wider than 50mm is a wide-angle lens. Although, between 35 and 50mm is a bit of a gray area. Below about 10 or 11mm, we stray into fisheye territory. However, it is partly linked to how the manufacturer wants the lens to deal with distortion.
This leaves us with the 10 to 50mm range. There’s no hard-and-fast rule (that I’m aware of), but a wide-angle lens would generally be a 24-35mm lens. Wider than 24mm can be seen as an ultra-wide angle. And some would say that 16mm or below is ultra-ultra-wide. Whatever you call it, it’s strikingly wide.
What Are the Advantages of a Wide-Angle Lens?
At its simplest, you can fit more in the frame with a wide-angle lens. When you can’t move far enough away from your subject, use a wider lens. But this is, in truth, missing the point. The beauty of a wide-angle lens is the fresh perspective it brings to a scene.
It’s an invitation for creativity. Tilt the camera back to give sweeping skyscapes with breathtaking clouds or sunsets. Or tilt the camera up to get stunning seascapes. Get close to a foreground object and exaggerate its importance with the distortion that comes with the focal length.
Experience is everything. And one of the wonders of digital photography is that you can see the effects of what you are doing immediately. That makes learning so much easier, so much quicker.
What Are the Other Things to Look Out For?
Some of the lenses in this review have image stabilization (IS), but it’s less important in a wide-angle lens. In general, the longer the lens, the more trouble camera shake can cause. With that said, if your lens has it, there will be times when it’s invaluable, especially if it has a slow maximum aperture.
The maximum aperture or how “fast” the lens is can be an important consideration. A fast lens has a wider maximum aperture. It lets more light in, so it can be used in darker situations than a “slower” lens. In general, a zoom lens tends to be slower than a prime lens. And a fast lens tends to be more expensive than a slow one. It has to do with how difficult it is to make larger and/or zoom lenses with consistent quality.
Conclusion: The Best Wide-Angle Lenses
With so many lens mounts and sensor formats, coming to a conclusion about the “best” is tricky. But we think these are the ones that stand out from this review. But all of the lenses on this list are great. You just have to decide which one is best for you.