When it comes to capturing images on our digital cameras, a sensor and lens aren’t the only things needed. Different types of memory cards act as the storage for all the scenes and scenarios that we capture.
There are many different memory cards you can purchase, though. The type will depend on what card slots your camera has.
This article has everything you need to know about the different types of memory cards.
Why Do We Have Different Types of Memory Cards?
Every camera manufacturer uses a range of different sizes and shapes when it comes to their products. These include lens mounts, flange distances, lens sizes, batteries, and cables to name but a few.
Memory cards are no different. They come in a range of sizes, both in terms of storage and physical shape. Some manufacturers (like Canon) prefer to use Compact Flash (CF) memory cards. Others opt for the smaller Secure Digital type.
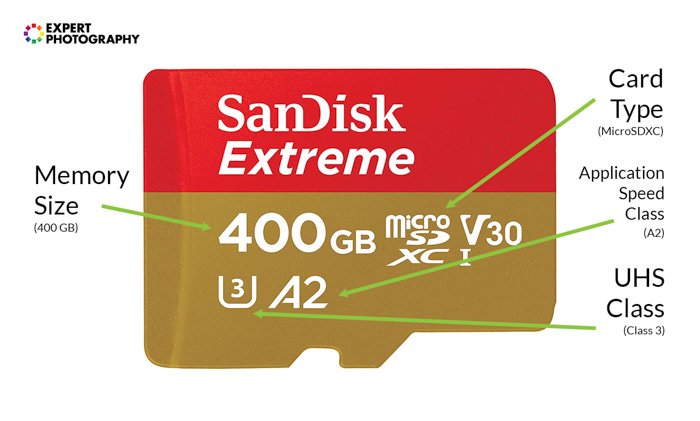
You must check the camera’s specifications before you buy these memory cards. Some, such as the Micro Secure Digital can be used with an adapter, but you can’t make SanDisc memory cards smaller.
What Memory Cards Are Available?
Don’t be confused by our list of memory cards types. You’ll find that CompactFlash and Secure Digital (both Micro and Normal) are the most common types of memory card.
CompactFlash
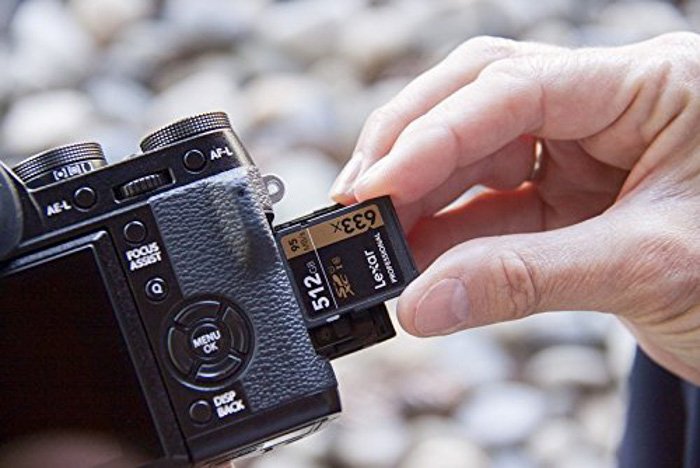
The CompactFlash (CF Card) is regarded as the best memory card for professional photographers. Most high-end DSLRs like the Canon EOS-1D X Mark II take CompactFlash cards.
These are physically much bigger than SD cards and less commonly used. But they often have bigger storage capacities and can run at very high speeds.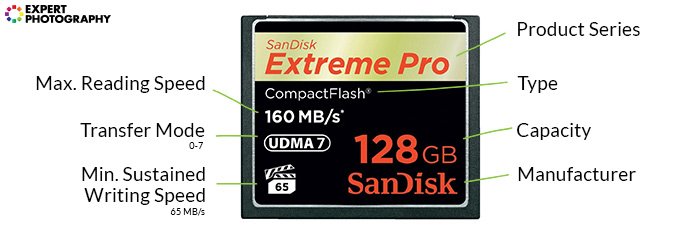
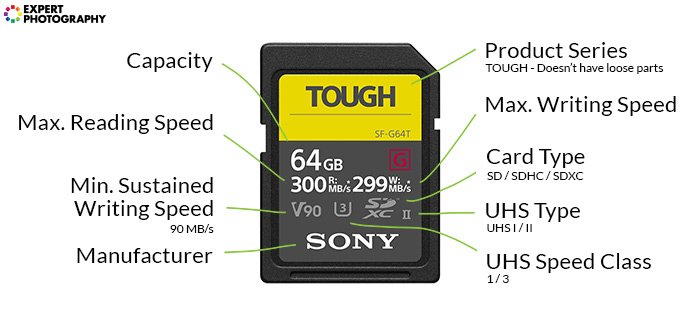
Secure Digital
The Secure Digital (SD) is the basic format of the SD card. The size measures at 32 x 24 x 2.1mm. They usually perform well, but not as fast as other SD cards, which we will look at below.
These are limited to 4 GB. Anything above 4 GB is considered an SDHC card.
Secure Digital High Capacity
The Secure Digital High Capacity card (SDHC) was created to meet the high demands for high-definition photography and video.
These are the same physical size and shape as standard SD cards, but fit the specifications of version 2.0.
Any SD card above 4 GB of memory is an SDHC card. Currently, these are limited to 64 GB. Anything higher is classed as an SDXC card.
| CLASS | MINIMUM SPEED |
|---|---|
| 2 | {{column-name-2}}: 2 MB/s |
| 4 | {{column-name-2}}: 4 MB/s |
| 6 | {{column-name-2}}: 6 MB/s |
| 8 | {{column-name-2}}: 8 MB/s |
| 10 | {{column-name-2}}: 10 MB/s |
Secure Digital Extended Capacity
The Secure Digital Extended Capacity (SDXC) card is essentially a beefed-up SDHC card. These cards start at 64 GB and can reach a size of 2 TB.
- SD – Up to 4 GB
- SDHC – Between 4 and 64 GB
- SDXC – Anything higher than 64 GB
| CLASS | MINIMUM SPEED |
|---|---|
| 1 | {{column-name-2}}: 10 MB/s |
| 3 | {{column-name-2}}: 30 MB/s |
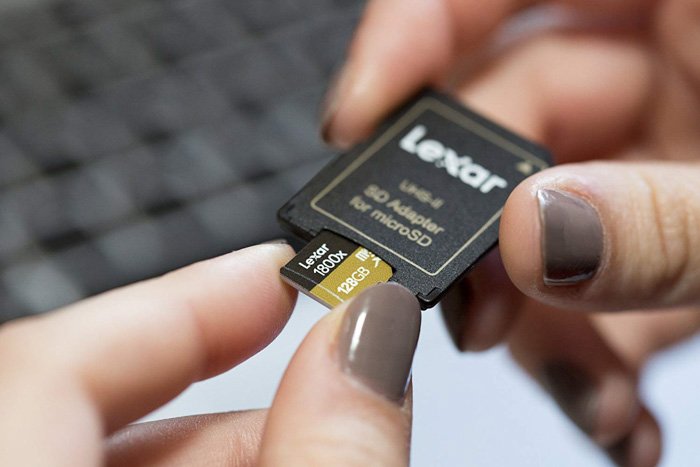
Micro Secure Digital
A Micro Secure Digital (MicroSD) card is a micro version of the SD card, as the name indicates.
Their physical size is 15 x 11 x 1mm.
Micro Secure Digital High Capacity
The Micro Secure Digital High Capacity (MicroSDHC) card is the same as the SDHC card, storing up to 32 GB of data.
This card was introduced in 2007 and can also transfer up to 10 Mbps.
Micro Secure Digital Extended Capacity
| Format | Focal Length | F-number | Crop Factor | Equivalent Focal Length | Equivalent Aperture |
|---|---|---|---|---|---|
| Full Frame | {{column-name-2}}: 85 mm | {{column-name-3}}: f/1.2 | {{column-name-4}}: 1 | {{column-name-5}}: 85 mm | {{column-name-6}}: f/1.2 |
| APS-C | {{column-name-2}}: 56 mm | {{column-name-3}}: f/1.2 | {{column-name-4}}: 1.5 | {{column-name-5}}: 84 mm | {{column-name-6}}: f/1.8 |
| Four Thirds | {{column-name-2}}: 42.5 mm | {{column-name-3}}: f/1.2 | {{column-name-4}}: 2 | {{column-name-5}}: 85 mm | {{column-name-6}}: f/2.4 |
The Micro Secure Extended Capacity (MicroSDXC) card is the micro version of the SDXC, where the storage is above 32 GB but under 2 TB.
This card has a faster transfer speed compared to the MicroSD and MicroSDHC.
- MicroSD – Up to 4 GB
- MicroSDHC – Between 4 and 32 GB
- MicroSDXC – Anything higher than 32 GB
Extreme Digital Picture Card
The Extreme Digital Picture Card (xD) is removable flash memory designed for use in digital cameras. It has a compact size of 20 x 25 x 1.7mm.
Fujifilm and Olympus developed this card.
Choosing the Best Memory Card
When it comes to choosing the best memory card, you may think that the biggest card is best. But it depends on what you are doing with it.
If you are taking hundreds of images without importing them to your computer, a bigger card is better. This rule is also valid for travel photographers who might go days without opening their laptop.
The downside is that if you lose that card, all of your images go with it. A smaller card might force you to back up your pictures more often.
A memory card with more storage is better for professional, high-end DSLRs. That’s because the images they take are bigger. This is especially true if you are shooting RAW, as the files can be bigger than 25 MB each.
You may also feel that the fastest card is the best. It might be able to write images fast, but if the card is faster than your camera, it is wasted speed. The fastest memory cards are great, but they are also costly.
For professionals covering sports or news photography, the fastest card will allow you to buffer the images while you capture. In these photography fields, you don’t want to lose out due to a cheaper card.

Terms and Considerations
- Compatibility – Memory cards will only work if they are compatible with the camera. For example, a MicroSDXC will only work in a MicroSDXC-compatible slot.
- UDMA Rating – (Ultra Direct Memory Access rating). Memory cards are graded from 0-7, with 0 being the lowest and 7 the highest. Not all devices support all speeds, so double check before you buy.
- Reading Speed – This is the rate at which the images are read or downloaded to your computer.
- Writing Speed – This is the rate at which the memory card can record and store the images you capture. This is the most critical speed.
- MicroSD cards can be used as standard SD cards when used with an adapter.
Conclusion—Different Types of Memory Card
Just because there are different types of memory cards doesn’t mean finding the right one for you needs to be confusing. There are a few things to consider, but compatibility with your camera is most important.
Beyond that, you should think about what type of photography you’re shooting. A sports photographer shooting RAW images in burst mode will need a bigger and faster memory card than a studio photographer.
Finding the best type of memory card for you can open up a range of different shooting styles!