Choosing the right photo editing software can be overwhelming. Camera Raw and Lightroom are two of the most popular options, but which one is best for you? In this article, we’ll compare camera raw vs lightroom to help you decide which is the best fit for your needs.
Camera Raw Vs Lightroom: What is Adobe Camera Raw?
You may not have noticed the Adobe Camera Raw (ACR) program before. But if you use Adobe products to edit your images, this program has been working away in the background.
Adobe developed Camera Raw in 2003 as a Raw image converter for Photoshop. Photoshop cannot directly open Raw files. It needs another program to decode the files. This is the job of Adobe Camera Raw.
Raw images are uncompressed digital image files. They are like undeveloped films. The files contain all the information collected by a digital camera. JPEGs are compressed image files. Your camera applies settings like white balance and color saturation to the image. Essentially, your camera post-processes JPEGS and removes the unused information. Raw files are unprocessed. This means they start out looking dull in comparison to their edited JPEG cousins. You do all the post-processing yourself.
Raw files are unique to each camera manufacturer. Canon cameras create .CR2 or .CR3 files and Sony cameras create .ARW files. There are dozens of different types of Raw files. Adobe Camera Raw decodes these files into a format that Photoshop can read.
From the start, Adobe Camera Raw has included image editing tools. These allow you to make adjustments that Raw files need to look good. You can change settings like white balance, contrast, saturation, and sharpness. Camera Raw developed into what photographers now recognise as the Develop module in Lightroom. But there are some differences between ACR and Lightroom.
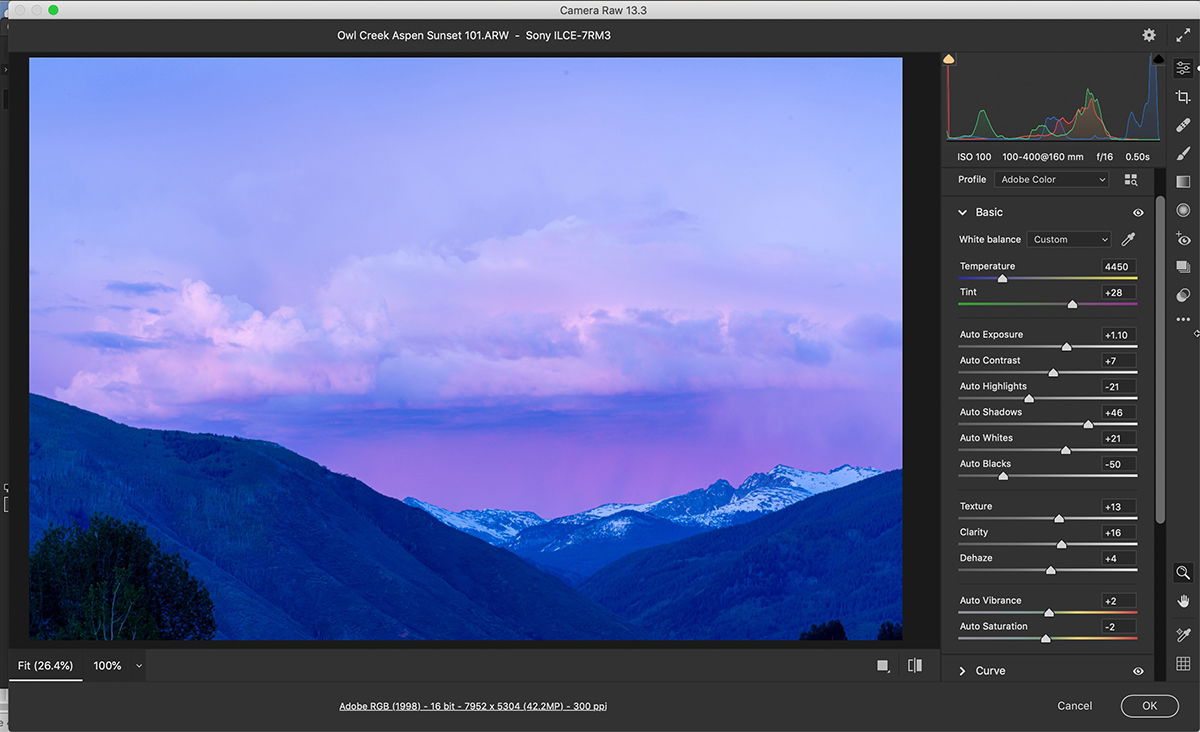
Adobe Camera Raw vs Lightroom
In 2007, Adobe released Lightroom. They based the Develop module on Adobe Camera Raw. Even today, the user interfaces of the two programs have a lot in common. Let’s take a deep look, comparing Lightroom vs Camera Raw.
Image Editing Workspace
The workspace in Adobe Camera Raw looks like the Develop Module in Lightroom. Image adjustments are grouped into panels. Open a panel to reveal sliders that control individual adjustments. The 2021 version of ACR (13.3.0.807) is a hybrid of Lightroom CC and Lightroom Classic. Most tools are organised into panels like Lightroom Classic, but Camera Raw uses a few tool labels updated in CC.
The Basic panel includes the same controls as Lightroom Classic. The expanded Curve / Tone Curve panel also looks similar. Camera Raw uses the term ‘Color Mixer’ like Lightroom CC rather than the HSL panel of Classic. The Optics and Geometry panel are the same as those found in Lightroom CC. But the Effects and Calibration panels are more like Classic.
In both Lightroom and Camera Raw, you can crop, heal spots, and clone. You can make local adjustments using Radial and Graduated filters as well as an adjustment Brush. The icons and location of the local adjustments are like those found in Lightroom CC. The 2021 version of ACR feels a bit more like Lightroom CC than Lightroom Classic.
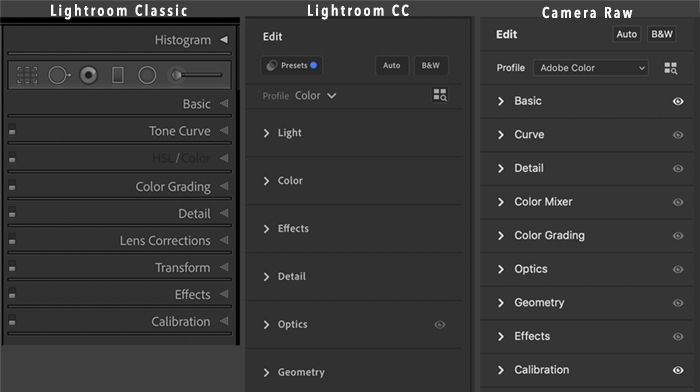
Image Editing Results
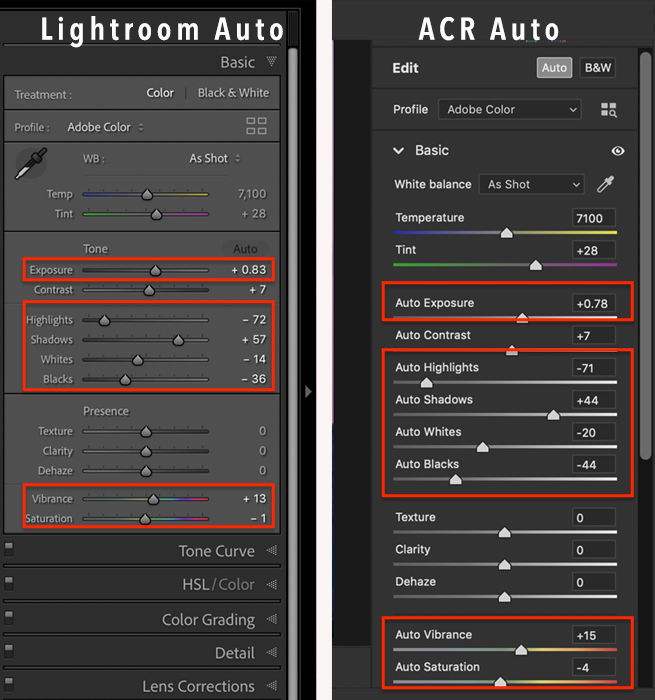
We tested the difference between Camera Raw and Lightroom head-to-head to see if either produced better results. We started by opening the same Raw file in both programs. The first thing we did was click the Auto button. This lets us see if underlying algorithms for analysing images were the same for the two programs. The results were close but not the same.
We then edited the image using the same settings in both programs. The results were the same. Compare two images: the first edited in ACR; the second edited in Lightroom Classic.
It does not matter if you edit in Adobe Camera Raw or Lightroom. The resulting image is the same.
Adobe Camera Raw Enhance Tools
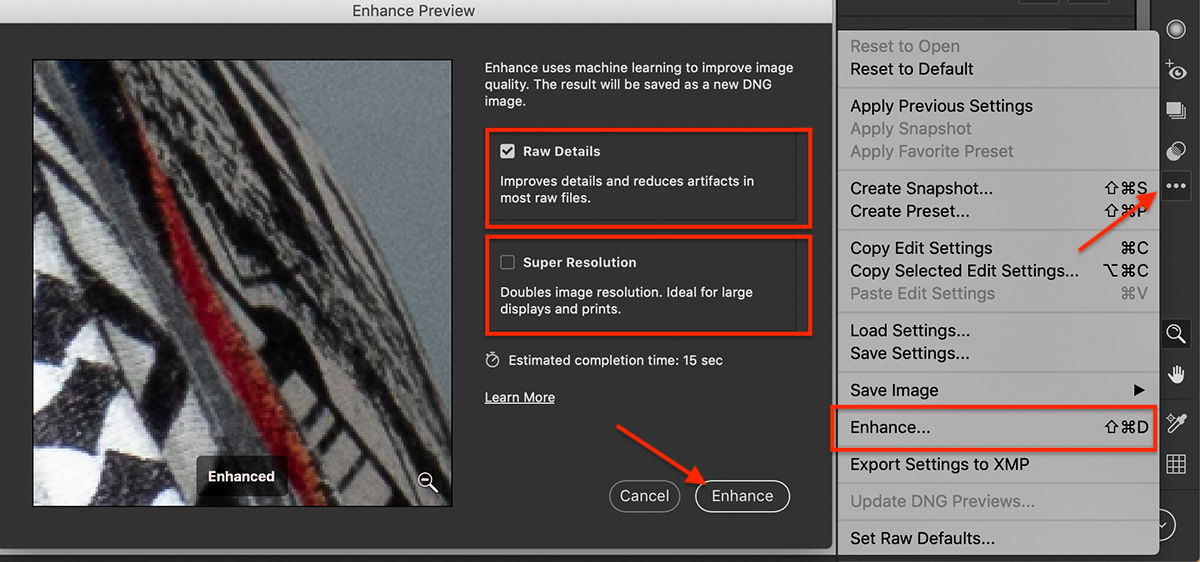
In the 2021 update to ACR (13.2), Adobe renamed the Enhanced Details tool to Raw Details. Also included is the Super Resolution tool. The Raw Detail tool sharpens your image. The Super Resolution tool doubles the width and height of your image.
These tools are under the three-dot icon on the toolbar. Click the icon and select Enhance (Shift+Ctrl or ⌘D). This feature is also in Lightroom under the Photo drop-down menu.
Plug-In vs Program
Unlike Lightroom, Camera Raw is not a standalone program. It works with Photoshop, Bridge, and After Effects to open and edit Raw files. Camera Raw is in the Adobe Creative Cloud Photography package. But you cannot buy it separately from Lightroom and Photoshop. ACR also does not appear as a separate program in your applications folder. There are two ways to open a file in Camera Raw.
Open a Raw File in Photoshop
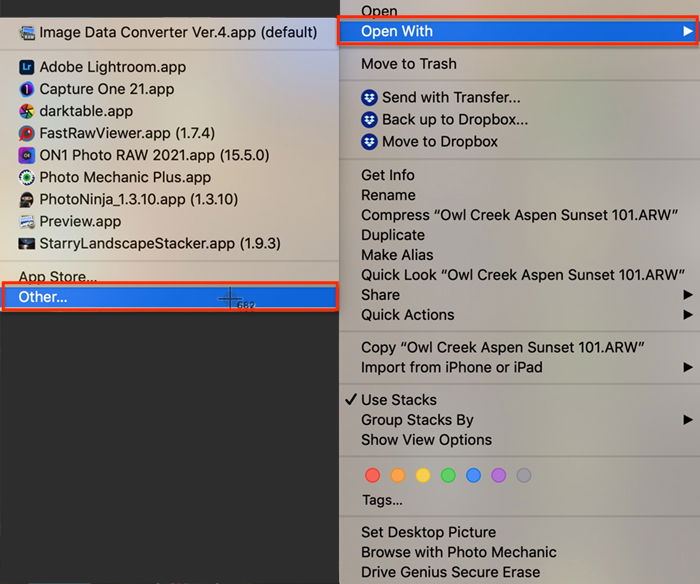
The Adobe Camera Raw workspace automatically opens if you try to open a Raw file in Photoshop. This happens if you right-click on a Raw image and select Photoshop if it appears in the list of programs. If not, your computer knows that Photoshop cannot open Raw image files. Click Other and navigate to the Photoshop app. Click Open. The image opens in the ACR workspace.
When you finish adjusting the image, click the Open button in the screen’s lower right-hand corner. The photo, with adjustments, opens as a layer in Photoshop.
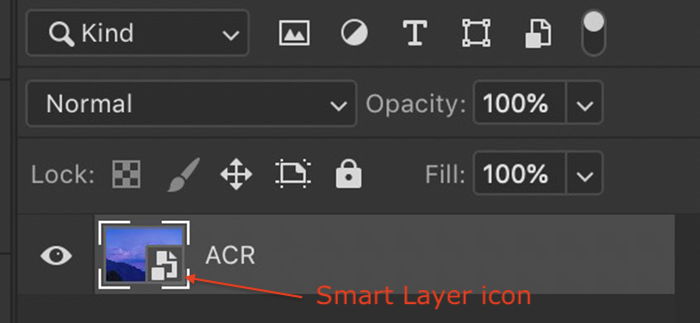
You have the option of opening the ACR-adjusted file in Photoshop as a Smart Object. By selecting Open Object rather than Open, the file remains a Raw file. To adjust your Camera Raw settings, double click on the Smart Object layer.
Open Camera Raw Filter in Photoshop
You can easily send files from Lightroom to Photoshop for more advanced editing. But the process does not work as easily in reverse. But you can start editing in Photoshop and make Lightroom-like edits using the Adobe Camera Raw filter. Of course, you can make most adjustments in both Lightroom and Photoshop. But in Photoshop, they can be more complex and need many adjustment layers. There is a reason Lightroom and ACR exist. They make basic photography adjustments easier.
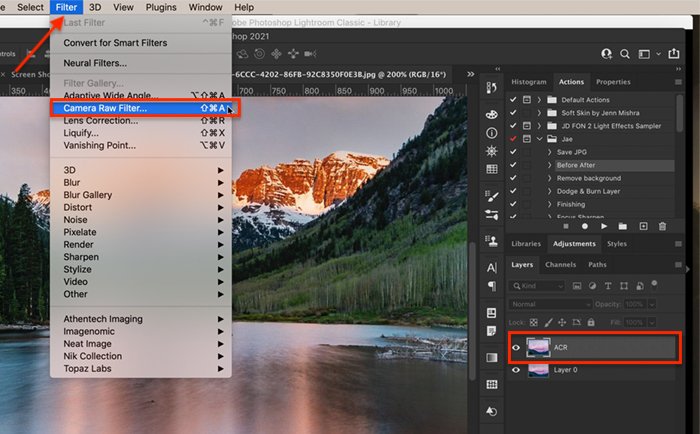
Making use of the filter in Photoshop is easy. Start by creating a duplicate of the layer you want to edit. Go to the Layers drop-down menu and select Layers > Duplicate Layer (Ctrl or ⌘J). Label this layer ACR. Go to the Filter drop-down menu and select Filter > Camera Raw Filter (Shift+Ctrl or ⌘A). The image opens in the Camera Raw workspace. Make your adjustments in ACR. Click OK. Your changes are applied to the selected layer.
To edit a file with many layers in Photoshop, make a new merged layer. The command you want is ‘Merge All Layers To A New Layer’. There is no drop-menu for this command. Instead, use a hotkey combination. Highlight the top layer. Click Shift+Command+Option+E or Shift+Ctrl+Alt+E. A new layer appears above the top layer. Label this layer ACR. Once you have a new ACR layer, open the Camera Raw Filter.
Program vs Plug-In
The Camera Raw filter is slightly different from the ACR program. Most of the editing tools are the same. But you cannot add ratings or color labels to your Raw files. Also, the Enhanced detail and Super Resolution features are not in the plug-in. Also missing are some of the file handling and workflow preferences included in the ACR program.
To see if there was a difference in quality, we edited an image in the ACR program and the Camera Raw filter. Compare two images. The first was edited in ACR; the second was edited using the Camera Raw filter in Photoshop. The results are slightly different.
Changes you make with the Camera Raw filter are embedded in the layer. Using the Camera Raw filter again to make more changes, all sliders will be reset to zero. In essence, the filter treats the layer as if it has not been edited before. Saving ACR settings as a Smart Object lets you change previous settings.
Missing ACR Catalog
ACR is like the Develop module in Lightroom. But ACR is only the Develop module. Lightroom includes other modules. The one that sets Lightroom apart is the Library module. Unlike Lightroom, ACR does not have a system of cataloguing and organization. Missing are the tagging and other metadata tools that are part of the Library module. But you can add a star or color label to an image in ACR. Also missing are the other less-used modules like Print and Slideshow.

There are some benefits to not using a cataloguing system, but also some drawbacks. Let’s start with a benefit. ACR does not need to import images into a catalog before editing. Skip culling and directly open the file you want to edit.
Both Lightroom and Adobe Camera Raw edit Raw files non-destructively. This means that the Raw file stays the same, and edits are saved in a separate file. By default, Lightroom stores the changes in a special LRCAT catalog file. Instead of using a cataloguing database, Adobe Camera Raw stores edits in a separate .xmp sidecar file. This file holds the changes and applies them to the Raw image. The Raw file is never changed. To see edits to a Raw file, you must also have the sidecar file. There is a way of producing an .xmp file in Lightroom, which allows sharing Raw files. But the program will not do this unless you select this option in Lightroom preferences.

Lightroom stores all edits in one database file. This makes it easy to backup. But if the LRCAT file is corrupted, you lose a lot of edits. With ACR, edits for each Raw file are stored as individual sidecar files. If one is deleted or corrupted, it will not affect the others. ACR, like Photoshop, works on only one image at a time. In Lightroom, you can batch edit many photos at once or sync changes across images.
Exporting
The export tools in Lightroom are more robust than those found in ACR. You can export a file to JPEG or DNG. Lightroom includes many other file formats, including the Photoshop .psd file type. Adobe designed ACR to be part of a Photoshop workflow. Most photographers will continue editing Raw images after completing ACR edits. Then, use Photoshop export or save options.
Conclusion
To Lightroom users, Adobe Camera Raw will feel very familiar. The difference is in how you want to use the programs in your workflow. Camera Raw is designed to work with Photoshop rather than as a standalone program.
Adobe has given you alternate programs to edit images and an alternative workflow. Many photographers start editing in Lightroom and move to Photoshop for advanced edits. But if you like to work in Photoshop, moving to ACR for basic edits is quicker than using individual adjustment layers.
Try out our Effortless Editing course to master all the secrets of professional editing in Lightroom!


