There’s no need to search the stars to find the best telescope for astrophotography. We have compiled a list of the top 10 telescopes that are perfect for astrophotography! Each of these telescopes provide you with great views and clear images of the night sky. Read on to find out which telescope is right for you.
Our top choice is the Celestron AstroMaster 130EQ. This is thanks to its wide range of features for a great price. It also includes a great app that can save hours of lining up your telescope in the right position.
What is the Best Telescope For Astrophotography?
Here us a quick roundup table of our choices. Read on to get an in-depth look at each option.
- Powerful 130mm Newtonian reflector telescope
- Quick and easy no-tool setup
- Includes German equatorial mount
- Includes 20mm and 10mm eyepieces
- Magnification from 26x to 65x
- Revolutionary computerized telescope
- High-quality 8-inch Schmidt-Cassegrain optical tube
- Easy to use SkyAlign alignment technology
- Powerful StarBright XLT optical coatings
- Includes SkyPortal app for enhanced viewing experience
- High-quality optics
- Easy to use
- Portable and lightweight
- 5x24 finder scope
- Includes 2 eyepieces

- Computerized telescope with 127mm aperture
- SkyAlign alignment technology
- Quick-release fork arm mount
- StarPointer finderscope for easy targeting
- Includes 25mm eyepiece and software
- Automatically aligns telescope with the night sky
- 130mm aperture for clear images
- Fully-motorized GoTo mount
- Includes 3 eyepieces and a Barlow lens
- Compact and lightweight design
- 30x to 60x magnification
- Fully coated optics for clear views
- Waterproof and fogproof design
- Portable and lightweight
- Easy to set up and use
- 80mm aperture for high-resolution images
- 607mm focal length for deep sky viewing
- Includes two eyepieces for different magnifications
- Lightweight and portable design
- 2” rack-and-pinion focuser for precise focusing
- 50mm aperture for excellent light gathering
- Dual speed 10:1 ratio focuser
- Motorized tracking with GoTo mount
- Compact and portable design
- Quality optics for clear views
- High-quality optics for clear, sharp images
- Up to 700mm focal length for great zoom capabilities
- Fully adjustable tripod for easy portability
- Includes two eyepieces for different magnifications
- Ideal for beginner and experienced astronomers
Best Telescopes For Astrophotography
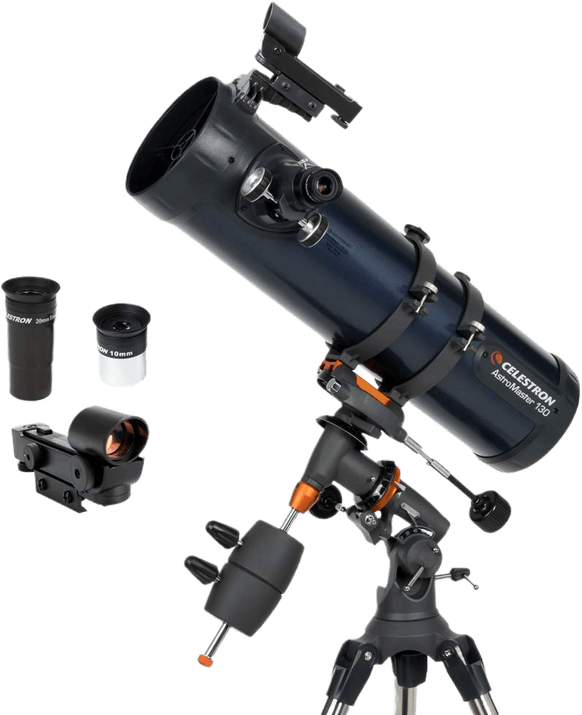
1. Celestron AstroMaster 130EQ
| Brand |
Brand
Celestron
|
| Aperture Size |
Aperture Size
114mm
|
| Focal Length |
Focal Length
1000mm
|
| Telescope Mount |
Telescope Mount
Manual equatorial mount
|
| Magnification |
Magnification
16x to 269x
|
| Weight |
Weight
7.7 kg
|
| Key Features |
Key Features
Long focal length for a great price
|
| Best For |
Best For
An all-around telescope for astrophotography enthusiasts
|
The Celestron AstroMaster 130EQ is a great option for anyone looking to get into astrophotography.
What if you’re experienced in astrophotography but on a budget? Then the Celestron AstroMaster is for you. It has most (if not all) of the features that only more expensive options offer. And all for a very reasonable price.
With an aperture of 114mm, it’s perfect for photographing planets and constellations. It also features an equatorial mount with two slow-motion control knobs, ideal for fine adjustments.
The only downside of the Celestron AstroMaster 130EQ is that it’s not a telescope for a beginner. It’s challenging to set up and use even without a camera. You need to be familiar with telescopes to use it to its full potential.
But that doesn’t mean you can’t buy it even if you don’t have the experience. After all, it’s not a bad idea to invest in a good piece of astrophotography equipment early on. It includes a tripod and Starry Night astronomy photography software.
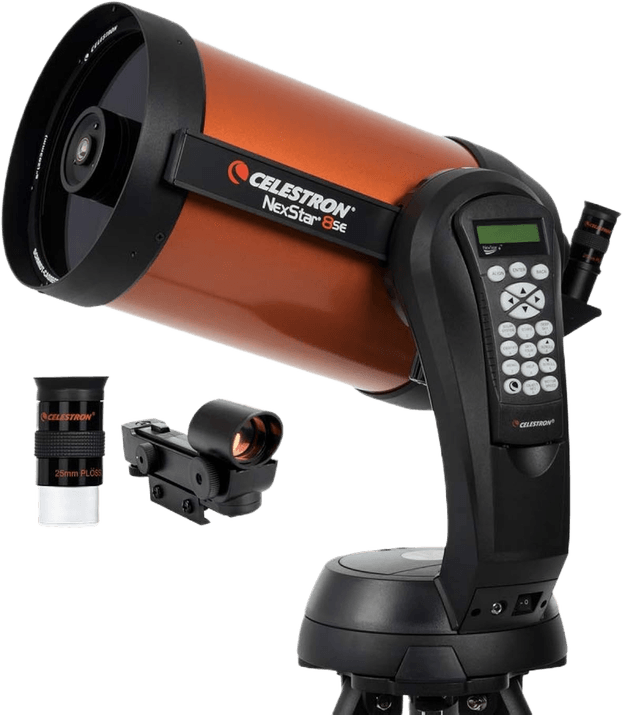
2. Celestron NexStar 8SE
| Brand |
Brand
Celestron
|
| Aperture Size |
Aperture Size
203.2mm
|
| Focal Length |
Focal Length
2032mm
|
| Telescope Mount |
Telescope Mount
GoTo tabletop mount
|
| Magnification |
Magnification
29x to 480x
|
| Weight |
Weight
15 kg
|
| Key Features |
Key Features
Longest focal range and plenty of smart features
|
| Best For |
Best For
Astrophotographers with no budget restrictions, advanced astrophotographers
|
This telescope is one of the most expensive ones on our list. But it’s also one of the best. It has excellent optics and computerized GoTo tracking. The Celestron NexStar 8SE is for experienced astrophotographers because you need a long focal length for a narrow field of view.
The Nexstar 8SE comes with a simple red dot finderscope and a basic 25mm eyepiece. To take full advantage of the telescope’s excellent optics, you should add a few good eyepieces.
The Celestron NexStar 8SE has a fully-automated, built-in GoTo mount. This automatically locates and tracks objects for you. It also features a database of more than 40,000 celestial objects!
Perhaps the only issue with the Nexstar 8 SE is its focal ratio of f/10. That means it doesn’t let in much light for your camera. In other words, you may have to use longer exposure times when taking pictures. Some other options have a focal ratio of f/4, which is much better for astrophotography.
It’s light, portable, and straightforward to use. And it includes a star diagonal, database, and SkyAlign software.
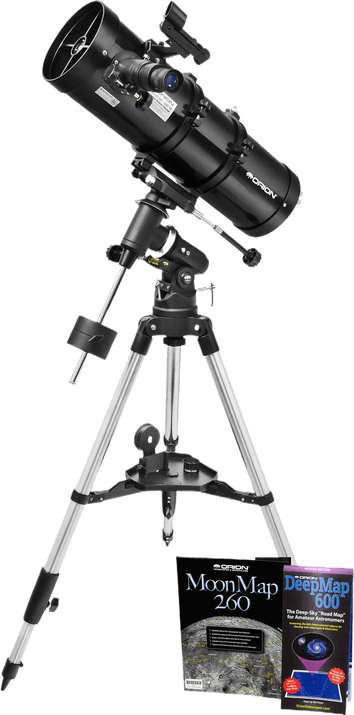
3. Orion 130ST
| Brand |
Brand
Orion
|
| Aperture Size |
Aperture Size
130mm
|
| Focal Length |
Focal Length
650mm
|
| Telescope Mount |
Telescope Mount
Equatorial mount
|
| Magnification |
Magnification
19x to 260x
|
| Weight |
Weight
12.2 kg
|
| Key Features |
Key Features
Great telescope brand for a low price
|
| Best For |
Best For
Astrophotographers looking for an everything-included telescope
|
Orion is a high-quality brand of telescopes. It has tons of products that are pretty expensive. But it also has budget-friendly options that are perfect for astrophotography beginners. The one that we like best is the Orion 09007 SpaceProbe 130ST.
What makes the SpaceProbe 130ST special is its quality materials. Plus, it has a mid-range price. That’s significant, especially since astrophotography demands high-quality optics—which Orion delivers.
The SpaceProbe has a 5.1-inch aperture that lets you view and photograph distant planets and nebulas. Its 24-inch tube makes it portable and ideal for long trips. The whole set also only weighs 27 pounds, which isn’t substantial for telescope equipment at all. That means you can take it to remote areas without much struggle.
Another great feature of the SpaceProbe is its equatorial mount. It allows you to track stars manually with precision. It includes a 1.25-inch rack-and-pinion focuser and a tripod. You also get a tripod accessory tray, tube rings, a collimation cap, and Starry Night astronomy photography software.
4. Celestron NexStar 127SLT
| Brand |
Brand
Celestron
|
| Aperture Size |
Aperture Size
127mm
|
| Focal Length |
Focal Length
1500mm
|
| Telescope Mount |
Telescope Mount
A computerized GoTo alt-azimuth mount
|
| Magnification |
Magnification
18x to 300x
|
| Weight |
Weight
8.2 kg
|
| Key Features |
Key Features
Comes with remote and easy storage design
|
| Best For |
Best For
Astrophotographers looking for an automated telescope
|
Are you a beginner with some money but don’t want to break the bank? Then you might want to take a look at the Celestron NexStar 127SLT. It’s an advanced telescope that you can buy for way less than a thousand dollars.
So what makes the NexStar 127SLT different? The SLT stands for “star locating telescope.” That means it has a built-in computer. You don’t have to guess where any planets or constellations are in the night sky. All you have to do is enter which celestial object you want to track and this device will find it for you. That’s quite an advantage, especially if you’re not familiar with astrophotography.
The NexStar comes in two telescope types—the refractor and catadioptric. Its 127mm aperture is ideal for deep-sky imaging. It will enable you to take photos of constellations and even observe Saturn’s rings!
It includes a star diagonal, SkyAlign, and Starry Night astronomy photography software.
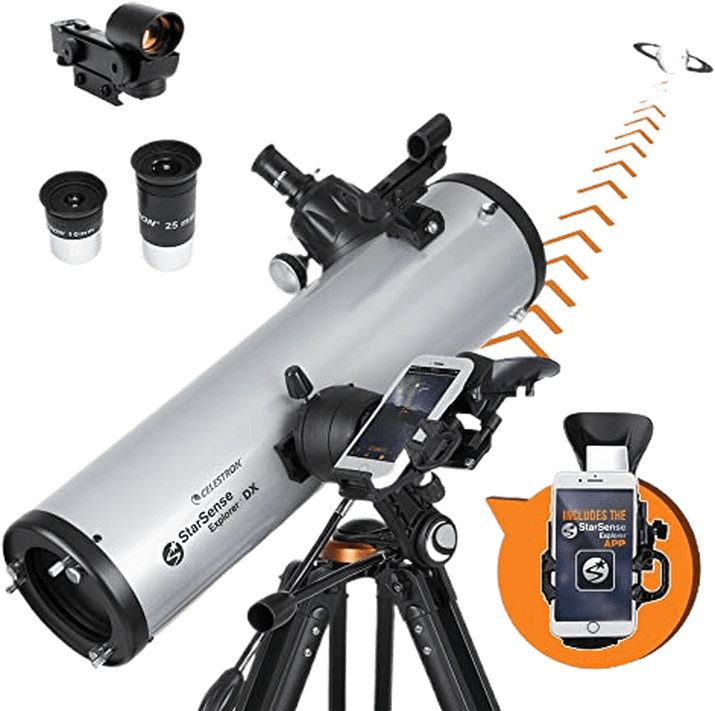
5. Celestron StarSense Explorer 130AZ
| Brand |
Brand
Celestron
|
| Aperture Size |
Aperture Size
130mm
|
| Focal Length |
Focal Length
650mm
|
| Telescope Mount |
Telescope Mount
Altazimuth Mount
|
| Magnification |
Magnification
19x to 307x
|
| Weight |
Weight
8.2 kg
|
| Key Features |
Key Features
Easy navigation with the app
|
| Best For |
Best For
All-around telescope for beginners and enthusiasts
|
The Celestron StarSense Explorer 130AZ is another high-quality telescope from Celestron. The 130AZ has a shorter focal range than the other Celestron options above. This means you will not get as large of a zoom, but it costs significantly less. These points make it ideal for a beginner who wants to dip their toe into astrophotography before diving in.
Its accessibility is the winning feature if you’re a beginner. Celestron operates by attaching your smartphone to it. You will then use the specially produced app to direct your telescope! This app and telescope combination makes finding your favorite stars and planets quick and easy.
You tell the app what you are looking for. Then it reads the sky in real time, constantly adjusting its reading for accurate navigation. The crosshairs turn green when your subject is in the shot.
My favorite thing about this app is that it doesn’t require any signal from your phone. This means you can use it in remote locations. The zoom is strong enough to see the craters of the moon and the gas lines on Jupiter. This is a great starting point for budding enthusiasts!
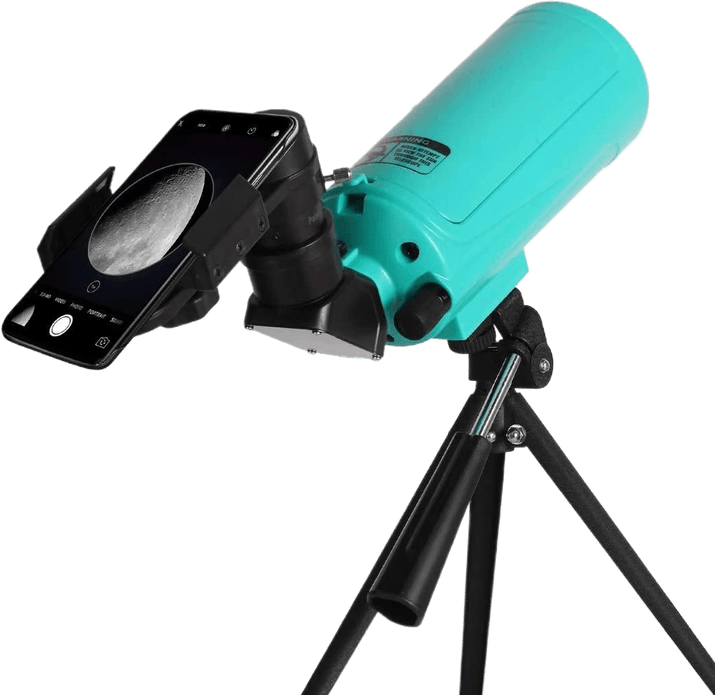
6. Sarblue Mak60 Telescope
| Brand |
Brand
Sarblue
|
| Aperture Size |
Aperture Size
60mm
|
| Focal Length |
Focal Length
750mm
|
| Telescope Mount |
Telescope Mount
Screw Mount
|
| Magnification |
Magnification
37.5x
|
| Weight |
Weight
2.4 kg
|
| Key Features |
Key Features
Compact design
|
| Best For |
Best For
Beginners or astrophotographers who don't have a lot of space
|
The Sarblue Mak60 is the cheapest option available on this list. So, you might notice it doesn’t have the same capabilities as others on this list. But, if you are looking for a relatively small piece of equipment, the Sarblue Mak60 is for you.
The reason this telescope is so small is thanks to its design. It uses a Maksutov-Cassegrain telescopic design. This is known to combat some problems presented by refractor or Newtonian reflector designs. This design gives you great performance in a fraction of the size.
Operating this telescope is a bit more challenging than others on this list. You get two notches on the side of the lens that you will use to line up the telescope. This means you may spend some time finding your specific subject. There is also a focus knob that may require quite a few spins to get your desired subject in focus.
All these points make the Mak60 ideal for astrophotographers who want the most compact kit. The telescope is still powerful enough to capture the rings of Saturn or even the International Space Station.
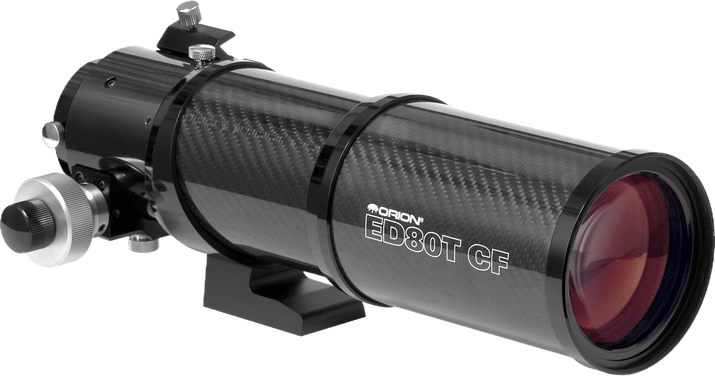
7. Orion ED80T
| Brand |
Brand
Orion
|
| Aperture Size |
Aperture Size
80mm
|
| Focal Length |
Focal Length
480mm
|
| Telescope Mount |
Telescope Mount
No Mount
|
| Magnification |
Magnification
12x to 160x
|
| Weight |
Weight
2.5 kg
|
| Key Features |
Key Features
High-quality materials from a great brand
|
| Best For |
Best For
Advanced astrophotographers
|
The Orion ED80T is an affordable option for advanced astrophotographers. The scope’s small size and lighter weight lets you get plenty of use out of it.
It is a popular choice due to its high-quality imaging performance. Plus, a built-in dew shield protects your telescope for those overnight shots.
It includes a dual-speed (11:1) 2-inch Crayford focuser, a 2 to 1.25-inch step-down adapter, and a dovetail finder scope base. You also get other accessories like a carrying case and Starry Night astronomy photography software.
Plus, the extra-low dispersion (ED) glass combats chromatic aberration. You can’t go wrong considering the Orion ED80T as your first telescope.
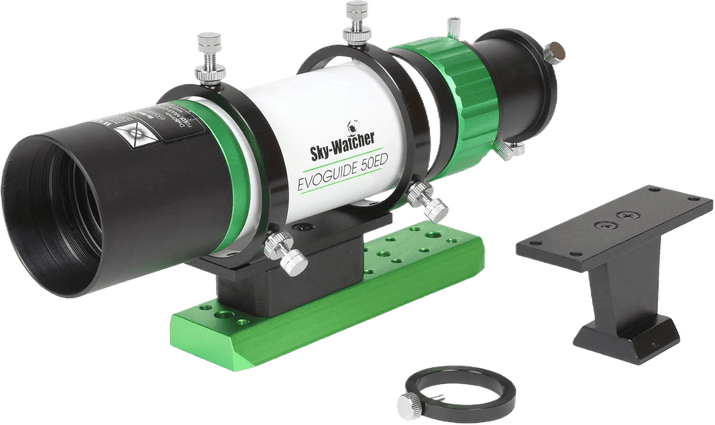
8. Sky-Watcher EvoGuide 50DX
| Brand |
Brand
Sky-Watcher
|
| Aperture Size |
Aperture Size
50mm
|
| Focal Length |
Focal Length
242mm
|
| Telescope Mount |
Telescope Mount
No Mount
|
| Magnification |
Magnification
Up to 100x
|
| Weight |
Weight
.9 kg
|
| Key Features |
Key Features
High-quality glass
|
| Best For |
Best For
Astrophotographers who already own some equipment
|
It’s always nice to save some money on equipment. But when you have a cheap telescope that produces distracting chromatic aberration, is it worth it?
If you want a simple telescope without spending a lot of money, you should consider the Sky-Watcher Evoguide. It doesn’t have as many add-ons as the others. But it’s a reasonable price for a high-quality piece of equipment.
It doesn’t look as impressive from the outside compared to its competitors. But in our opinion, when it comes to performance, it belongs in the top tier.
The Evoguide is a triplet APO refractor. That means it has the necessary optics to correct any chromatic aberration that may occur. Its simple design also makes it easy for a beginner. It just looks like any regular telescope and you can use it right away after you attach your camera.
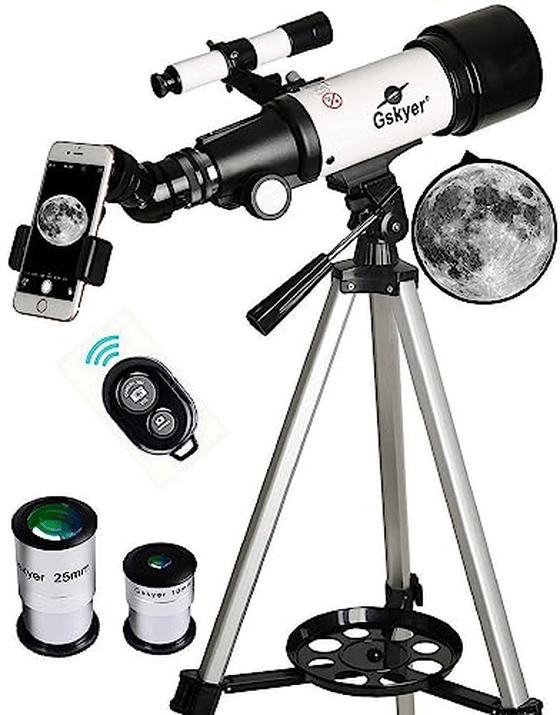
9. Gskyer 700mm Telescope
| Brand |
Brand
Gskyer
|
| Aperture Size |
Aperture Size
70mm
|
| Focal Length |
Focal Length
400mm
|
| Telescope Mount |
Telescope Mount
Alt-azimuth mount
|
| Magnification |
Magnification
16x to 120x
|
| Weight |
Weight
2.6 kg
|
| Key Features |
Key Features
Comes with smartphone mount and remote shutter
|
| Best For |
Best For
Great price to dip your toe into astrophotography
|
There’s no doubt that astrophotography can be pretty expensive. But what if you’re on a super-low budget and still want to take photos of the moon or the stars? Then the Gskyer 70mm telescope is the best option for you. The Gskyer is one of the cheapest options you can find online. But is it any good for astrophotography? The answer is yes if you’re a beginner.
In our opinion, the Gskyer is the most reasonably priced telescope that produces decent images. Its 400mm focal length is enough for you to take photos of the moon. This telescope also includes a phone mount and remote control. So if you want to try astrophotography with your mobile device, this is the way to go!
Since the Gskyer is quite inexpensive, you may see some chromatic aberration every once in a while. That just means you may find fringes of colors around the moon or other celestial objects. It’s the reason why it’s at the lower end of our list. But the good news is you can quickly fix it in post-production if you want.
It includes a 45-degree diagonal, a smartphone adapter, a wireless camera remote, an adjustable aluminum alloy tripod, and a carry bag.
Conclusion: The Best Telescope For Astrophotography
The Celestron AstroMaster 130EQ is the best telescope for astrophotography in 2023. This telescope is an excellent choice for amateur and professional photographers alike. It provides a clear view of the night sky with its 130mm aperture, fully coated glass optics, and sturdy German equatorial mount.
It also comes with two eyepieces and a finderscope, making it a great value for its price. With its ease of use and great features, the Celestron AstroMaster 130EQ is the perfect telescope for astrophotography in 2023 and beyond. We highly recommend it to anyone looking for a reliable, high-quality telescope for their astrophotography needs.