
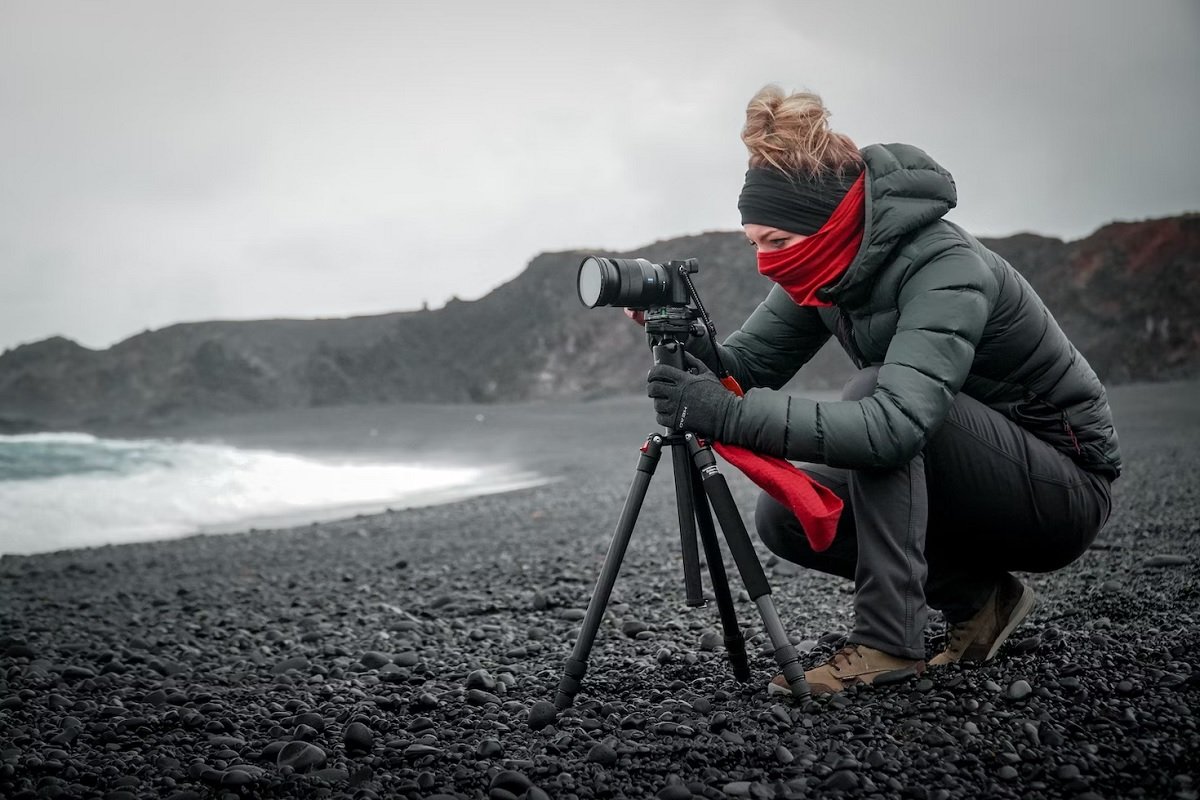
With the best tripod for landscape photography, there’s no scene you can’t capture. Whether you’re up a mountain, in an urban sprawl, or on the seashore, a tripod gives you lots more camera control. But which tripod is best for landscape photography?
That’s what we’re going to answer in this article. You’ll see our top recommendations for landscape photography tripods. But we also have a buyer’s guide to help you find the tripod that’s right for you.
The Manfrotto Element MII is our top tripod for landscape photography. It’s a lightweight, portable tripod that’s tough enough for a life outdoors. It’s strong, stable, and versatile. And it’s the perfect tripod for a landscape photographer’s pack.
What Is the Best Tripod For Landscape Photography?
The best tripod for landscape photography helps you capture the perfect shot no matter where you are. The life of a landscape photographer can be adventurous, traveling from location to location. And while you need a tripod to get the best results, landscape photography puts demands on your equipment.
You need a strong tripod. Of course, it needs a load capacity suitable for your camera and lens setup. But it also needs to be sturdy and durable. You can’t have a tripod that falls apart after one expedition. You need something that will withstand the rigors of outdoor life.
The tripod’s weight is also important. You need a tripod made of strong materials. But it can’t be too heavy. Your camera backpack is already full of cameras, lenses, and accessories. Adding a heavy tripod is only going to bring you discomfort and exhaustion. That’s why you need to strike the right balance between durability and weight.
We have a full-length buyer’s guide at the end of the article if you want more information. But first, here’s a quick rundown of the best tripods for landscape photography.
Then we look at each tripod in more detail in the following section.
- Ultra-compact and lightweight for easy transport
- Sturdy with an 17.6 lb / 8 kg payload for heavier lenses
- Swift setup with quick leg angle switching
- Ball head with quick-release head and bubble level
- Versatile mounting with removable central column
- Four settings for leg width
- Ball head with 360-degree panning
- Built-in bubble level to help you stay level
- Weighs only 2.5 lbs / 1.5 kg
- Folded height of 15.3 inches / 29 cm
- Ball head with degree markings for panoramas
- Excellent value product
- Strong yet lightweight carbon fiber frame
- Max weight capacity of 44 lbs / 20 kg
- Easily adjustable legs with secure twist locks
- Rubber feet for extra grip and stability
- Durable carbon fiber construction
- 26.5-lb maximum load capacity
- Ball head with three built-in bubble levels
- Rubber feet with retractable spikes
- Lightweight and compact design makes it easy to carry
- Incredible 33-lb max load limit
- Panning head with 15 degrees of tilting motion
- Rubber feet and metal spikes for extra grip
- Comes with handy carrying case
- Versatile tripod with wide working height range
- Ball head with panning base and bubble level
- Transforms into monopod
7 Best Tripods for Landscape Photography
This section looks at all the best landscape photography tripods in detail. We have lightweight tripods for traveling photographers. There are heavy-duty tripods for photographers with heavy equipment. And we have mini tripods for smaller cameras.
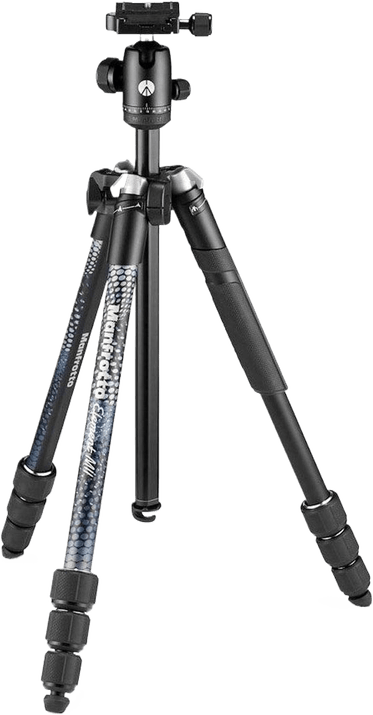
1. Manfrotto Element MII Tripod
| Brand |
Brand
Manfrotto
|
| Material |
Material
Aluminum
|
| Tripod Weight |
Tripod Weight
3.3 lbs / 1.5 kg
|
| Max Height |
Max Height
63 inches / 160 cm
|
| Folded Height |
Folded Height
16.7 inches / 42.4 cm
|
| Max Load Capacity |
Max Load Capacity
17.6 lbs / 8 kg
|
| Other Key Features |
Other Key Features
Adjustable central column, rubber feet, twist locks, ball head, bubble level
|
| Best For |
Best For
Landscape photographers looking for a versatile and reliable tripod
|
The Manfrotto Element MII Tripod is our top recommendation for landscape photographers. It’s a well-built tripod made with durable aluminum, giving you excellent stability for your camera. And it’s versatile enough for any outdoor environment.
Weighing only 3.3 lbs / 1.5 kg, it doesn’t add too much heft to your pack. And despite its light weight, it can safely hold a load much heavier than itself. You can use this tripod with a camera and lens combos weighing up to 17.6 lbs / 8 kgs. Mirrorless cameras are no problem. But it can also support full-frame DSLR cameras without issue.
The Element MII is equipped with a handy ball head, which is great for landscape photography. It allows you to pan 360 degrees and tilt in all directions. And thanks to the built-in bubble level, you can always achieve a perfect horizontal alignment.
Each leg has three sections you can adjust to raise or lower the tripod. The max height of 63 inches / 160 cm is sufficient for most photographers. And by mounting reverse mounting the central pole, you can mount your camera upside down. This helps you shoot from lower angles.
The rubber feet give you extra grip on any surface, such as grass or wet rocks. And the quick-release plate makes it easy to mount and dismount your camera. It also comes with a handy carry bag, making it easier to transport.
The Manfrotto Element MII Tripod is a good investment for any landscape photographer. It offers excellent value for money. And it’s a piece of equipment you can use time and time again.
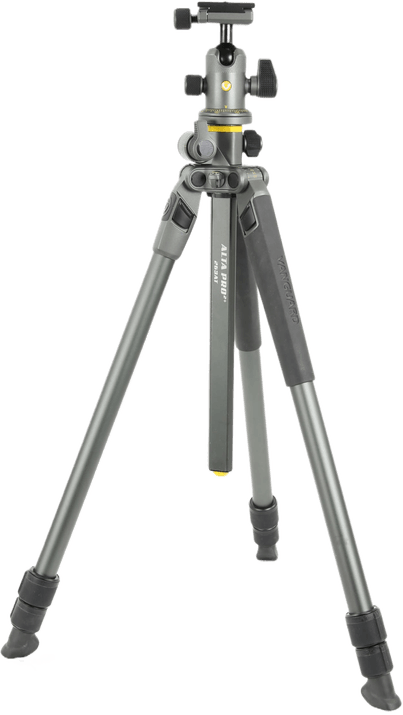
2. Vanguard Alta Pro 2+
| Brand |
Brand
Vanguard
|
| Material |
Material
Aluminum
|
| Tripod Weight |
Tripod Weight
5.3 lbs / 2.4 kg
|
| Max Height |
Max Height
68 inches / 173 cm
|
| Folded Height |
Folded Height
29 inches / 73 cm
|
| Max Load Capacity |
Max Load Capacity
15.4 lbs / 7 kg
|
| Other Key Features |
Other Key Features
Quick-release plate, multi-angle central column, twist locks, bubble level
|
| Best For |
Best For
Photographers looking for a tripod with lots of mounting options
|
The Vanguard Alta Pro 2+ is one of the most versatile tripods for landscape photographers. Thanks to its ingenious design, you have a wide range of mounting options. And it’s a strong and durable piece of kit.
It is one of the heavier tripods, weighing 5.3 lbs / 2.4 kg. That does mean a bit more weight to carry. But it still folds down to 29 inches / 73 cm, making it easy to lug around with you.
It’s also strong, with a maximum load capacity of 15.4 lbs / 7 kg. That’s strong enough for anything from compact cameras to medium-format cameras. You can even use larger landscape photography lenses.
The removable central column is this tripod’s unique selling point. You can mount it vertically, like a standard tripod. And you can adjust it for height, moving it up and down. But you can also remove the column and remount it at diagonal angles. This gives you incredible versatility when it comes to mounting. It’s great on any terrain.
You also have good versatility when positioning the legs. There are four options, allowing you to spread the legs to 20, 40, 60, or 80 degrees. The widest angle allows you to get a really low mounting position.
The legs can also be adjusted for height, with twist locks making it easy to change and fix the position.
You get even more flexibility with the ball head. You can rotate the camera 360 degrees horizontally when mounted. And you can tilt the head in any direction. But it comes with a bubble level to help you keep your camera flat. The friction control also allows you to control the amount of movement you get from the ball joint.
With an Arca-type quick-release plate, it only takes a second to mount or remove your camera. That’s handy if you’re in cold conditions or wearing gloves.
The Vanguard Alta Pro 2+ isn’t a budget tripod. But it is worth every penny of the price tag.
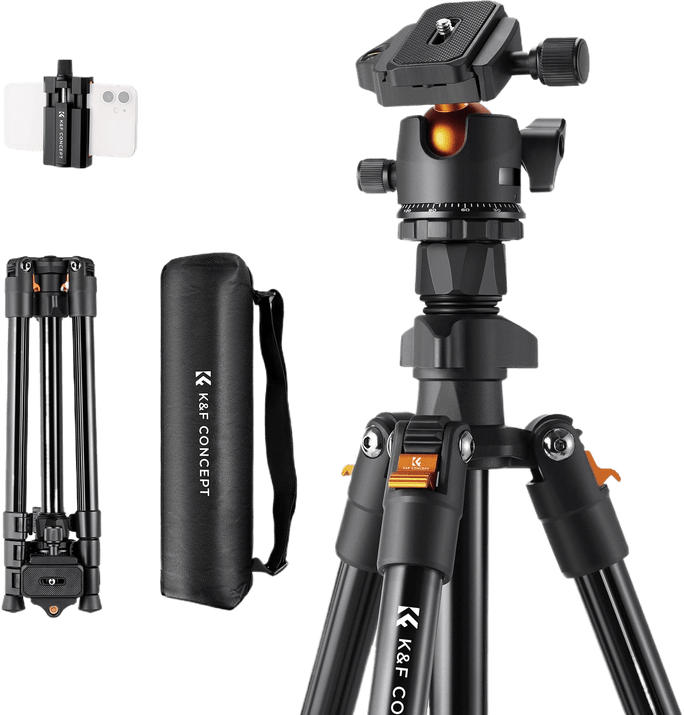
3. K&F Concept Lightweight Outdoor Tripod
| Brand |
Brand
K&F Concept
|
| Material |
Material
Aluminum
|
| Tripod Weight |
Tripod Weight
2.5 lbs / 1.1 kg
|
| Max Height |
Max Height
64 inches / 163 cm
|
| Folded Height |
Folded Height
15.3 inches / 29 cm
|
| Max Load Capacity |
Max Load Capacity
17.6 lbs / 8 kg
|
| Other Key Features |
Other Key Features
Ball head, quick-release plate, flip locks, bubble level
|
| Best For |
Best For
Landscape photographers on a tight budget
|
The K&F Concept Lightweight Outdoor Tripod is a great product at a great price. The build quality doesn’t quite match some of the pricier tripods. But you get a strong, stable, and lightweight tripod at a decent price.
All the main sections are made of lightweight but durable aluminum. And it folds down to 15.3 inches / 29 cm and weighs only 2.5 lbs / 1.1 kg, making it easy to carry in your hiking backpack.
Each leg is made up of three sections, which you can adjust easily with the flip locks. You can have a mounting height range from 20.4 to 64 inches / 52 to 163 cm. And the ball head gives you even more mounting versatility.
The ball joint has a U-shaped groove, allowing you to mount your camera vertically. Shooting landscapes in portrait orientation can make interesting compositions. And the degree rulings on the base of the head help you shoot sweeping landscape panoramas.
Keeping the camera perfectly aligned is easy, thanks to the built-in bubble level. And mounting the camera only takes seconds with the quick-release plate.
The max load capacity is stated as 17.6 lbs / 8 kg, but we’d aim lower to be safe. Even so, it’s still strong enough for most interchangeable lens cameras. You can use anything from APS-C to full-frame cameras.
The K&F Concept Lightweight Outdoor Tripod is affordable yet durable. It proves you don’t need the most expensive equipment to shoot stunning landscape photography.
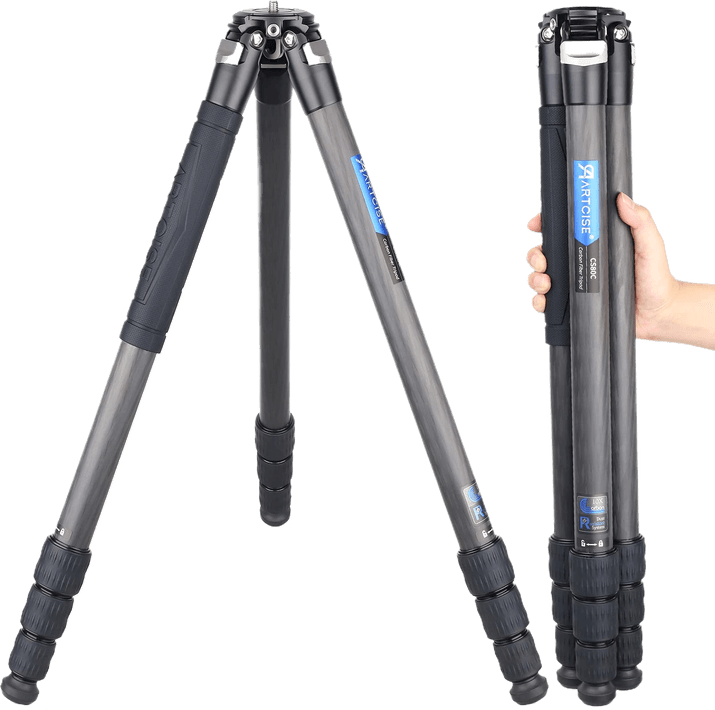
4. ARTCISE Carbon Fiber Tripod
| Brand |
Brand
ARTCISE
|
| Material |
Material
Carbon fiber
|
| Tripod Weight |
Tripod Weight
3.7 lbs / 1.6 kg
|
| Max Height |
Max Height
57.5 inches / 146 cm
|
| Folded Height |
Folded Height
22.8 inches / 58 cm
|
| Max Load Capacity |
Max Load Capacity
44 lbs / 20 kg
|
| Other Key Features |
Other Key Features
Twist locks, rubber feet
|
| Best For |
Best For
Photographers using heavy equipment
|
The ARTCISE Carbon Fiber Tripod is perfect if you use heavy camera equipment. It’s solid and robust, which is great for working outdoors. But it’s also light enough for hiking, so you can reach the best vistas for breathtaking landscape shots.
This tripod is incredibly strong, with a max capacity of 44 lbs / 20 kg. That’s more than enough even for medium-format cameras. It allows you to add extra photography accessories if you need them. And even then, you’ll struggle to hit the payload limit.
It isn’t the tallest tripod. With all the legs fully extended, the maximum height is 57.5 inches / 146 cm. This is enough for most photographers, as height isn’t always important when shooting landscapes. You also have a minimum height of 21 inches / 55 cm.
You can easily adjust the height and reposition the legs using the twist locks. And thanks to the rubber seals, grit and dirt can’t get into the joints. This helps stability and longevity. Each leg also has a rubber foot, giving you more grip on any terrain.
The ARTCISE Carbon Fiber Tripod doesn’t come with a tripod head, so you will have to buy one separately. But it’s the strongest tripod on the list and one of the best heavy-duty tripods on the market.
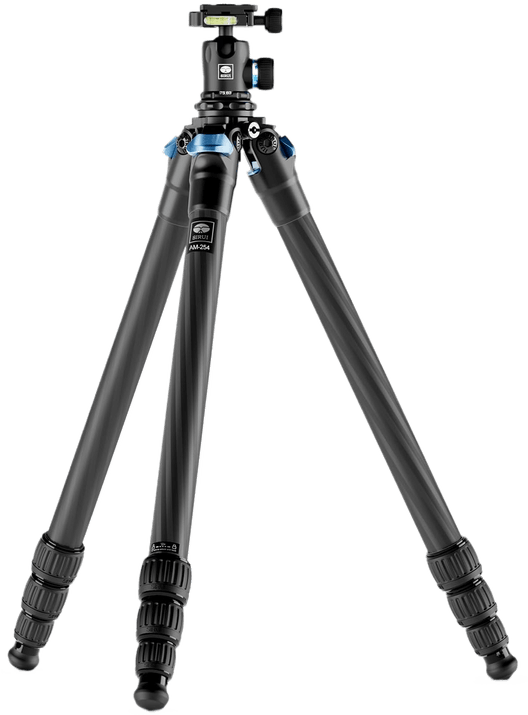
5. Sirui AM-254 Carbon Fiber Tripod
| Brand |
Brand
Sirui
|
| Material |
Material
Carbon Fiber
|
| Tripod Weight |
Tripod Weight
4.7 lbs / 2.1 kg
|
| Max Height |
Max Height
51.2 inches / 130 cm
|
| Folded Height |
Folded Height
21.3 inches / 54 cm
|
| Max Load Capacity |
Max Load Capacity
26.5 lbs / 12 kg
|
| Other Key Features |
Other Key Features
Rubber feet, twist locks, ball head, bubble level
|
| Best For |
Best For
Landscape photographers looking for a portable and versatile carbon fiber tripod
|
If you need a rugged tripod that can withstand life outdoors, look no further than the Sirui AM-254 Carbon Fiber Tripod. It’s strong, robust, and versatile. It’s a good investment for any adventurous landscape photographer.
The main structure is made of durable carbon fiber. It isn’t the lightest tripod on our list, weighing 4.7 lbs / 2.1 kg. But it can carry a load weighing up to 26.5 lbs / 12 kg. That’s strong enough for full-frame or medium-format cameras with plenty to spare.
It also folds down to a convenient 21.3 inches / 54 cm. That makes it easy to strap to your backpack when you’re heading to your next location.
With the ball head, you get an excellent range of motion when the camera’s mounted. You can also lock the camera in the vertical position using the U-shaped groove. It also has several locking mechanisms, so the camera never slips out of position.
You can also rotate the tripod head 360 degrees thanks to the panning base. This allows you to make adjustments without demounting and remounting the camera. And it makes it easier to shoot panoramic landscapes. It also has three built-in bubble levels for precision framing.
Adjusting the legs is easy with the twist locks. And the feet give you excellent grip thanks to the rubber feet and retractable spikes.
The Sirui AM-254 is one of the best carbon fiber tripods. And it’s a great choice for outdoorsy landscape photographers.
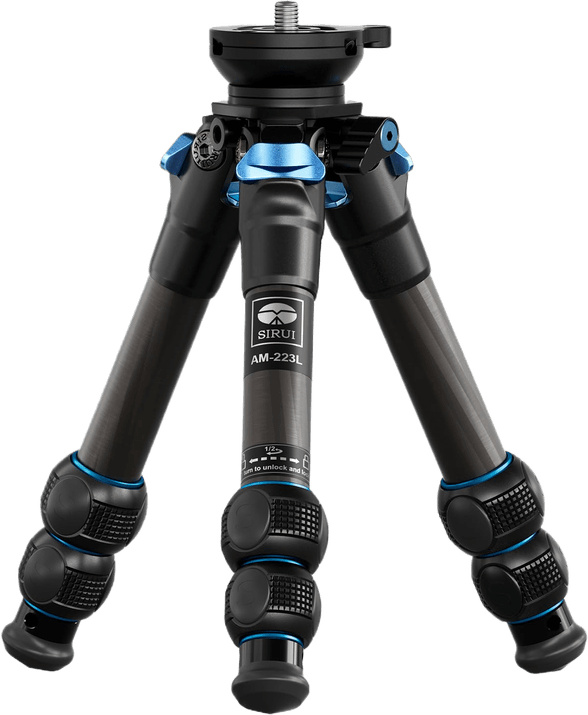
6. Sirui AM-223L Mini Travel Tripod
| Brand |
Brand
Sirui
|
| Material |
Material
Carbon Fiber
|
| Tripod Weight |
Tripod Weight
1.3 lbs / 620 g
|
| Max Height |
Max Height
14.2 inches / 36.2 cm
|
| Folded Height |
Folded Height
9 inches / 23 cm
|
| Max Load Capacity |
Max Load Capacity
33 lbs / 15 kg
|
| Other Key Features |
Other Key Features
Bubble level, rubber feet, metal spikes, twist locks
|
| Best For |
Best For
Photographers in need of a strong mini tripod
|
If you want something small and portable, you should consider the Sirui AM-223L Mini Travel Tripod. It’s small enough for any camera backpack. And it has an incredible load capacity for its size.
Made of strong and lightweight carbon fiber, it’s portable yet durable. It measures only 9 inches / 23 cm when folded down and weighs just 1.3 lbs / 620 g. It’s perfect for travel.
But despite its size, it’s one of the strongest tripods on this list. It can hold a load of anything up to 33 lbs / 15 kg. That means no camera is too heavy, even with a large lens. And thanks to the low center of gravity, there isn’t much danger of it toppling over.
The tripod has an adjustable head. It pans 360 degrees and has 15 degrees of tilting motion in all directions. The bubble level also helps you keep the camera flat on uneven ground.
You can easily adjust the height of the legs with the twist locks. And the feet have rubber stoppers or metal spikes.
The maximum height is 14.2 inches / 36.2 cm. And by spreading the legs out wide, you can shoot from a super low angle. You can mount as low as 3.3 inches / 8.4 cm.
The Sirui AM-223L is one of the best mini tripods. And it’s definitely the best mini tripod for shooting landscape photography. And considering the build quality and strength, it’s well worth the price.
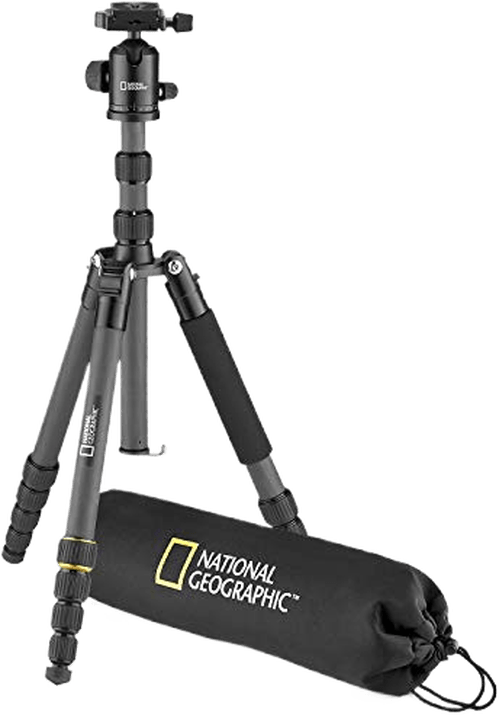
7. National Geographic Travel Tripod
| Brand |
Brand
National Geographic
|
| Material |
Material
Carbon fiber
|
| Tripod Weight |
Tripod Weight
3 lbs / 1.3 kg
|
| Max Height |
Max Height
62 inches / 158 cm
|
| Folded Height |
Folded Height
15 inches / 38 cm
|
| Max Load Capacity |
Max Load Capacity
17.6 lbs / 8 kg
|
| Other Key Features |
Other Key Features
Carrying case, ball head with panning base, rubber feet, bubble level
|
| Best For |
Best For
Landscape photographers looking for a versatile tripod with its own carry case
|
National Geographic is more famous for its magazines than its photography equipment. But the National Geographic Travel Tripod is an excellent choice for landscape shooters.
With a robust carbon fiber build, it’s a durable option for traveling photographers. It’s lightweight at just 3 lbs / 1.3 kg. And it folds down to 15 inches / 38 cm and fits in its own convenient carry case.
It’s a versatile tripod with a max mounting height of 62 inches / 158 cm. And the 5-section legs with twist locks make it easy to find the perfect working height when shooting. You can also extend the central column for additional height if needed.
You can use heavy full-frame cameras with this tripod. It can safely support any load up to 17.6 lbs / 8 kg. But you’ll struggle to reach that limit with standard camera gear.
You get even more versatility with the ball head. You can rotate the camera 360 degrees when mounted. And you get a wide tilting motion in all directions. It also has friction knobs for more stability and control. And there’s a built-in bubble level for precision alignment.
You can also use the National Geographic Travel Tripod as a monopod. Monopods are not a popular choice with landscape photographers. But it adds another level of versatility to an already handy travel tripod.
Buyer’s Guide—Best Tripods for Landscape Photography
Finding the best tripod for landscape photography isn’t always easy. That’s why we’re providing even more information to help you find the best tripod. We answer some of the most frequently asked questions on the topic. The answers will give you the knowledge you need to choose the right tripod for you.
Why Use a Tripod for Landscape Photography?
Not all photographers use a tripod. Street photographers need to be quick on their feet, for example. They need to move around and react quickly to the world around them. And street photography camera settings don’t require the extra stability you get from a tripod.
Sports photographers also want stability. But they also need to move and reposition themselves. That’s why they like to use monopods.
But tripods are vital in landscape photography. Landscape is all about composition, so you need to take your time setting up the shot. Also, landscapes move at a glacial pace, so you don’t have to worry about mountains moving or rivers changing direction.
The best camera settings for landscape photography also require more stability. When shooting landscapes, you need a deep depth of field. And to achieve a deep depth of field, you need to use a narrow aperture. This ensures your entire scene is in focus, from the foreground to way far away.
But using a narrow aperture affects your other exposure settings. Of course, you also want to keep your ISO as low as possible. That means you have to sacrifice shutter speed.
But we all know using a slow shutter speed increases the risk of motion blur. That’s why you need to increase stability with a sturdy tripod when shooting landscape photography.
What to Look For in a Tripod for Landscape Photography
Now that we know why you need a tripod, let’s look at the key features you need to look out for in a landscape photography tripod.
Weight – Often, landscape photography involves adventurous expeditions into the great outdoors. And when you’re setting off on a photography hike, you don’t want the burden of heavy equipment. That’s why you need a light tripod for landscapes.
Size – You don’t want a tripod that is too big. The best way to carry a tripod is to strap it to your camera backpack, so you don’t want a tripod that’s much bigger than the pack. You might even want to go for a tripod that fits inside your backpack.
Build Materials – While you want a light tripod, it still needs to be strong. That’s why it’s best to look for aluminum or carbon fiber tripods. Both materials offer excellent strength while being lighter than other options.
Aluminum tripods are often lighter than carbon fiber ones. But carbon fiber tripods are stronger and have a bigger load capacity.
Aluminum and carbon fiber are also great for working outdoors. They don’t rust. And you can use them in wet weather without issue.
Maximum Load Capacity – You need to know the tripod can hold your gear safely and securely. That’s why you need a tripod with a max load capacity well above the weight of your camera. Thankfully, modern mirrorless cameras are fairly lightweight. But you need to consider the lens and other accessories too.
It’s also worth buying one well above what you need in case you upgrade your camera. That way, you won’t need to upgrade your tripod as well.
Flexibility – When you’re out in the wild, finding a level space for shooting is next to impossible. That’s why you need a tripod with flexible mounting options. Adjustable legs are important. But you should also look out for other handy features, like removable columns or spreadable legs.
What Is the Best Type of Tripod Head for Landscape Photography?
There are three types of tripod head that are great for landscape photography. You have ball heads, 3-way pan and tilt heads, and panoramic tripod heads.
Ball Heads
Ball tripod heads have a ball joint that connects the main tripod to the camera mount. This joint allows for small movements in a variety of directions. You can move the camera around in a panning motion when mounted. And you can tilt in all directions.
The tilting is useful when working on uneven ground. It means you don’t have to get the legs perfectly level for a perfect shot.
It also means you can mount your camera vertically. Using a portrait orientation isn’t common in landscape photography, but it does add versatility.
See our full list of the best ball tripod heads.
Three-Way Pan and Tilt Heads
Three-way pan and tilt heads allow you to pan and tilt the camera in any direction. They have two or three tilting joints, allowing you to find level shooting in any environment. They give you more security than a ball head when mounted on harsher angles.
They are better for larger and heavier cameras. And they give you more control over the mounting position than ball heads. They are the best for precision camera mounting.
Check out our full article on the best 3-way pan and tilt tripod heads.
Panoramic Heads
Panoramic heads give you excellent panning control. They don’t always give you much tilting control. But they are perfect for shooting sweeping panoramic images.
The best panoramic heads have degree markings and bubble levels built in. This makes it easier to construct your panoramic compositions. You’ll spend less time stitching them together using photo editing software.
For more info, check out our full article on the best panoramic tripod heads.
How to Set Up Your Landscape Tripod
Setting up a tripod isn’t rocket science, but there are a few tips you should know to ensure you get the maximum stability from your tripod.
- Always extend the larger sections of the legs first.
- Fully extend the legs first. Raise the central column only if you need extra height.
- When setting up the tripod on soft ground, put a flat stone or similar object under each foot to distribute the weight onto a larger surface area. Some manufacturers offer optional feet with larger surface areas.
- Make sure the tripod is set up securely before you mount the camera.
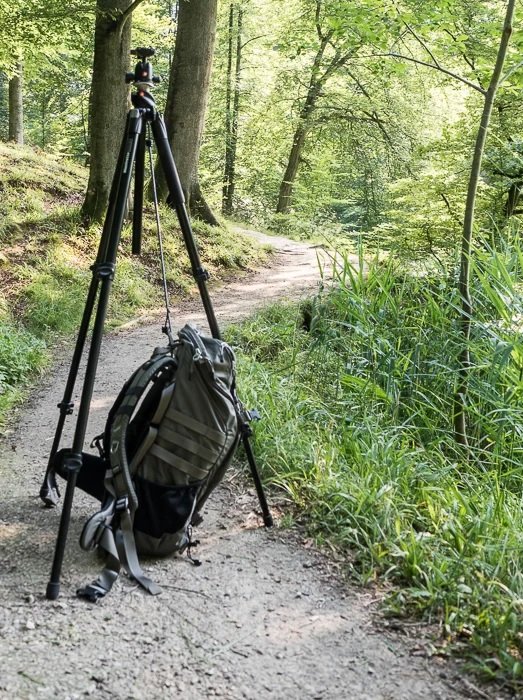
- To further stabilize your tripod, attach your backpack to the bottom of the tripod to give the tripod some weight. Make sure your backpack is still touching the ground and not swinging in midair. This is the reason why some tripods have a little loop near the central column.
Conclusion: The Best Tripod For Landscape Photography
With the best tripod for landscape photography, a photographer’s life is a whole lot easier. When you know the tripod is up to the job, you can focus on getting the best results. You don’t need to worry about it falling apart. You don’t have to waste time setting it up or fiddling about with it. Using a tripod for landscape photography is simple and easy.
The Manfrotto Element MII Tripod is our favorite tripod for landscape photography. It’s durable, portable, and easy to use. It’s strong enough for most cameras. And we know it can survive expedition after expedition, so it’s a long-term investment.


