If you’re looking for the best zoom lens for iPhone, you’ve come to the right place. We’ve compiled a list of the seven best zoom lenses available today.
But before that, let’s look at our top pick. This Selvim 4-in-1 Phone Lens Kit has four lenses and a tripod and comes in a handy travel case.
Our Top 3 Choices for the Best Zoom Lens for iPhone
Selvim 4-in-1 Phone Lens Kit for iPhone & Android
Selvim 4-in-1 Phone Lens Kit for iPhone & Android
Shop Offers
×
Selvim 4-in-1 Phone Lens Kit for iPhone & Android Deals
|
(second hand)
Check Price
|
(second hand)
|
Check Price
|
Buy Now!
|
If you buy a product through one of our referral links we will earn a commission (without costing you anything).
Prices last updated on .
As an Amazon Associate, I earn from qualifying purchases. Product prices and availability are accurate as of the date/time indicated and are subject to change. Any price and availability information displayed on Amazon at the time of purchase will apply to the purchase of this product.
Unavailable
ShiftCam Videography ProLens Kit
ShiftCam Videography ProLens Kit
Shop Offers
×
ShiftCam Videography ProLens Kit Deals
|
(second hand)
Check Price
|
(second hand)
|
Check Price
|
Buy Now!
|
If you buy a product through one of our referral links we will earn a commission (without costing you anything).
Prices last updated on .
As an Amazon Associate, I earn from qualifying purchases. Product prices and availability are accurate as of the date/time indicated and are subject to change. Any price and availability information displayed on Amazon at the time of purchase will apply to the purchase of this product.
Unavailable
MIAO LAB HD 20-40X Zoom Lens with Tripod
MIAO LAB HD 20-40X Zoom Lens with Tripod
Shop Offers
×
MIAO LAB HD 20-40X Zoom Lens with Tripod Deals
|
(second hand)
Check Price
|
(second hand)
|
Check Price
|
Buy Now!
|
If you buy a product through one of our referral links we will earn a commission (without costing you anything).
Prices last updated on .
As an Amazon Associate, I earn from qualifying purchases. Product prices and availability are accurate as of the date/time indicated and are subject to change. Any price and availability information displayed on Amazon at the time of purchase will apply to the purchase of this product.
Unavailable
What Is the Best Zoom Lens for iPhone?
Before we look in more detail at the products we’ve picked for you, here is a summary of all our recommendations.
Our Top Pick
Selvim 4-in-1 Phone Lens Kit for iPhone & Android
Selvim 4-in-1 Phone Lens Kit for iPhone & Android
- Four lenses included
- Massive 22x telephoto
- Includes tripod and carrying case
- Rubber eye-cup for monocular use
Shop Offers
×
Selvim 4-in-1 Phone Lens Kit for iPhone & Android Deals
|
(second hand)
Check Price
|
(second hand)
|
Check Price
|
Buy Now!
|
If you buy a product through one of our referral links we will earn a commission (without costing you anything).
Prices last updated on .
As an Amazon Associate, I earn from qualifying purchases. Product prices and availability are accurate as of the date/time indicated and are subject to change. Any price and availability information displayed on Amazon at the time of purchase will apply to the purchase of this product.
Unavailable
Best Cinematic Quality
ShiftCam Videography ProLens Kit
ShiftCam Videography ProLens Kit
- Amazing anamorphic lens
- Useful telephoto
- Quality construction
- Decent travel pouch included
Shop Offers
×
ShiftCam Videography ProLens Kit Deals
|
(second hand)
Check Price
|
(second hand)
|
Check Price
|
Buy Now!
|
If you buy a product through one of our referral links we will earn a commission (without costing you anything).
Prices last updated on .
As an Amazon Associate, I earn from qualifying purchases. Product prices and availability are accurate as of the date/time indicated and are subject to change. Any price and availability information displayed on Amazon at the time of purchase will apply to the purchase of this product.
Unavailable
Best Long Telephoto
MIAO LAB HD 20-40X Zoom Lens with Tripod
MIAO LAB HD 20-40X Zoom Lens with Tripod
- Zoom telephoto lens
- Handy tripod included
- Manual focus ring
- Includes handy travel pouch
Shop Offers
×
MIAO LAB HD 20-40X Zoom Lens with Tripod Deals
|
(second hand)
Check Price
|
(second hand)
|
Check Price
|
Buy Now!
|
If you buy a product through one of our referral links we will earn a commission (without costing you anything).
Prices last updated on .
As an Amazon Associate, I earn from qualifying purchases. Product prices and availability are accurate as of the date/time indicated and are subject to change. Any price and availability information displayed on Amazon at the time of purchase will apply to the purchase of this product.
Unavailable
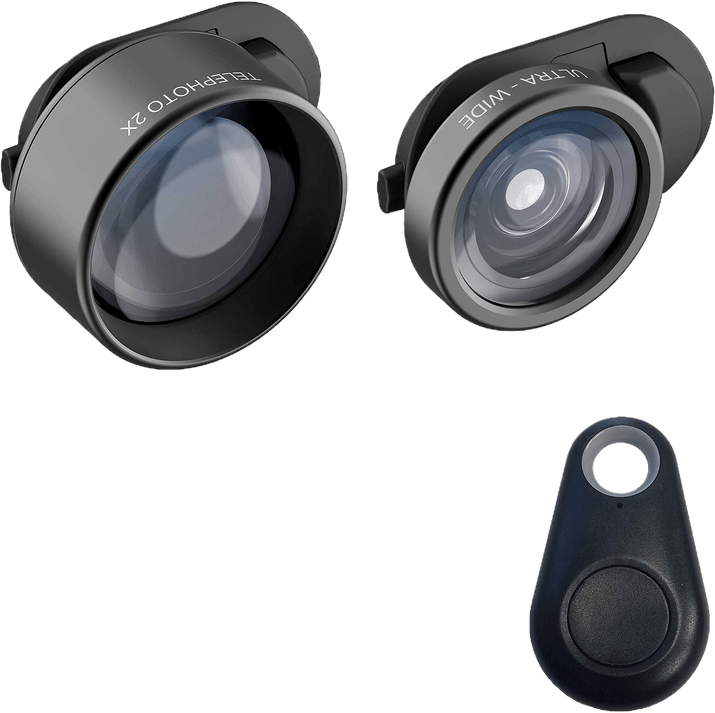
Best for Selfies
olloclip Essential Telephoto 2x, Ultra-Wide Lens Kit
olloclip Essential Telephoto 2x, Ultra-Wide Lens Kit
- Useful combination of ultra-wide and telephoto
- Includes Bluetooth remote control
- Glass lens elements
- Easy to use
Shop Offers
×
olloclip Essential Telephoto 2x, Ultra-Wide Lens Kit Deals
|
(second hand)
Check Price
|
(second hand)
|
Check Price
|
Buy Now!
|
If you buy a product through one of our referral links we will earn a commission (without costing you anything).
Prices last updated on .
As an Amazon Associate, I earn from qualifying purchases. Product prices and availability are accurate as of the date/time indicated and are subject to change. Any price and availability information displayed on Amazon at the time of purchase will apply to the purchase of this product.
Unavailable
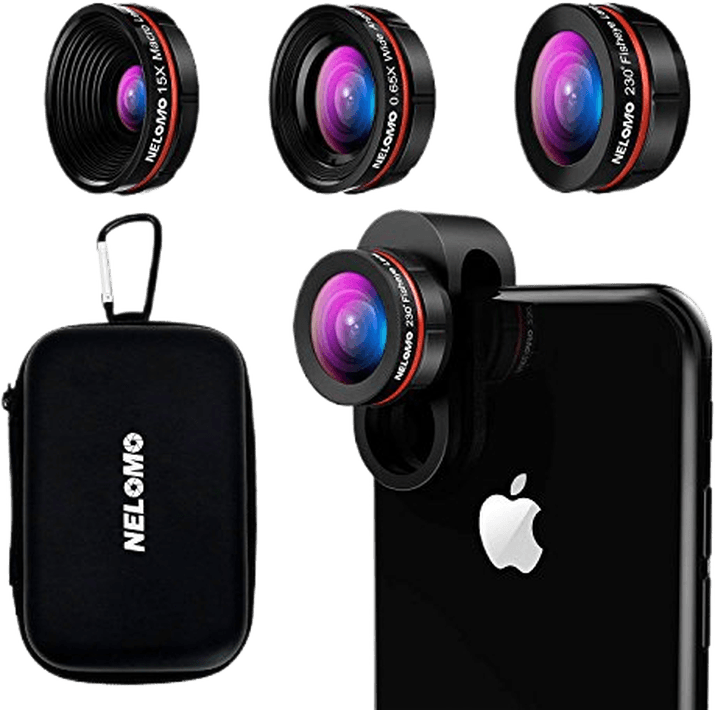
Best Super-Wide Lens
NELOMO Universal Professional HD Camera Lens Kit
NELOMO Universal Professional HD Camera Lens Kit
- 15x macro lens for super close-up shots
- 230-degree super-wide lens
- Useful range of focal lengths
- Convenient carry pouch with carabiner
Shop Offers
×
NELOMO Universal Professional HD Camera Lens Kit Deals
|
(second hand)
Check Price
|
(second hand)
|
Check Price
|
Buy Now!
|
If you buy a product through one of our referral links we will earn a commission (without costing you anything).
Prices last updated on .
As an Amazon Associate, I earn from qualifying purchases. Product prices and availability are accurate as of the date/time indicated and are subject to change. Any price and availability information displayed on Amazon at the time of purchase will apply to the purchase of this product.
Unavailable
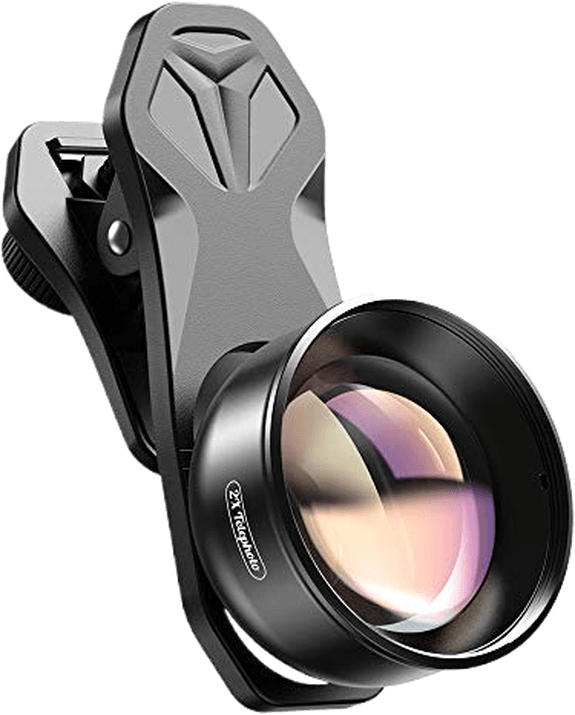
Most Practical Lens
Apexel 2x Telephoto Lens for Smartphones
Apexel 2x Telephoto Lens for Smartphones
- Multicoated lens elements
- Attractive, clean design
- Quick and simple to use
- Great for portraits
Shop Offers
×
Apexel 2x Telephoto Lens for Smartphones Deals
|
(second hand)
Check Price
|
(second hand)
|
Check Price
|
Buy Now!
|
If you buy a product through one of our referral links we will earn a commission (without costing you anything).
Prices last updated on .
As an Amazon Associate, I earn from qualifying purchases. Product prices and availability are accurate as of the date/time indicated and are subject to change. Any price and availability information displayed on Amazon at the time of purchase will apply to the purchase of this product.
Unavailable
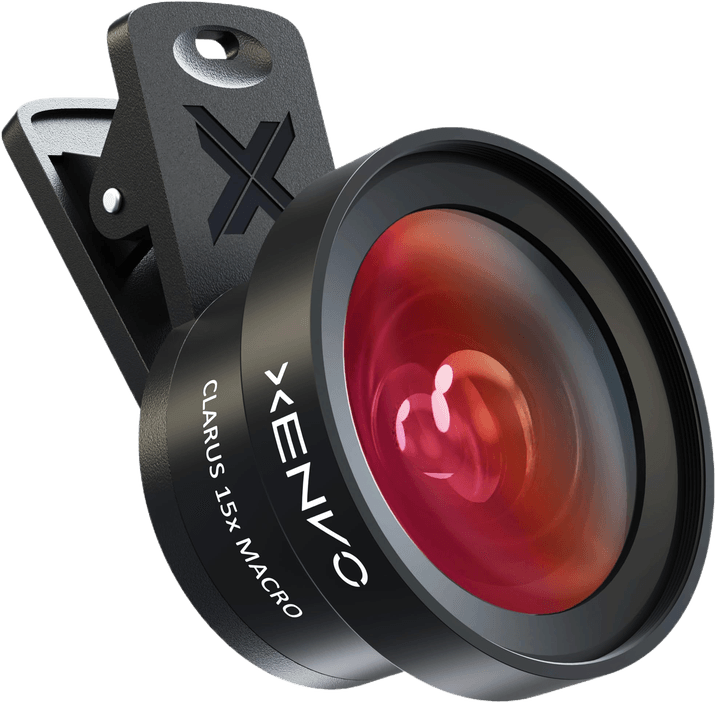
Best for Macro
Xenvo Pro Lens Kit
Xenvo Pro Lens Kit
- Superb close-up photographs
- Includes clip-on light
- Sharp picture quality
- Simple and easy to use
Shop Offers
×
Xenvo Pro Lens Kit Deals
|
(second hand)
Check Price
|
(second hand)
|
Check Price
|
Buy Now!
|
If you buy a product through one of our referral links we will earn a commission (without costing you anything).
Prices last updated on .
As an Amazon Associate, I earn from qualifying purchases. Product prices and availability are accurate as of the date/time indicated and are subject to change. Any price and availability information displayed on Amazon at the time of purchase will apply to the purchase of this product.
Unavailable
7 Best Zoom Lenses for iPhone
Let’s start with our top choice of iPhone zoom lens and examine what we like about it.
1. Selvim 4-in-1 Phone Lens Kit for iPhone & Android
Shop Offers
×
Selvim 4-in-1 Phone Lens Kit for iPhone & Android Deals
|
(second hand)
Check Price
|
(second hand)
|
Check Price
|
Buy Now!
|
If you buy a product through one of our referral links we will earn a commission (without costing you anything).
Prices last updated on .
As an Amazon Associate, I earn from qualifying purchases. Product prices and availability are accurate as of the date/time indicated and are subject to change. Any price and availability information displayed on Amazon at the time of purchase will apply to the purchase of this product.
Unavailable
|
Number of Lenses |
Number of Lenses
Four
|
|
Telephoto |
Telephoto
Yes
|
|
Wide Angle |
Wide Angle
Yes
|
|
Macro |
Macro
Yes
|
|
Best For |
Best For
Everything from macro to telephoto
|
Selvim 4-in-1 Phone Lens Kit for iPhone & Android
The Selvim 4-in-1 Phone Lens Kit is a comprehensive solution for expanding the range of your smartphone camera. It opens up new possibilities, from close-ups with the macro lens to the telephoto.
The lenses’ effective focal length depends on your camera lens. For instance, the iPhone 13 telephoto has an effective focal length of 73mm. So this telephoto makes that a whopping 1694mm! It’s a good deal that the kit comes with a mini tripod.
The lens kit comes with an adjustable clip. You can slide the position of the lens so that it lines up with your phone’s lens. It’s important, given the wide range of phone camera arrangements. The Selvim 4-in-1 even supplies an eyecup to use the telephoto as a monocular.
2. ShiftCam Videography ProLens Kit
Shop Offers
×
ShiftCam Videography ProLens Kit Deals
|
(second hand)
Check Price
|
(second hand)
|
Check Price
|
Buy Now!
|
If you buy a product through one of our referral links we will earn a commission (without costing you anything).
Prices last updated on .
As an Amazon Associate, I earn from qualifying purchases. Product prices and availability are accurate as of the date/time indicated and are subject to change. Any price and availability information displayed on Amazon at the time of purchase will apply to the purchase of this product.
Unavailable
|
Number of Lenses |
Number of Lenses
Two
|
|
Telephoto |
Telephoto
Yes (60mm)
|
|
Wide Angle |
Wide Angle
Yes 1.33x Anamorphic
|
|
Macro |
Macro
No
|
|
Best For |
Best For
Giving your videos that big screen look
|
ShiftCam Videography ProLens Kit
The ShiftCam Videography ProLens Kit brings the look of a movie to your videos. The anamorphic lens will even give you the distinctive flare associated with movies and pro videos.
The 60mm telephoto means you won’t miss out on what’s happening in the distance. This zoom tackles the weakness of almost all smartphone cameras. Hardly any can get you close with an optical zoom or telephoto. This lens kit solves that problem.
The manufacturer has neatly packaged it in a travel pouch to protect the lenses and keep it handy for instant use. The ShiftCam ProLens Kit isn’t a cheap solution, but you’ll almost certainly love the effects!
3. MIAO LAB HD 20-40X Zoom Lens
Shop Offers
×
MIAO LAB HD 20-40X Zoom Lens with Tripod Deals
|
(second hand)
Check Price
|
(second hand)
|
Check Price
|
Buy Now!
|
If you buy a product through one of our referral links we will earn a commission (without costing you anything).
Prices last updated on .
As an Amazon Associate, I earn from qualifying purchases. Product prices and availability are accurate as of the date/time indicated and are subject to change. Any price and availability information displayed on Amazon at the time of purchase will apply to the purchase of this product.
Unavailable
|
Number of Lenses |
Number of Lenses
One
|
|
Telephoto |
Telephoto
Yes
|
|
Wide Angle |
Wide Angle
No
|
|
Macro |
Macro
No
|
|
Best For |
Best For
Pulling distant objects in close, using the supplied tripod
|
MIAO LAB HD 20-40X Zoom Lens with Tripod
This MIAO LAB HD 20-40X Zoom Lens allows you to zoom into your frame up to 40x magnification. Due to the extended zoom range, the lens is huge compared to other smartphone lenses. It even comes with a tripod for support.
The manual focus ring comes in handy when focusing on subjects at the longer end of the lens. The lens is perfect for sport, wildlife, and travel photography with the amount of magnification it offers.
Even though the lens is big, it is still portable in the lens bag that comes with it. The HD 20-40X Zoom Lens is compatible with almost every smartphone. It is simple to attach to your device.
4. Olloclip Essential Telephoto Zoom 2x Lens
Shop Offers
×
olloclip Essential Telephoto 2x, Ultra-Wide Lens Kit Deals
|
(second hand)
Check Price
|
(second hand)
|
Check Price
|
Buy Now!
|
If you buy a product through one of our referral links we will earn a commission (without costing you anything).
Prices last updated on .
As an Amazon Associate, I earn from qualifying purchases. Product prices and availability are accurate as of the date/time indicated and are subject to change. Any price and availability information displayed on Amazon at the time of purchase will apply to the purchase of this product.
Unavailable
|
Number of Lenses |
Number of Lenses
Two
|
|
Telephoto |
Telephoto
Yes
|
|
Wide Angle |
Wide Angle
Yes
|
|
Macro |
Macro
No
|
|
Best For |
Best For
The added convenience of a Bluetooth remote control
|
olloclip Essential Telephoto 2x, Ultra-Wide Lens Kit
The Olloclip Telephoto Lens‘s 2x optical zoom lets you get closer to the subject while maintaining HD image quality. This quality makes the lens suitable for portraits, street photos, or events.
You can also buy this lens in a kit that contains a 2x telephoto, a macro, a fisheye, and a wide-angle lens.
This lens’s grip is adjustable and attaches to your phone. You can use it with any screen protection or phone case. The manufacturer designed the glass optics to offer the greatest image quality.
It includes a wireless Bluetooth remote that lets you take photos up to 30 feet (9.1 meters) away. The Olloclip 2x Telephoto Lens also includes a lens cover to protect it from damage.
5. Nelomo Universal Professional HD Camera Lens Kit
Shop Offers
×
NELOMO Universal Professional HD Camera Lens Kit Deals
|
(second hand)
Check Price
|
(second hand)
|
Check Price
|
Buy Now!
|
If you buy a product through one of our referral links we will earn a commission (without costing you anything).
Prices last updated on .
As an Amazon Associate, I earn from qualifying purchases. Product prices and availability are accurate as of the date/time indicated and are subject to change. Any price and availability information displayed on Amazon at the time of purchase will apply to the purchase of this product.
Unavailable
|
Number of Lenses |
Number of Lenses
Three
|
|
Telephoto |
Telephoto
No
|
|
Wide Angle |
Wide Angle
Yes and Superwide
|
|
Macro |
Macro
Yes
|
|
Best For |
Best For
GoPro-style super-wide video and photos
|
NELOMO Universal Professional HD Camera Lens Kit
This Nelomo HD Camera Lens Kit includes three lenses that attach to your smartphone camera. The 0.65x wide-angle lens is perfect for capturing groups of people, street photos, or landscapes. Meanwhile, the 230-degree lens provides dramatic optical distortion.
But the most outstanding element of this kit is the 15x magnification macro lens. It lets you capture subjects only a few centimeters away from your camera.
The high-quality lenses give you sharp images and are wonderful for universal use. Since the Nelomo Lens Kit covers various focal lengths, it fits whatever situation you photograph.
6. Apexel 2x Telephoto Lens
Shop Offers
×
Apexel 2x Telephoto Lens for Smartphones Deals
|
(second hand)
Check Price
|
(second hand)
|
Check Price
|
Buy Now!
|
If you buy a product through one of our referral links we will earn a commission (without costing you anything).
Prices last updated on .
As an Amazon Associate, I earn from qualifying purchases. Product prices and availability are accurate as of the date/time indicated and are subject to change. Any price and availability information displayed on Amazon at the time of purchase will apply to the purchase of this product.
Unavailable
|
Number of Lenses |
Number of Lenses
One
|
|
Telephoto |
Telephoto
Yes
|
|
Wide Angle |
Wide Angle
No
|
|
Macro |
Macro
No
|
|
Best For |
Best For
Quick and simple medium telephoto photography
|
Apexel 2x Telephoto Lens for Smartphones
This Apexel 2x Telephoto Lens is a great tool for portrait photography. The 2x magnification might not seem much. But it is just enough for close-up portrait photos and creating a blurry background.
The lens was made to prevent distortion, ensuring the greatest accuracy when taking photographs. It has a minimalistic design that can attach to any smartphone. The size of the clip is adjustable to the custom size of your phone.
The Apexel Telephoto also includes multi-layer lens elements. These have a special coating to prevent flares and reflections. You can also use filters, resulting in stronger clarity in your images.
7. Xenvo Pro Lens Kit
Shop Offers
×
Xenvo Pro Lens Kit Deals
|
(second hand)
Check Price
|
(second hand)
|
Check Price
|
Buy Now!
|
If you buy a product through one of our referral links we will earn a commission (without costing you anything).
Prices last updated on .
As an Amazon Associate, I earn from qualifying purchases. Product prices and availability are accurate as of the date/time indicated and are subject to change. Any price and availability information displayed on Amazon at the time of purchase will apply to the purchase of this product.
Unavailable
|
Number of Lenses |
Number of Lenses
Two
|
|
Telephoto |
Telephoto
No
|
|
Wide Angle |
Wide Angle
Yes
|
|
Macro |
Macro
Yes
|
|
Best For |
Best For
Close-up photography and street photography
|
The Xenvo Pro Lens Kit is a bit of an outlier. It doesn’t have a telephoto lens but a wide-angle and close-up lens.
This lens kit consists of wide-angle and macro lenses. There is also a clamp, a clip-on light, and other necessary accessories.
A wide-angle lens is excellent for landscape and street photography with minimal distortion. But a macro lens provides a 15x magnification, making your phone perfect for close-up photos.
The optical performance of these lenses is impressive. They provide sharp details and accurate colors. The clip-on light is a useful accessory. It delivers soft and even lighting with three different modes.
Considering everything the Xenvo Pro Lens Kit has, it’s a good value for money.
Conclusion: Best Zoom Lens for iPhone
Taking photos with iPhones is more popular than ever. We think we’ve found some great add-on lens options for your smartphone. Which one is best for you comes down to your requirements. We think they all have a lot to offer.
The Selvim 4-in-1 Phone Lens Kit is our top pick. It offers a lens for almost every occasion at an attractive price.
Our Top 3 Choices for the Best Zoom Lens for iPhone
Selvim 4-in-1 Phone Lens Kit for iPhone & Android
Selvim 4-in-1 Phone Lens Kit for iPhone & Android
Shop Offers
×
Selvim 4-in-1 Phone Lens Kit for iPhone & Android Deals
|
(second hand)
Check Price
|
(second hand)
|
Check Price
|
Buy Now!
|
If you buy a product through one of our referral links we will earn a commission (without costing you anything).
Prices last updated on .
As an Amazon Associate, I earn from qualifying purchases. Product prices and availability are accurate as of the date/time indicated and are subject to change. Any price and availability information displayed on Amazon at the time of purchase will apply to the purchase of this product.
Unavailable
ShiftCam Videography ProLens Kit
ShiftCam Videography ProLens Kit
Shop Offers
×
ShiftCam Videography ProLens Kit Deals
|
(second hand)
Check Price
|
(second hand)
|
Check Price
|
Buy Now!
|
If you buy a product through one of our referral links we will earn a commission (without costing you anything).
Prices last updated on .
As an Amazon Associate, I earn from qualifying purchases. Product prices and availability are accurate as of the date/time indicated and are subject to change. Any price and availability information displayed on Amazon at the time of purchase will apply to the purchase of this product.
Unavailable
MIAO LAB HD 20-40X Zoom Lens with Tripod
MIAO LAB HD 20-40X Zoom Lens with Tripod
Shop Offers
×
MIAO LAB HD 20-40X Zoom Lens with Tripod Deals
|
(second hand)
Check Price
|
(second hand)
|
Check Price
|
Buy Now!
|
If you buy a product through one of our referral links we will earn a commission (without costing you anything).
Prices last updated on .
As an Amazon Associate, I earn from qualifying purchases. Product prices and availability are accurate as of the date/time indicated and are subject to change. Any price and availability information displayed on Amazon at the time of purchase will apply to the purchase of this product.
Unavailable