
Over the weekend, I visited an Ansel Adams exhibition in London. Having found his work even more breathtaking in print, I purchased a documentary about the man himself. It was an effort to learn more about the artist I admired.
What I learned helped me see his creative process more clearly. And I better understand his thought process while taking photos. So, this is what I hope to share with you today. You can also read my 10 favorite Ansel Adams quotes.
10 Ways Ansel Adams Created Art
Here are 10 photography lessons I learned from Ansel Adams.
1. Half of His Creative Process Occurred in the Dark Room
Ansel Adams is well known for spending a whole day in the darkroom just to produce one print. He and Fred Archer formulated the Zone System.
The technique is a systematic method that helps photographers determine the optimal film exposure and development. He would paint onto the enlarger the areas of the photo he thought should be darker or lighter than others.
His ability to find perfection in the darkroom was coupled with his work behind a camera. And it produced some of the greatest landscape photography ever made.
“Dodging and burning are steps to take care of mistakes God made in establishing tonal relationships.”
The lesson here is that post-processing is just as important as taking the photo. And it should be looked at as a way of improving your art, not detracting from it.
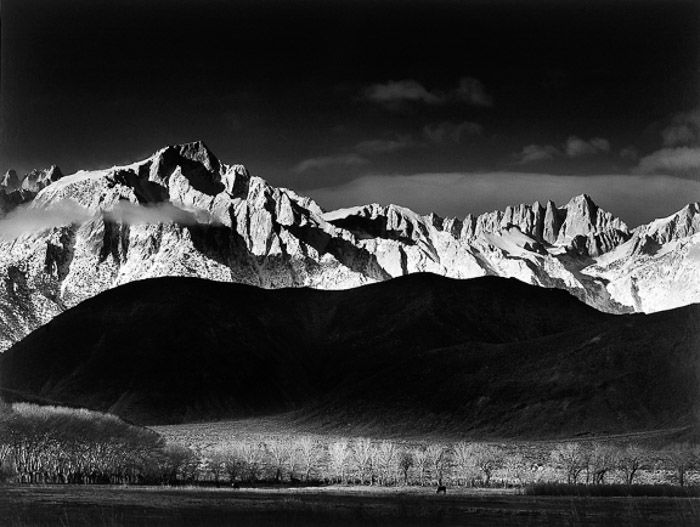
2. His Best Work Used a Dropped Horizon
During his earlier work in the 1920s and 1930s, Adams would place the horizon very high in the frame. It gave favor to the landscape below.
It’s widely regarded that his best work came in the decades to come. And they would often favor a much higher horizon.
Placing the horizon high in the frame helped the viewer realize the image’s scale. This was in comparison to the sky that surrounded it. Here’s our full article on how to place your horizon in your composition.
3. He Was So in Tune With His Equipment, Taking Photos Became Instinctive
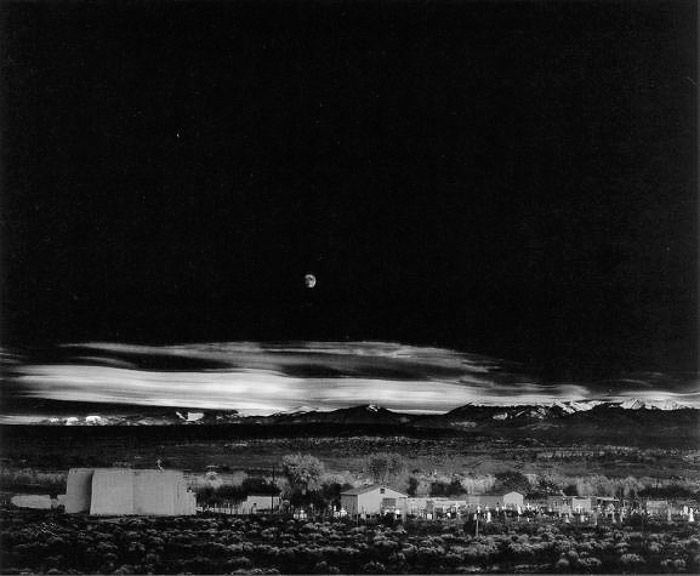
Arguably, his most famous photograph was Moonrise Over Hernandez. It was taken within a few seconds of pulling his car over to the side of the road he was driving along.
The sunlight was quickly fading. And he didn’t have enough time to find his light reader. But Adams quickly calculated the exposure for the photo without any tools but his mind.
As he went to capture a second “safety photo,” the sun had disappeared from the gravestones in the foreground. And the moment had gone with it.
He was so in tune with his equipment the process became instinctive when it mattered the most. If you understand your camera and your exposure, taking photos becomes instinctive.
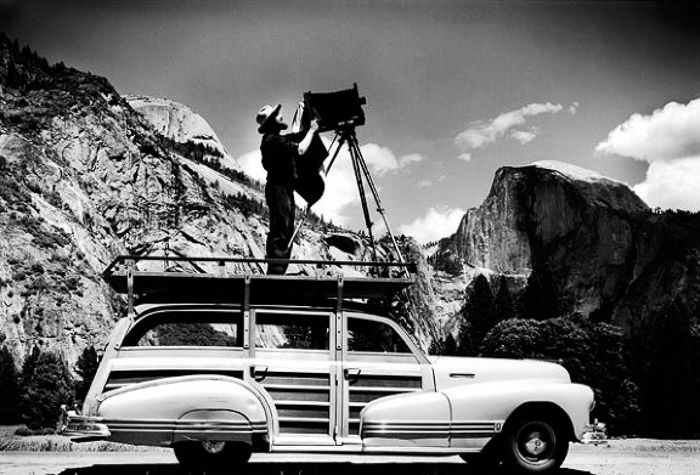
4. Ansel Adams Went to Great Lengths to Capture his Photos
Taking a good photograph comes from knowing where to stand. For Ansel Adams, this meant climbing mountains and trekking for hours.
He would often leave before dawn and arrive home after dusk. This was because he knew the importance of finding the right perspective. Sometimes, finding the right vantage point means having an unwavering commitment to taking photos.
5. He Put Humankind Into Perspective in His Frames
The first thing most people notice about Adam’s photography is the sheer scale of the images. They’re often of the great outdoors, which puts humankind into perspective. They show how insignificant we can seem in comparison.
He wanted people to understand the world through his images. He wanted us to know that we live in a world that exists in an even larger world.
His images seem to be almost completely detached from human involvement. And I think that’s part of why they’re so great. He encourages us to focus on these majestic parts of the world.
6. He Always Knew Before He Took the Photo
Ansel Adams often only took two versions of the same photo. The extra shot was in case of scratches or marks in the dark room. But many of us tend to take lots of photos of the same scene.
He always knew the shutter speed and aperture for the photo he would take. He could tell by looking at the frame what settings to use to make certain areas stand out more than others. And he would know whether he needed a filter or not.
If you think more about your composition before you shoot, you can probably work this out, too.
7. Ansel Adams Communicated Feelings, Not Images
When Adams took a photo, he didn’t just capture a scene. He captured a feeling. I challenge anyone interested in photography to view the works of Ansel Adams and not feel something.
It is this thought process behind his images that makes them so powerful. Whether you felt the same thing he did or even understood his message is not important here.
He created these images, knowing exactly what he wanted to portray before he pressed the shutter. That’s something I think we can all learn from.
We live in a digital world of instant gratification. And I think that’s caused us to think less as photographers.
8. His Purpose for Taking Photos Was More Than Just Art
The great French photographer Henri Cartier-Bresson made a well-known comment. He said, “The world is falling to pieces, and all Adams and Weston photograph is rocks and trees.”
This was a criticism implying that Adams focused too much on capturing images of the world while more important factors were at stake.
But as an environmental conservationist, Adams didn’t see it this way. He fought hard and lobbied Congress to create more national parks. And he was successful with Kings Canyon National Park.
After his death in 1984, an area of the national park was named The Ansel Adams Wilderness. And a mount was even named after him, christened Mount Ansel Adams.
His purpose is clear in his photos and his legacy, and you can see his message in his images.

9. Ansel Adams Didn’t Find Financial Success Until His 60s
It wasn’t until his 60s that Adams finally reached commercial success as a fine art photographer. Until then, he would work as a commercial photographer when he had to. It was a means to earn money to support his family.
But he still focused on fine art photography. And he incorporated it into commercial photography where possible.
Shooting fine art photography was his passion. But as a creative, the business aspect didn’t come naturally. It was only when he met his business partner that things started to change.
He had always been a phenomenally successful fine art photographer with wide critical acclaim. But the lesson here is that we shouldn’t try to manage every aspect of photography. If you need help transforming your business, then you should seek it out.
Adam’s highest-value print sold at auction is Moonrise Over Hernandez, which sold at Sotheby’s for $609,600 in 2006.
10. Ansel Adams Never Followed “Rules of Photography”
I feel this is a nice quote from Ansel Adams to end on. “There are no rules for good photographs, there are only good photographs.”
For Adams, there was a clear purpose behind his photography. You can see the hours of work he put into finding the right location and time to capture the perfect photo. And for Adams, the “perfect photo” didn’t necessarily need to follow the rules of photography.

Conclusion: Important Photography Lessons From Ansel Adams
Ansel Adams knew good photography from decades of practice and life in the art world. He knew his camera so well that photography became instinctual for Adams.
Ansel Adams is considered a master of photography. And that means he’s the perfect photographer for us to learn from. Next time you’re out taking photos of the wilderness, ask yourself, “What would Ansel Adams do?”
Check out our Simply Stunning Landscapes course to take your landscape compositions to the next level!

