
One of the most important factors in landscape photography is composition. It can make or break an image. Understanding the principles of landscape photography composition will make your pictures much more visually pleasing.
To some people, these things come naturally. They instinctively understand the principles of composition. They have a “good eye.” But for the rest of us, these composition rules must be learned.
Regardless of which kind of photographer you are, there is always room for improvement. Here are a few tips to help you create more pleasing landscapes.
Our Top Landscape Photography Composition Tips
Here are our 13 top tips for improving your landscape photography composition.
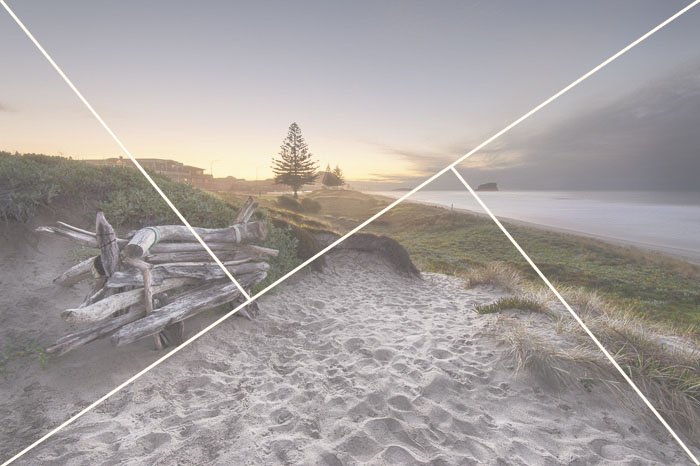
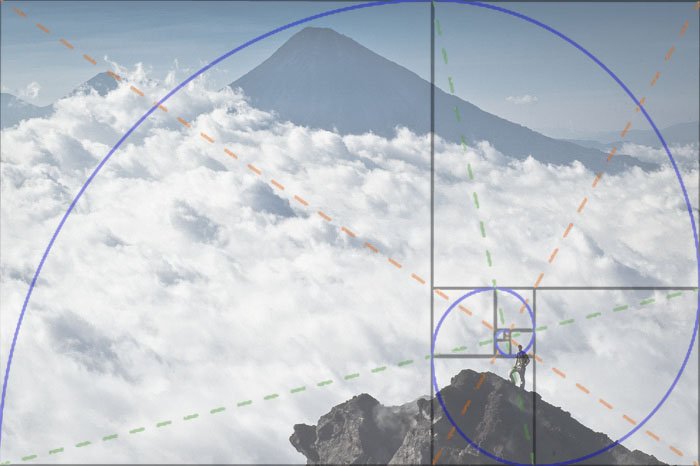
1. The Rule of Thirds and Beyond
One of the very first compositional lessons most of us learn as beginner photographers is the rule of thirds. It probably isn’t a new concept to you. It works on the principle that the human eye is naturally drawn to objects roughly one-third into an image.
It’s a solid rule for good photography composition, but don’t limit your landscapes to just the rule of thirds.
There are a couple more guides that can help you compose your landscapes in a more visually pleasing way.
The first is the golden ratio, and the second is the golden triangle.
They can help you break out of the rule of thirds and open up even more pleasing compositions in your landscapes. The easiest way to understand these two composition rules is to see them visually.
The more you practice these principles within your landscape photography composition, the more it will become second nature.
Many cameras now have the option to overlay grids in the viewfinder or on the LCD screen. So you can see these rules in action as you frame your landscape photography composition.
2. Take Advantage of Symmetry When You Find It
Rules are a great way to understand and improve your photography composition. But sometimes, those rules can be broken. One of those times is when you use symmetry in your photography.
Symmetry is visually pleasing to our eyes in many ways, and photography is no exception. Try looking for symmetry in your landscape photography using natural or manmade elements or both.
The hard, straight lines of a building contrast well with the natural lines of a landscape to create a great symmetrical photograph.

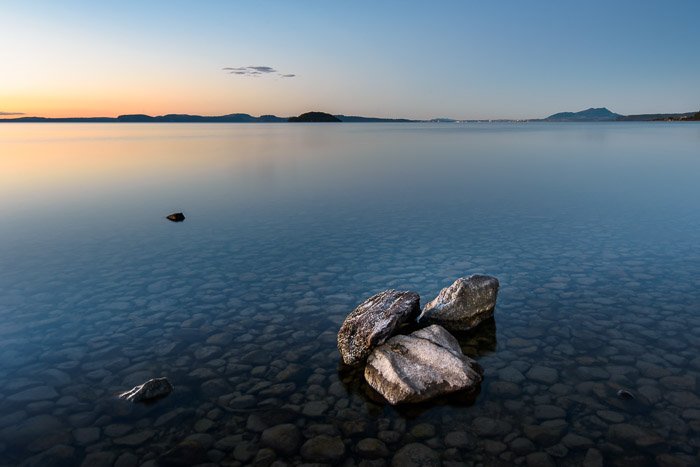
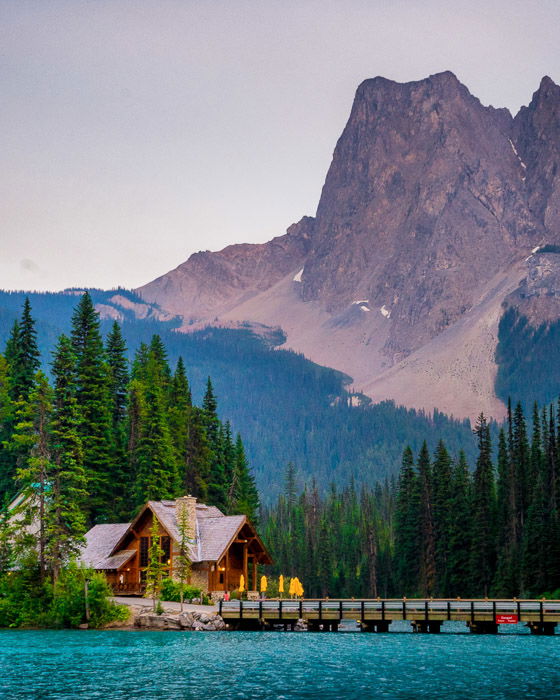
3. Include the Foreground
There is a natural tendency to think of landscape photography as grand vistas that capture big mountains, oceans, sky, etc. Those things definitely make for beautiful landscapes, but often including the foreground element can really make the photo.
There is a saying in landscape photography, “Put a great foreground in front of a great background.” I’ve taken many landscape photos that had great potential but fell short because they didn’t have the foreground interest to make the image.
A great foreground will grab the attention of the viewer, especially with a wide-angle lens, which makes closer objects look much bigger. Add something interesting in the foreground of the landscape, like some rocks or flowers. Use it to guide the viewer’s eye to the beautiful background.
4. Layer Your Landscapes
One of the defining characteristics of natural landscapes is the layers that exist everywhere. No matter where you look in nature, they are there. There are always at least two—earth and sky. Usually there are many more though.
Often, in the same scene, you can see layers of sand, grass, trees, water, mountains, clouds, sky, etc. And that’s not even considering manmade elements.
Try composing your landscapes to capture a variety of layers within the same frame to display the different elements of the scene. Sometimes these layers may line up beautifully, sometimes they will criss-cross and have no pattern to them. Both can look great.
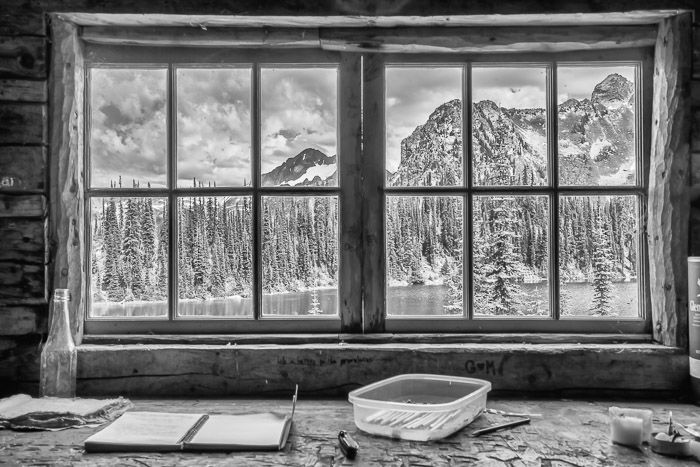
5. Create a Frame Within a Frame
If you’ve ever noticed how much different a photograph can look when it’s put into a frame, then you know how dramatic framing can be. Finding natural frames in your landscape photography can change the way the image looks and feels.
I’m not talking about making natural frames out of driftwood to display your prints. I’m talking about shooting through a gap in some trees, through a window, between two buildings, or under a bridge, for example. Doing so is called shooting a frame within a frame.
You can get really creative with this. Natural frames can focus the viewer, add interest, or obscure uninteresting parts of the scene.
6. Make Your Subject Clear
When you look at a photograph, your eye is searching for a route to take and a place to rest. Nothing ruins an image quite like a busy scene that draws the eye in every direction.
If your eye is searching for something to focus on and doesn’t find it, you won’t look at the image long. Including a clear subject within your landscape photo is a vital part of creating visually pleasing images.
Knowing what draws the eye is key. Color, contrast, brightness, and size are a few of the things that affect how the eye is drawn through a photo. Think about which part of the scene you want the viewer to look at and what the main subject is. Then use composition techniques to guide the viewer’s eye to it.
7. Get Low to Change Your Perspective
When you position your camera close to the ground, you can get a really interesting perspective on the scene. It allows you to add more of the foreground in the scene without needing to crop out the background or sky.
If you are shooting with a wide-angle lens, objects that are closer will appear to be bigger. This means that the closer you get to the ground, the bigger it will appear in your frame.
This can work really well if your foreground includes small, interesting objects like flowers. It can also work well if the ground has an interesting texture, like sand. I use this technique a lot when I’m photographing beaches and seascapes. It can also work well when your foreground includes moving water.
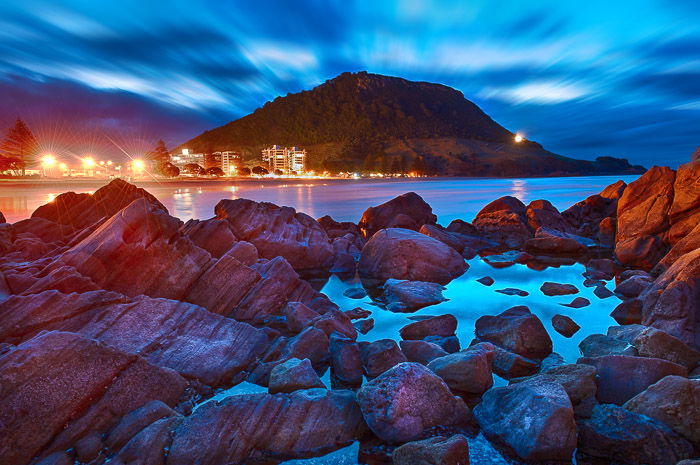
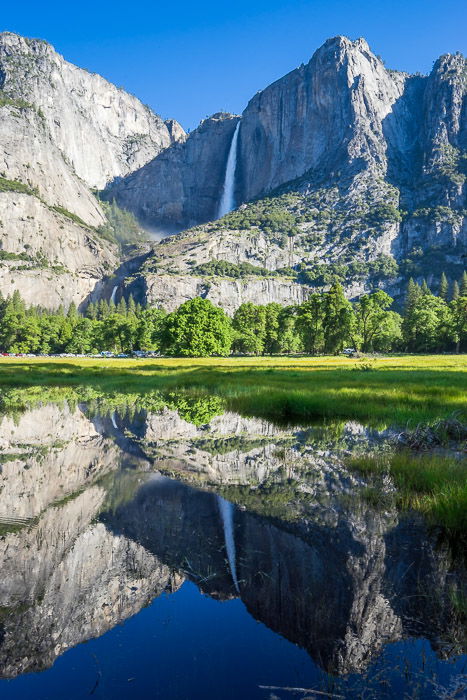
8. Use Reflections When You Can
You’ve probably noticed that reflections are popular in landscape photography, and this is for good reason. There’s something about a photo with a reflection that’s very pleasing to the eye. They can play tricks on our eyes too, which makes us take a second look at the image.
You’ll most commonly see reflections in water, such as a calm lake. But you can find them in other places, like windows. Reflections are a great way to add symmetry to your landscape photography.
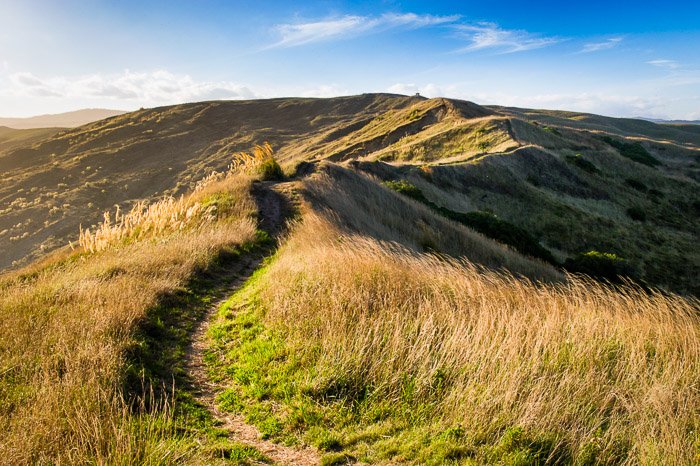
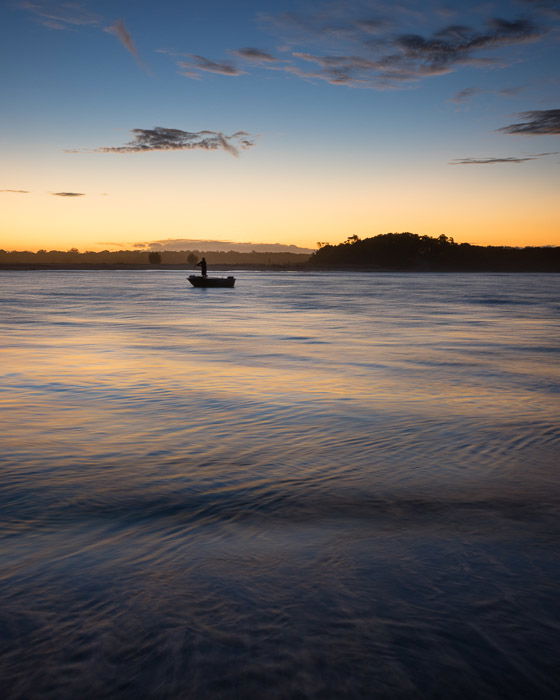
9. Leading Lines
Leading lines refer to lines within your frame that lead the eye through the frame. Most of the examples you see of leading lines in landscape photography use straight lines. But your lines can take the viewer’s eye on a journey through the image even if they aren’t straight.
I sometimes think curved lines that lead the eye can be even more pleasing. That’s especially true if the scene is natural without any manmade objects. A hiking trail, footsteps in the sand, or a river bend can lead the eye in a much more natural way.
10. Zoom In
Although I love the look of wide landscapes, zooming in on part of a scene can also create some very striking landscape photos. It’s easy to try to fit everything you can see into one photo. But isolating just part of the scene can make for great photos.
You can often get multiple images that look completely different from the same scene. There are a couple of ways to do this. The first and most obvious is to use your feet and move closer to the part of the scene you want to isolate. The other option is using a telephoto or a zoom lens to focus in on that part of the scene.
Each of these options has pros and cons, but they both open up new possibilities.
11. Crop for Drama
The aspect ratio of your image can have a dramatic effect on the way an image feels. Most DSLR and mirrorless cameras use a 2:3 aspect ratio. Cropping your images to a 16:9 ratio can create a more cinematic look. Many panoramic images use a 3:1 or even 4:1 aspect ratio.
You don’t need to photograph and stitch multiple frames into a panorama to create a wide, dramatic look. Try experimenting with cropping your images into different aspect ratios to see how it affects the feel of your photos.

12. Simplify Your Frame for Minimalist Images
When it comes to landscape photography, the expression “less is more” is highly relevant. A busy image with a lot going on is confusing to the eye. If we’re not naturally drawn in, we won’t look at the photo for long.
Another way to avoid this is to exclude elements from the frame. Some of the most dramatic landscapes I’ve seen use minimalist principles. Often, all that’s needed for a great landscape photo is a shape or a texture that stands out.
Look at your composition and ask yourself which elements you can remove to simplify it. Sometimes, you’ll need to reframe your image or zoom in. Sometimes, you’ll need to pick up your gear and move to another vantage point.
There will be times when there are elements out of your control that you simply have to include in the frame. But you can remove them in post-production if you want.
13. Search for the Best Composition
It’s tempting to get a location, pull your tripod out, and shoot the first decent composition you find. And there’s nothing wrong with this. But I recommend taking a bit more time to explore the area and consider alternative compositions.
Human nature tends to focus on the first thing we see and miss others that may be even better. I find this is often the case with my landscape photography. I’ve learned to spend a bit more time working with the scene and looking for other shots that I might like more.
You can always go back to that first shot if you can’t find anything better. Or you can take multiple compositions from multiple positions, as I regularly do.
Conclusion—Landscape Photography Composition
Creating more intentional landscape compositions is a skill. It’s easy to pull out your camera and just start shooting. But learning to stop and think about what you’re doing and how these principles might improve your photos will go a long way.
Check out our Simply Stunning Landscapes course to take your landscape photography to the next level!


