
There are so many great locations to take beautiful photos. It can be hard to choose your next travel photography destination!
To make your decision easier, we list 12 of the most iconic places for photography around the world.
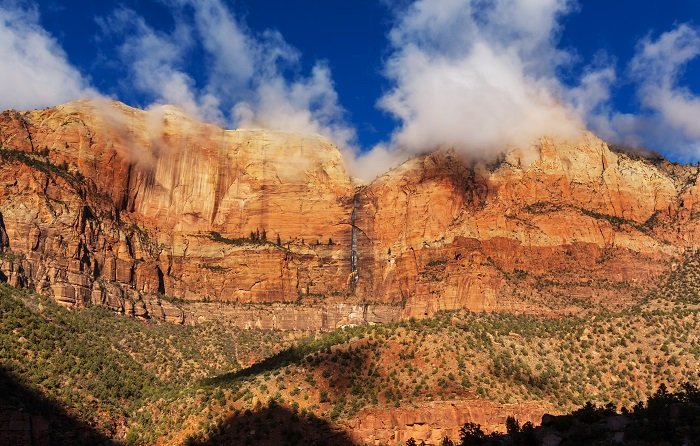
Iconic Places: Zion National Park – Utah, USA
Ansel Adams made Zion National Park famous through his iconic black and white photos. This has made it one of the most famous landmarks for all photographers.
This unique place is a must for landscape photographers. Zion National Park has towering cliffs, dramatic landscapes, and narrow canyons.
The park covers an area of 229 sq miles (596 sq km). Zion Canyon is 15 miles (24 km) long and up to 2,640 ft (800 m) deep. The Virgin River carved the canyon over centuries. You can see some evidence in its 90-degree turns. The canyon walls are reddish sandstone caused by erosion.
Explore Zion Canyon through short walks or more strenuous adventures. Some of these need a permit.
During Spring, the wildflowers bloom and offer unique nature photography opportunities. The downside is that it can be quite crowded. If you want more seclusion, try visiting in fall or winter when crowds have dissipated. To avoid crowds altogether, head out on weekdays as they tend to be less busy than on weekends. Remember to pack layers and water!
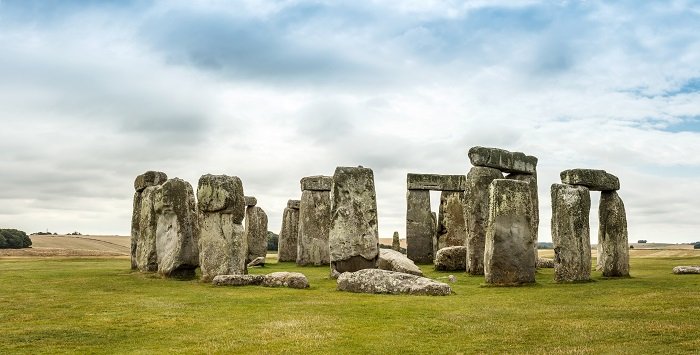
Stonehenge – UK
One of the most iconic places for photography is Stonehenge in Wiltshire, UK. This place has been a popular tourist destination since the 18th century.
Stonehenge consists of a ring of standing stones, each around 13 ft (4 m) high and 7 ft (2.1 m) wide. There are two bluestones, 11 in each horseshoe and 17 around the outer circle.
The best time for photography at Stonehenge is the golden hour and sunrise. If you can beat the crowds, then sunset and the blue hour are great too.
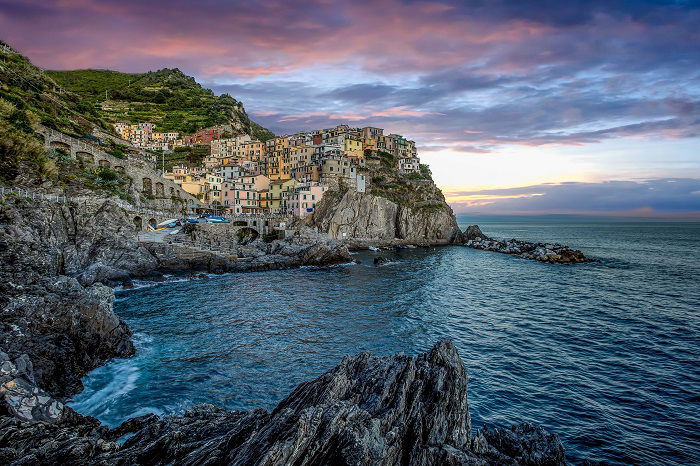
Cinque Terre – Italy
The name means ‘five lands’. It is named so because it is a collection of five villages and surrounding hillsides. All these locations add up to the full title of Cinque Terre National Park and are a UNESCO World Heritage Site. The rugged and mountainous terrain, combined with its beautiful views, make it an ideal place to take stunning photographs.
The Cinque Terre is accessible by train, bus, and boat. If you are driving from Genoa, be prepared for narrow roads with sharp turns.
Many professional photographers have captured the exquisite and colorful coastline.
The location, colors, and the cliffs adorned with tiny houses make this one of the most iconic places in the world.
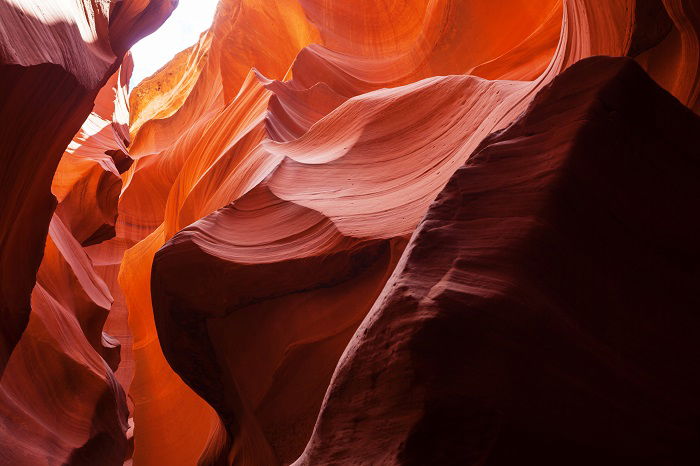
Antelope Canyon – Arizona, USA
Antelope Canyon is a slot canyon in Arizona. This is a breathtaking place to visit, made even more so by its photographic potential.
The canyon’s narrow passageways were formed by erosion from nearby Navajo Sandstone. The natural light coming through the cracks in the walls creates a unique ambiance. They also offer an escape from the sun while you set up your camera gear.
As the sun sets, the canyon’s light changes. The best times for photography are sunrise or sunset when the colors become more vibrant and dramatic.
Antelope Canyon has been a landscape photography mecca for a long time. It became an even more popular photography location as it’s the location of Peter Liks image ‘Phantom’.
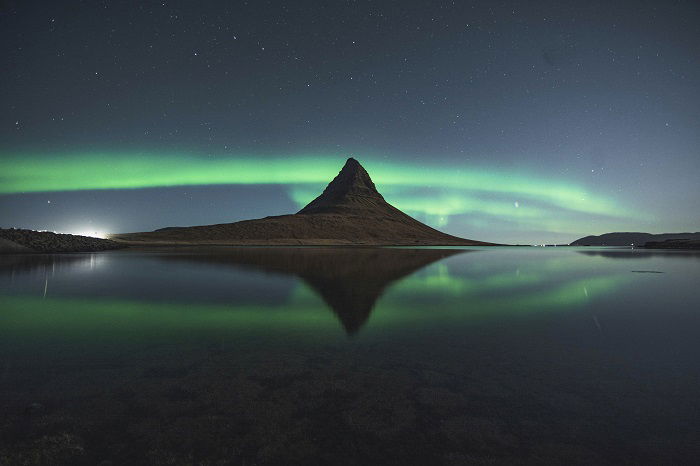
Iceland
We have traveled to many places and Iceland is by far the most beautiful. That’s why we have chosen the entire country as an iconic photography location.
The landscapes are so diverse, from black sand beaches to ice-capped mountains. There are also many opportunities to get up close with wildlife like puffins and whales.
Iceland offers a wide variety of landscapes and natural beauty that have been untouched by man. The country is also known for its active volcanoes, glaciers, hot springs, and lava fields, all of which make up beautiful photo opportunities. In addition, the land or air can change in seconds depending on the weather, making it an unpredictable environment.
Photographers flock from all over the globe to capture images of the Northern Lights.
The waterfall Seljalandsfoss, highlands Landmannalaugar, and mountain Kirkjufell are just a few other great photography locations.
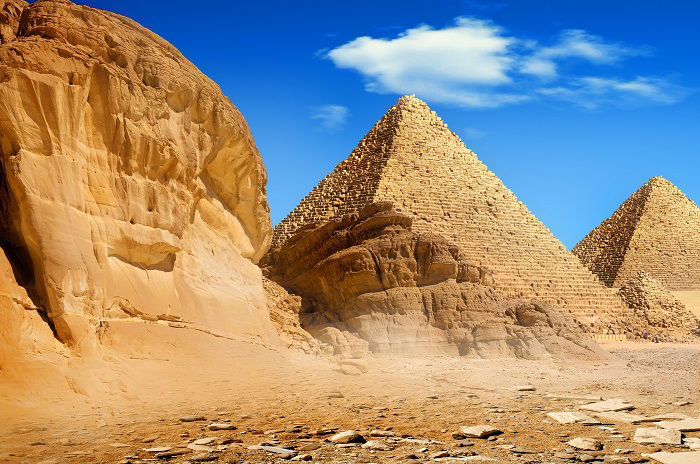
Pyramids of Giza – Egypt
The Pyramids of Giza are the only remaining intact Ancient Wonder of the world. Just seeing the pyramids with their own eyes is a dream for many photographers.
The pyramids are in Giza, on the outskirts of Cairo. There are three main pyramids: the Pyramid of Khufu (or Cheops), which is the largest and oldest at 138 m high; the Pyramid of Khafre (or Khephren), and finally that of Menkaure (or Mykerinus).
If you want to take close-ups from ground level, there is an entrance for each.
A good time for visiting Giza would be before sunrise so you will have a beautiful view with no crowds or lines.
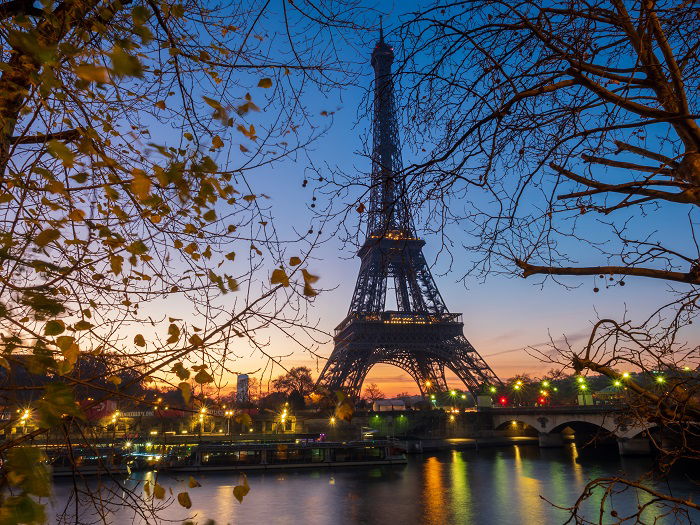
Eiffel Tower – Paris, France
Paris is known for its iconic landmarks, delicious cuisine, and romantic attractions. So what better place to take your photography trip?
Number one on that list is the Eiffel Tower. The tower found its name after its structural engineer, Gustave Eiffel. This wrought iron lattice tower sits at a little 1000 ft tall (324 m). It is so big you can see it from any location in the city.
Are you thinking of visiting the Eiffel Tower at night? Keep your camera in its bag! It’s technically illegal to photograph because it is an artistic creation that has yet to be released from copyright.
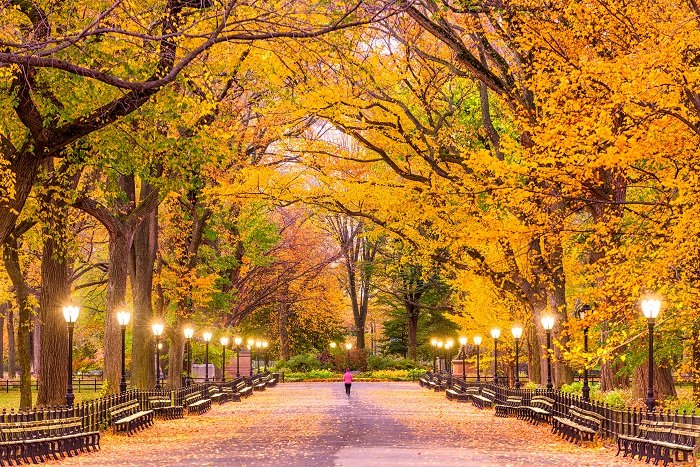
Central Park – New York, USA
Central Park is an integral part of New York City. It is one the most filmed locations in the world.
It also happens to be very popular with visitors. Over 40 million people visit Central Park every year.
The park is a great setting for nature and cityscape-meets-nature images. The surroundings have great photo opportunities too. Inside the park, you will find Central Park Zoo, Bethesda Terrace, and the Conservatory Garden.
Around the park, you can find Rockefeller Center, The American Museum of National History, and The Metropolitan Museum of Art.
While you are in the city, also visit the Empire State Building for a stunning aerial view of the park!
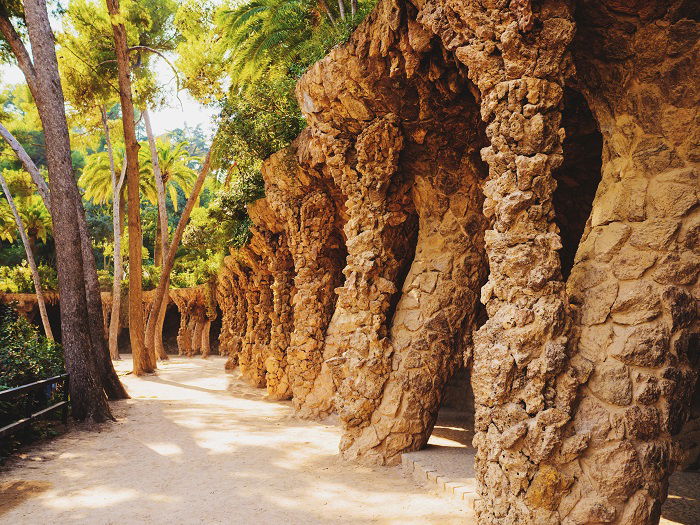
Park Guell – Barcelona, Spain
Park Güell is a public park on Carmel Hill, in the heart of Barcelona. You will find it in La Salut, a neighborhood in the Gràcia district.
Built from 1900 to 1914, it was officially opened in 1926. UNESCO declared the park a World Heritage Site under ‘Works of Antoni Gaudí’ in 1984.
The park represents Gaudi’s naturalist period. He focused on natural and organic shapes. This park is rich with beautiful gardens and architectural elements.
Inside, you will find the winding sea serpent bench made entirely from mosaic tiles. The Barcelona City History Museum is at the entrance, in a building with a remarkable roof.
The best thing about this park is the panoramic view of Barcelona, with the Sagrada Familia nested in the background. The view alone is one of the most beautiful in the world.
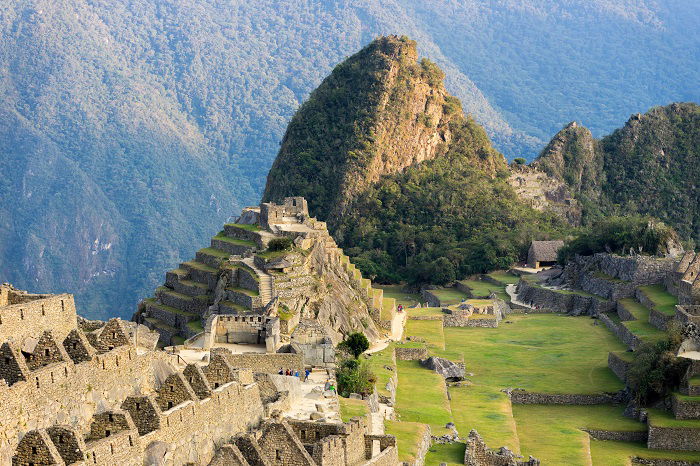
Machu Picchu – Aguas Calientes, Peru
Machu Picchu was the last Incan settlement set high in the Andes mountains. It is a culturally, architecturally, and agriculturally significant place. This citadel was built in the 15th century, located in the Cusco region of Southern Peru.
This site, 7970 ft (2430 m) above sea level, is one of the most visited and most photographed places in the world.
Here, you will see organised farming terraces. Stone-built buildings so perfect, they needed no mortar.
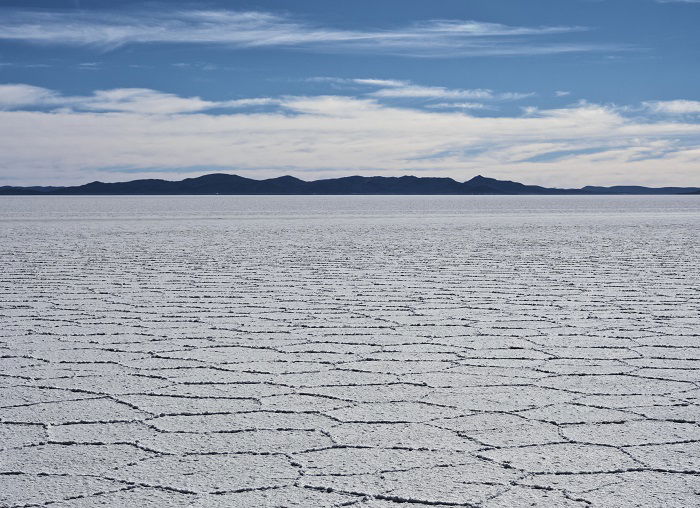
Salar de Uyuni – Andes, Bolivia
These salt flats in Bolivia are the largest in the world, measuring 10,582 sq. km (4,086 sq. m). You will find them at the crest of the Andes in southwest Bolivia.
There are plants and animals that can be photographed here. A giant cactus and Andean and James’ Flamingoes, among them.
On top of this, there is a train cemetery that serves as a unique tourist attraction. These trains helped the mining companies transfer their mineral goods until the 1940s.
This area is remarkably flat, with only one meter of elevation across its entirety. It is also covered in a crust of salt.
The main reason why this area is one of the most photographed places in the world is due to the salt flat itself. After a rainfall, the water collects on top of the salt, creating the world’s largest mirror.
People from all over the world come to capture stunning images. It serves as a reflective, alien landscape.
Due to its size and lack of elevation, you can also create some interesting forced perspective imagery.
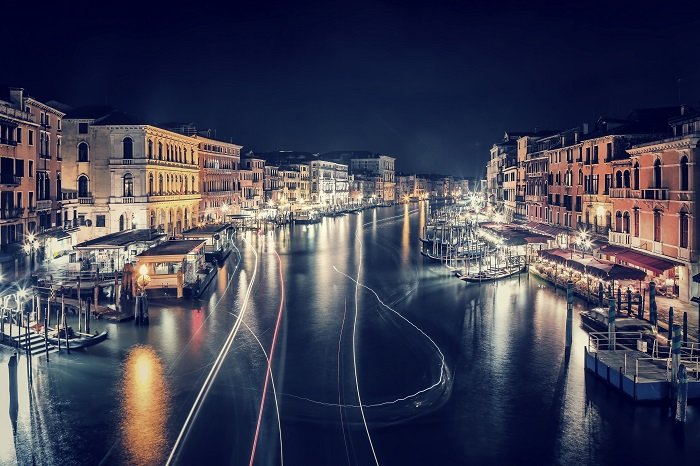
Venice City – Venice, Italy
Conclusion
We hope this article inspires you to travel and visit these iconic places for photography.
Remember, if it’s not worth photographing, then it’s not worth doing! So get out there and explore the world with your camera in hand.
Which one of those 12 iconic places are you most excited about?
Capture stunning images of these iconic places with our Simply Stunning Landscapes course!


