
Landscape photography often brings to mind dramatic mountains, beautiful reflections, and sweeping hills. Often accompanied by gorgeous starry skies at night.
But landscape photography doesn’t have to be limited to traditional forms. Abstract landscape photography is an option for those wanting to venture outside of their comfort zone and into creative photography.
Here are 11 tips for stunning abstract landscape photography.
11 Great Tips for Abstract Landscape Photography
Below are our top 10 tips for abstract landscape photography.
1. Understanding Abstract Landscape Photography
Abstract photography is a term that can be a little tricky to define in itself.
Let’s make it simple, though. If you are looking at an image and having trouble defining what it is that you are looking at, that’s an abstract photograph.
Landscape photographers aim to capture and illustrate their surroundings as close to reality as possible. The genre can include manmade landscapes and natural scenes.
Abstract landscape photography melds each practice to push the boundaries of both. It introduces abstract tenants to emphasize, skew, or break down how we appreciate landscapes.
Abstract landscape photography isolates and studies the visual components of a landscape image. This allows us to reimagine the way we view the environment around us.

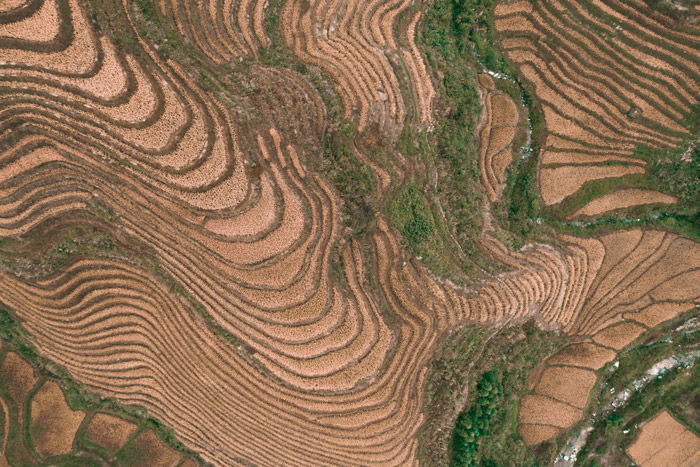
2. Try an Aerial Perspective
Aerial landscape photography captures an environment that many will never encounter in person. The transformative nature of height creates an abstracted and often unrecognizable landscape.
It reveals shapes, textures, colors, and patterns that are impossible to see from the ground.
Aerial perspectives flatten a 3D environment into a 2D canvas. And, with the increased accessibility of drone photography, aerial abstract landscape photography is becoming more and more feasible.
If you’re looking to photograph a unique, abstract perspective, and own a drone, go out there and see what images your surroundings are hiding.
3. Include Camera Movement
Camera movement involves deliberately moving your camera during a long exposure. The artistic photography technique introduces physicality into an image. This creates a dynamic abstract landscape photograph.
Camera movement introduces a unique type of energy into image-making. It creates abstract photography that communicates the experience of the process to a viewer.
Results of the camera movement technique seen below have been likened to the art of painter Mark Rothko. He once said, “A painting is not a picture of an experience, but is the experience.”
The same can be said here about photography too.

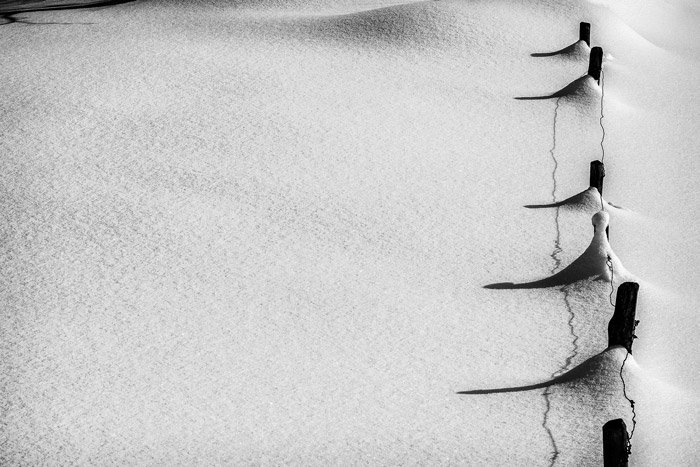
4. Go Black and White
Abstraction relies on the balance between light and shadow. This is why many abstract photographers choose to shoot in black and white or convert to it in post-production.
By removing color, distraction is minimized. There’s more space in a photograph to emphasize composition. The subtlety in the degrees of light enhances form, creating a greater sense of depth in an image.
Bright-colored clothing and cars, ambient lighting, and color temperature are all common distractions that can let an image down.
While shooting in black and white, the interaction between light and shadow has more impact. It allows elements within a frame to relate to each other where color would have interfered.
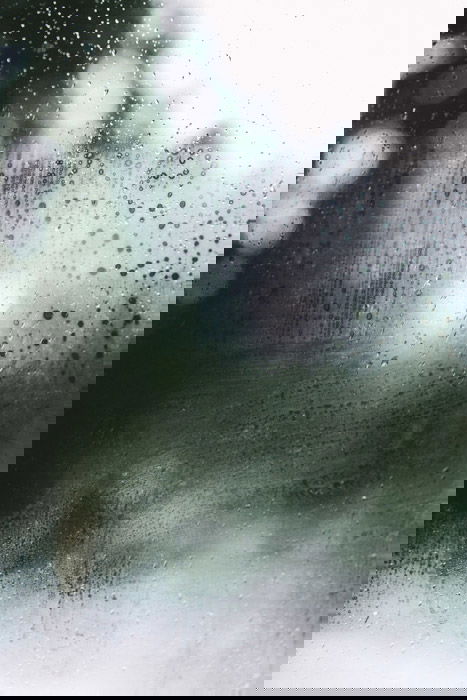
5. Take Abstract Landscapes Through Glass
Look for condensation and imperfections on a glass surface. You can use these to introduce a pallet of distilled color and light to an image, both obscuring and illuminating a landscape.
It’s this interplay that creates abstraction. And invites the viewer to investigate the scene more intently.
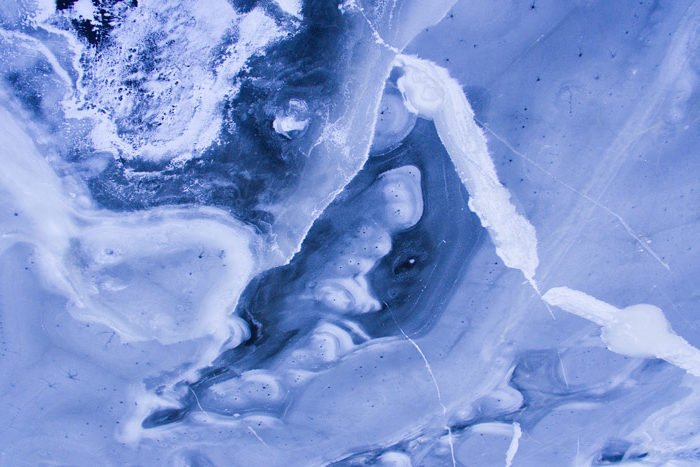
6. Remove Scale
A physical photograph is a flat medium. It’s two-dimensional. To convey the third dimension in an image, photographers include visual cues. These allow us to identify depth and scale.
Incorporating familiar-sized subjects such as people or cars is one way to do this. Using identifiable subjects allows a viewer to “orient” themselves. This way, they can read an image more easily.
In abstract landscape photography, the emphasis on the scale can be turned right on its head. Intuition, creative insight, and a sense of play take priority. These leave a photographer free to experiment regardless of size and depth.
From a viewer’s perspective, a lack of scale in an abstract landscape can be disorientating. But that isn’t always a bad thing!
The viewer can focus instead on other aspects of the image, including shape, form, color, and light.

7. Play with Bokeh
Bokeh is the quality of blur created in the unfocused areas of an image by a lens.
There are a few technical aspects that go into achieving a nice bokeh effect. Basically, bokeh is produced using a fast lens at its widest aperture. Some or all of your image is out of focus to transform highlights into soft, disk-like orbs.
The bokeh effect can range from subtle to immersive. It depends on your lens, subject matter, and technique.
Imagine a dramatic whole-image bokeh landscape. It appears as a soft, abstract image punctuated with filtered points of light.
Despite the lack of immediate subject matter, the image still draws attention.
Bokeh abstract landscapes are a study of both light and the tools we use as photographers. Plus, they make lovely wallpaper backgrounds for a phone or computer.

8. Add a Sense of Feeling with Form
Form refers to the point where a shape becomes three-dimensional. In simple terms, the shape is two dimensions. It’s an outline without volume.
The form is three-dimensional. It has both volume and shape. A square is a shape, whereas a cube is a form.
Form creates depth through shadows and highlights. Adjusting your perspective so that your camera is at an angle to a subject helps accentuate form.
Golden hour light is ideal for capturing form in the natural landscape. Light during the golden hour is softer, warmer, and at a lower angle, accentuating shape to coax out the form.
9. Incorporate Minimalist Techniques
By using a “less is more” approach to composition, minimalist photographers emphasize the subject matter.
A minimalist photographer asks, “What can I leave out of an image?” rather than, “What can I add?”
Abstract minimalist landscapes may sound a bit convoluted. But the basics are the same.
Abstraction plays on our associations with the objective. Minimalism culls anything but the imperative. And landscape photography embraces the naturally occurring wonders of the world.
With each component working in unison, you can achieve simple, intriguing, and beautiful abstract landscape imagery.

10. Use a Shallow Depth of Field
Depth of field (DoF) describes how much of an image is in or out of focus. By controlling DoF with the aperture, a photographer shapes a scene. The image goes from intentional blur to acceptable focus.
Abstract photographers often use shallow depth of field. It can obscure key parts of a subject, emphasizing compositional elements instead of subject matter.
A shallow DoF takes advantage of the human eye’s tenancy to seek out sharp focus. It draws the viewer’s attention to the sharpest areas in a photo.
In this way, a photographer can control where a viewer pays the most attention.
Using a shallow DoF also separates a subject from the fore and background of an image. You can fit a point of interest between the two to make it stand out.

11. Experiment with Illusion
Photographing subject matter that appears to take on the visual characteristics of a landscape tests a viewer’s perceptions of the world around them.
It’s a natural human inclination to attempt to “figure out” an environment visually. Creating ambiguous abstract landscapes motivates a viewer to engage with a photograph out of instinct as well as curiosity.
Conclusion: Abstract Landscape Photography
Abstract and landscape photography are two genres with competing goals. Abstraction aims to describe the indescribable, abandoning obvious subject matter.
Landscape photography, on the other hand, is centered around depicting the essence of an environment visually.
When you combine the two, the results are fascinating and engaging. Next time you are out photographing a landscape, take the time to deconstruct the scenery. Turn it into abstract shapes and forms with your camera. You might be surprised by the results!


