
In today’s article, you’ll learn 10 tips for producing the perfect minimalist landscape. Read on to find out how to create minimalism in your photography today!
Shooting Minimalist Landscape Photography (10 Tips)
1. Best Locations for Minimalist Landscape Photography
Location is arguably the most important thing to consider. Certain places lend themselves to minimalist photography more than others.
It’s possible to create minimalism more or less anywhere with the right lens and careful composition. But visiting more remote locations will give you more options.
- Coastal Areas: Coastal areas will offer a clean sky and a clear foreground. These are both useful when you’re looking to create minimalism.
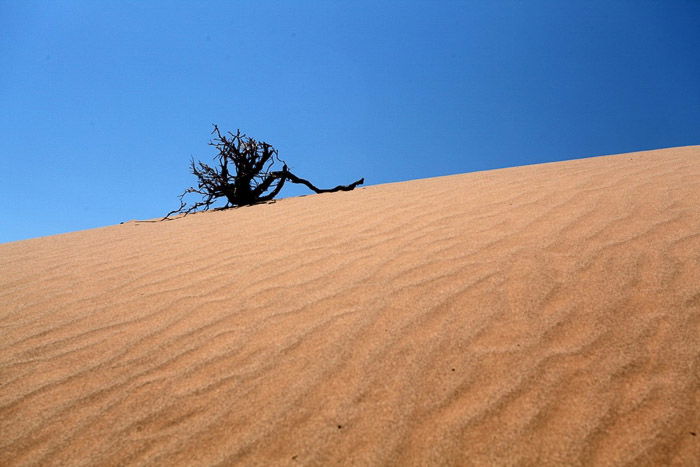
- Deserts: Similar to coastal areas, the sparsity of deserts lends them to minimalist landscapes.
- Mountains: Mountains also have potential minimalist features. They’re not as ideal as coastal and desert areas, but you’ll still find good locations here too.
2. Compose Your Minimalist Landscapes Without Extra Elements
As mentioned earlier, photography is the art of subtraction. This concept can be readily applied to minimalist landscape composition. You’re really aiming to remove as many unwanted elements as you can, to keep the photo as open as possible.
Visiting the right location will help a lot, as you won’t need to deal with too many unwanted elements in the first place. But some composition tricks will help too.
- The Rule of Thirds: Generally used as a tighter crop. For minimalist images, compose slightly wider yet keep the same proportions in your photo. You’ll want a focal point in your photo, but it shouldn’t dominate the frame.
- Expansive Compositions: Include a large amount of negative space. This area of the image should dominate the whole photo. The photo’s main subject will be small and likely appear at the bottom of the frame. You can also compose it in the left or right third of the image to keep within the rule of thirds. The remainder of the frame should be kept clean to give a minimalist feel. This sometimes needs a background that has some texture and gradation to it.
3. Using a Wide-Angle Lens
One of the best lenses for minimalist landscape photography is the wide angle. But you need to be in the right location. Using this kind of lens in a busy urban environment, for instance, will be challenging when it comes to producing minimalism.
To get the most out of this lens, choose a minimal environment. Now when you open out to those wide focal lengths, you won’t need to deal with distracting elements coming into your frame.
A minimalist photo needs a strong subject to play off against those negative spaces, though. With the wide-angle lens, you’ll need to be in a location where you can get physically close enough to your main subject.
4. Using Lenses With Long Focal Lengths for Minimalist Landscapes
Minimalism is also possible with a lens that has a longer focal length. Using longer focal lengths allows you to compress a scene, focusing on a panel within the overall scene in front of you.
That means it’s easier to create minimalism, even if your photo’s location is generally cluttered. The trick is choosing an interesting enough panel. This is often about choosing a good focal point.
Unlike the wide-angle lens, you can photograph your main subject from some distance away. A longer focal length combined with a large aperture will allow you to blur out the background and create a bokeh.
A smooth bokeh background, perhaps with some gradation through it, juxtaposed against a strong main subject, will give you a good photo.
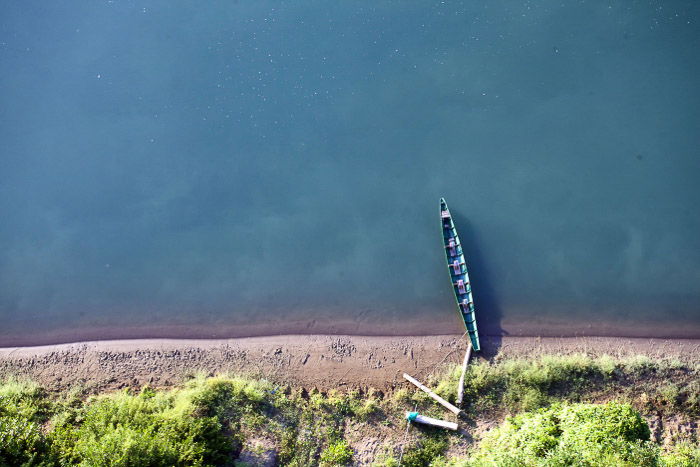
5. Try Minimalist Aerial Landscapes
A great way to get a minimalist landscape is by photographing from above. Gone are the days you’d need to photograph from a plane window or hire a helicopter.
Now drones offer you this unique point of view. And it’s an extra string to a landscape photographer‘s bow.
Once again, you must find a good location to use your drone. If the area you photograph above has too many features, minimalism will be hard to achieve.
Look for details like a road winding through a thick forest, where the tree canopy provides texture and negative space.
Coastal areas where the sea meets the land are good hunting grounds for minimalist landscapes taken using drones.
6. Pick a Striking Focus Point to Draw the Viewer’s Attention
Within your minimalist landscape photo, the focal point will be the key to the image. That’s because you’ll likely remove all other elements from the image. That one main subject really needs to count.
You’ll also need to find a main subject that’s remote and doesn’t have things surrounding it. Remember you’ll need to include quite a large area around the main subject.
A few ideas for the main focal points are as follows.
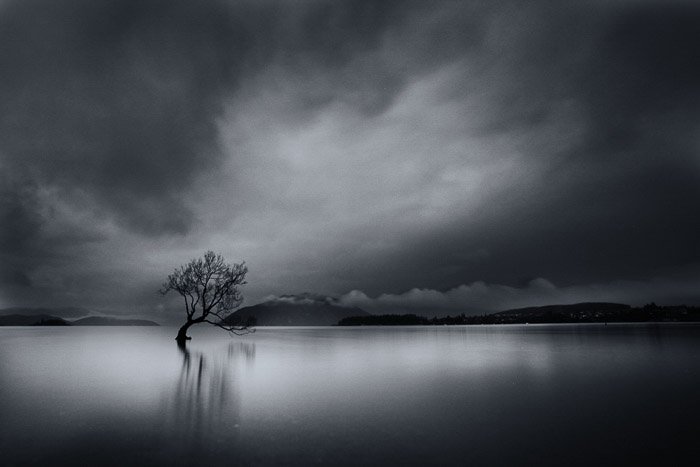
- A Lone Tree: A classic in photography and a great contender for the main subject in a minimalist landscape. You’ll need to find a remote tree, apart from other trees—ideally, a mature well-grown tree.
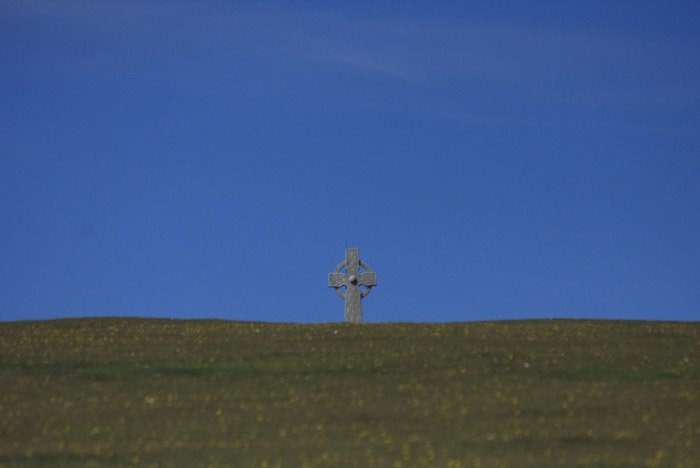
- A Building: A church standing on its own. Or perhaps a farmhouse or barn makes for a good main subject.
- A Jetty: For coastal photos, a jetty will provide a great leading line as you look out to the sea. This subject works well with long exposure to flatten the water around it.
7. Stick to Fewer Colors to Increase the Minimalist Feel of Your Images
In addition to removing extra objects and buildings from your frame, you can also reduce the number of colors. The reason why a high-contrast black-and-white photo has a minimalist quality is precisely because of the lack of colors.
You’ll want to photograph a scene that contains two or three colors. Any more, and the frame starts to look busy. And you’ll lose the minimalism. An image that contains the blue sky, a green grass foreground, and a building would work well.
The craze around selective colors in photography was built around minimalism. A totally black-and-white landscape with a colored focal point could work too.
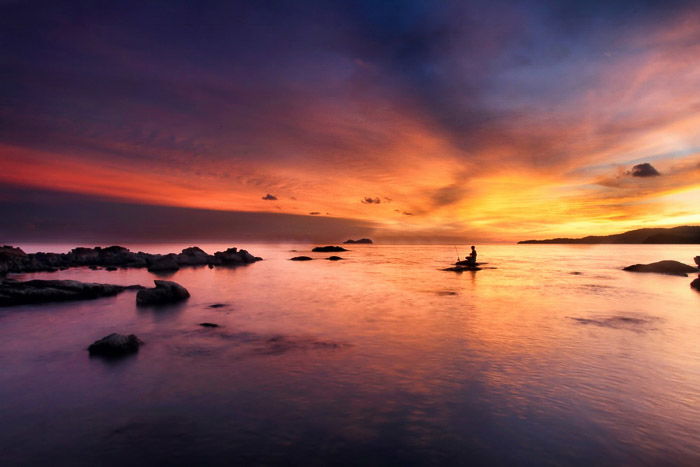
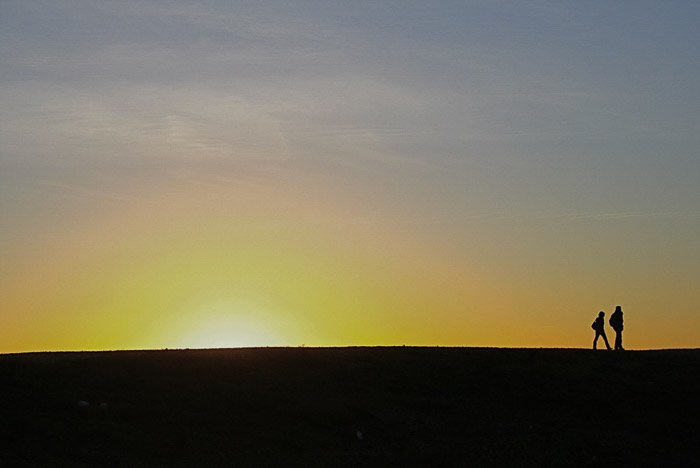
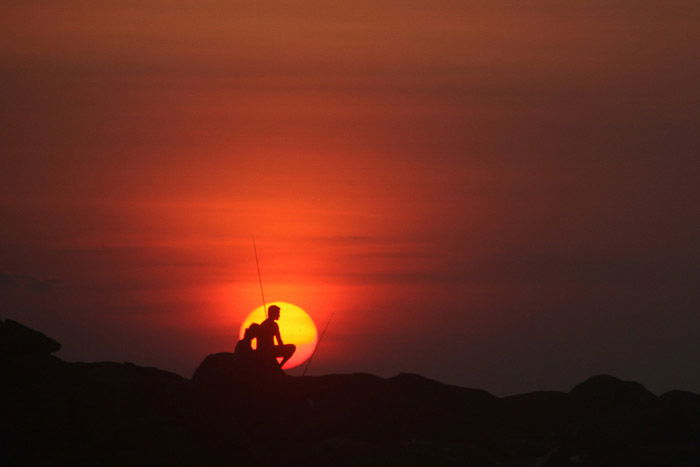
8. Focus on Silhouettes for More Interesting Landscapes
Silhouettes look great in photography. With minimalist landscape photography, they’ll work very well as the main subject. Whether you choose to silhouette a lone tree, people, or perhaps a building will depend on your scene.
This will work especially well at sunset when you get all the nice colors from the sky. But you are not restricted to sunset—any time of day when you photograph against the light works.
The advantage of silhouettes is related to reducing the number of colors. These will always appear black in your frame. Added to this, other foreground elements in your frame will likewise be black, adding further minimalism.
How to Photograph Silhouettes
Photographing silhouettes is relatively straightforward. You just need to follow these steps:
- Photograph into the light. You’ll need a strong background light against your main subject.
- Now set your exposure value as zero against the sky. This should ensure elements in the foreground become silhouettes against the sky.
- Make sure you are photographing at an angle. Ideally, you want the whole object silhouetted against the sky. Photograph from a lower angle if needed. That way, you can aim upwards toward the sky.
9. Use Long Exposures for Better Minimalist Landscapes
Long exposure is a great technique to combine with minimalism. It can be used in many locations where you’d photograph a minimalist landscape. It can also add to the minimalism of your photos.
To take long exposure photos, you’ll need a tripod. If you photograph during the day, you will likely also need an ND filter. This is best used in coastal areas, where long exposure can make water surfaces smooth and flat.
That flat water will now mirror the sky, making your photograph more minimalist. This can also be applied to the sky on a day with fast-moving clouds.

10. Best Time for Minimalist Landscape Photography
Visiting a location at the correct time of day can also impact your photo. If you visit a popular location in the middle of the day, crowds will likely be there.
Those crowds of people, especially if they stand near your main subject, will make the photo much busier. But if you’re looking to photograph people walking against a sunset sky, visiting when people are around is a good idea.
Knowing where the sun will be is also a factor. If you want to photograph silhouettes, you’ll need the sun before you.
Conclusion: Shooting Minimalist Landscape Photography
Landscape photography is popular among many photographers. And many more also aim for minimalism in their work.
Today’s article gives you an idea of how you can combine these two areas of photography effectively and in one image.
Do you enjoy photographing minimalist landscapes? What approaches do you use to get successful results?
We’d love to see your photographs in the comments section. And as always, please share your opinion.


