A hand grip camera strap brings a new level of comfort and convenience to your photography. It keeps the camera securely in your grasp. There’s less risk of drops and knocks. And they give you instant access to your camera.
The Peak Design CL-3 Clutch Camera Hand Strap is the best on the market. It has a simple yet functional design. It’s compatible with DSLR and mirrorless cameras. And it’s even compatible when working with tripods. It’s a high-quality hand strap that’ll transform the way you work.
What Is the Best Hand Grip Camera Strap?
The best hand grip camera strap keeps your camera in your hand. It gives you a secure grip on your camera at all times. This gives you security against accidentally dropping your camera. And it allows you to activate your camera quickly.
Unlike a neck strap, the camera isn’t hanging freely. It isn’t vulnerable to being knocked around. And you’re less likely to drop it since the camera is already in your hand.
A hand grip camera strap also improves your response time as a photographer. With the camera already secured in your hand, you can react quickly. You don’t have to grab your camera out of a bag. You are already primed and ready to shoot at any moment.
There are many different hand strap designs. Some have large padded areas for the back of the hand. Others have a simple wrist strap. The most important thing is finding one you find comfortable. You need a hand strap you can adjust to fit your hand and camera.
You also need to think about your camera. Are you using a DSLR or mirrorless camera? The size and weight of your camera are also important considerations. Heavier cameras need more support. And that’s going to influence your decision when buying a hand grip camera strap.
Here’s a quick look at all the hand grip camera straps. We look at each hand strap in more detail below. And there’s an FAQ section at the end, so keep reading to find the best hand strap for you.
- Quick-connecting and quick-adjusting for total security
- Ultra-durable Hypalon, microfiber, and aluminum hardware
- Compatible with any DSLR and most Arca-Swiss tripod heads
- Works by itself or with the Peak Design Capture Camera Clip
- Secure metal mounting plate also compatible with the Altura Photo Rapid Fire Neck Strap
- Grips the hand and wrist to prevent accidental slips
- Compatible with any DSLR or mirrorless camera with a standard ¼" tripod screw mount
- Relieves hand fatigue by equally distributing the weight
- Total peace of mind and low profile
- Quickly and securely connects to any device
- Magnetic wrist loop and bracelet storage
- All-custom aluminum hardware and ultra-soft nylon
- Simple and stylish design
- Leather hoop for adjusting tightness
- Weighs next to nothing and fits in your pocket
- A great choice for film cameras
- Thick wrist support strap for more security
- Quick-release buckle for easy connecting and disconnecting
- Tripod mount connector
- Affordable price tag
- Secure your camera with extra security to prevent accidental slipping
- Adjustable length provides perfect fit for any hand size
- Flexibility with metal base plate and Arca-Swiss design
- Comfortable with padded hand cushion and air holes for breathability
- Genuine parachute rope strap
- Simple and effective design
- Excellent quality for a low price
- Perfect for smaller cameras
- Thick and strong materials give it incredible strength
- Quick-release connector for easy use
- Leather hoop for tightening around your wrist
- Loop connecting system is compatible with a wide range of cameras
- Slim design makes it discreet and stylish
- Quality build materials
- Wrist strap provides double support
- Can support heavy cameras
10 Best Hand Grip Camera Straps
Here’s our deep dive on the best hand grip camera straps. We have everything from hand grip straps to wrist straps. There are straps for light and heavy cameras. And we have straps for casual and professional photographers.
1. Peak Design CL-3 Clutch Camera Hand Strap
| Brand |
Brand
Peak Design
|
| Strap Type |
Strap Type
Hand grip strap
|
| Material |
Material
Nylon, hypalon, aluminum
|
| Other Key Features |
Other Key Features
Tripod compatible, adjustable tightness
|
| Best For |
Best For
All photographers
|
The Peak Design CL-3 Clutch is the best hand strap for photographers. Peak Design is one of the most respected brands for photography accessories. And their range of wrist straps is no exception. Their CL-3 combines build quality, affordability, and functionality. Photographers from all levels will appreciate this hand strap.
The CL-3 Clutch hand strap gives you security when working with heavy cameras. It’s compatible with all DSLR cameras, including the largest full frame models. You can also use it with the best mirrorless cameras if you prefer those machines.
The camera anchors can hold anything up to 200 lbs (90 kgs). So there’s no fear of your camera falling loose.
The hypalon strap is strong and durable. The microfiber pad adds comfort to the user experience. And the aluminum adjuster is a robust piece of hardware.
The aluminum clutch adjuster allows you to tighten the strap against your hand. You can keep it tight for better control. But it’s quick and easy to loosen if you need to free your hand.
It’s compatible with any DSLR camera, including Nikon, Canon, and Pentax cameras. You can also use the camera hand strap while using a tripod.
The Peak Design CL-3 Clutch gives you complete control while you’re working. And it’s ideal for portraits, landscapes, and street photography. Photographers in all areas will immediately feel the benefit of this high-quality hand grip camera strap.
2. Altura Photo Rapid Fire Grip
| Brand |
Brand
Altura Photo
|
| Strap Type |
Strap Type
Hand grip strap
|
| Material |
Material
Leather, nylon
|
| Other Key Features |
Other Key Features
Wrist strap, metal mounting plate
|
| Best For |
Best For
Full frame mirrorless and DSLR cameras
|
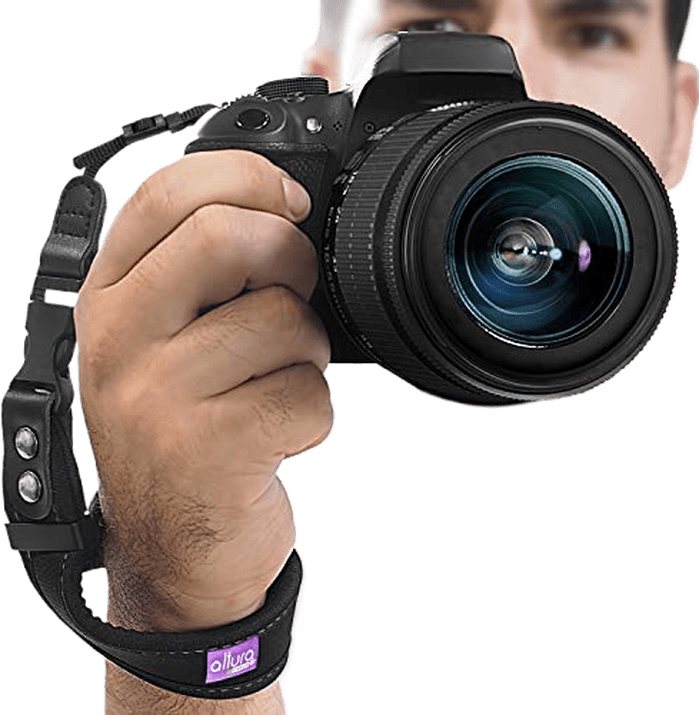
The Altura Photo Rapid Fire Grip gives you comfort and control. It isn’t the most discreet hand strap. It’s not a fashion accessory, but it’s strong, durable, and reliable when shooting.
It’s compatible with all the major camera brands like Sony, Nikon, and Canon. You can also use it with the best Olympus and Fujifilm cameras. And it’s suitable for all photography styles.
The Altura hand strap has a large padded section for the back of your hand. And there’s a wrist strap that keeps the camera secure, preventing accidental drops.
Getting the straps tight and comfortable takes a while. But once everything is in place, it’s one of the most secure camera hand straps you’ll find.
You attach the Rapid Fire Grip using two connectors. The top of the padded strap connects to the camera’s strap ring. And the lower part has a mounting plate that screws into the tripod mount on the bottom of the camera. The combination gives you unparalleled levels of protection. There’s no escape for the camera even if your hand loses grip.
The Altura Photo Rapid Fire Grip is versatile and affordable. Everyone from street to fashion photographers can use this strap. It’s compatible with mirrorless and DSLR machines. And the price is more than reasonable. It’s a fantastic addition to any well-stocked camera bag.
3. Peak Design Cuff Wrist Strap
| Brand |
Brand
Peak Design
|
| Strap Type |
Strap Type
Wrist strap
|
| Material |
Material
Nylon, leather
|
| Other Key Features |
Other Key Features
Dyneema anchor, quick-connecting buckle
|
| Best For |
Best For
APS-C mirrorless and compact cameras
|
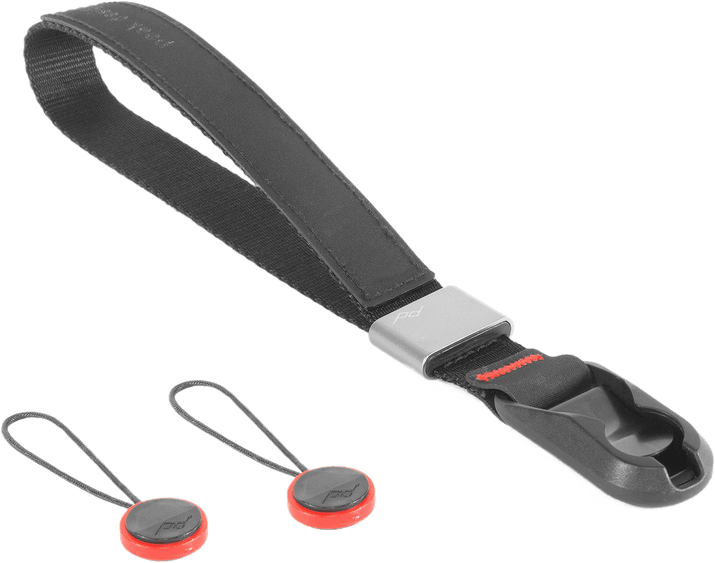
Peak Design has the perfect blend of form and function in its Cuff Wrist Strap. It’s practical, simple, and does exactly what you need it to. There’s nothing fancy about the Peak Design Cuff. But it’s well-made and reliable. It’s the perfect wrist strap for photographers using smaller cameras.
The wrist strap is made of durable nylon. It uses a more compact weave and feels smooth against your skin. You’ll experience little chafing or discomfort even when shooting for long periods. It’s easy to adjust the size of the strap loop with a slider. And the strap also has a padded leather section for extra durability and comfort.
The wrist strap holds the camera using the anti-abrasion anchors. They don’t cause damage to your camera and can support weights up to 200 lbs (90 kgs). That’s a heavy load. But the Cuff strap is better suited to APS-C mirrorless and compact cameras.
The Peak Design Cuff is the perfect wrist strap for street and travel photography. Its discreet black design is ideal for photographers who want to keep a low profile. And it gives you the control and mobility to move the camera quickly for those blink-and-you-miss-it street shots.
4. VKO Camera Wrist Strap
| Brand |
Brand
VKO
|
| Strap Type |
Strap Type
Wrist strap
|
| Material |
Material
Microfiber leather, nylon
|
| Other Key Features |
Other Key Features
Leather hoop adjuster
|
| Best For |
Best For
Street and film photographers
|
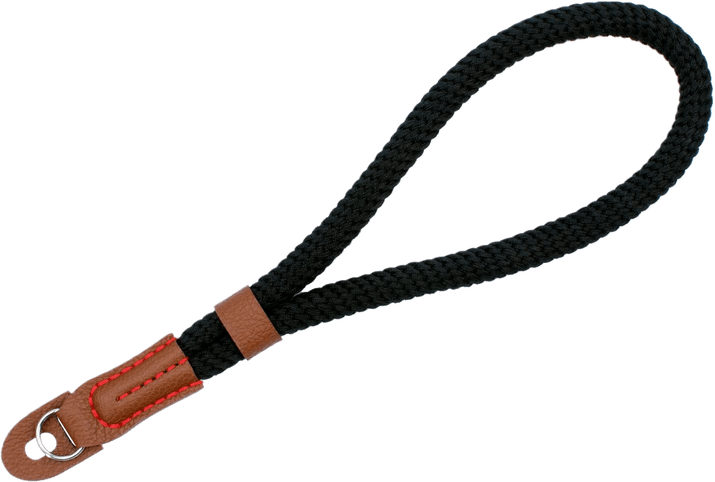
The VKO Camera Wrist Strap is simple and stylish. It’s a trendy wrist strap that looks great with any camera. It’s ideal if you’re using a point-and-shoot camera. And the retro style is the perfect match for the best 35mm film cameras.
It’s a lightweight strap, weighing only 0.5 oz / 16 g. And it fits in your pocket if you’re not using it. The strap is made of soft nylon. It feels gentle against your skin so you don’t get chafing or discomfort. It’s also strong enough for cameras with a bit of heft, like the Canon AE-1.
A loose wrist strap doesn’t offer much security. But thankfully, the strap has a leather loop that allows you to tighten it around your wrist. This gives you a more secure hold on your camera.
Any photographer can afford the VKO Camera Wrist Strap. It’s stylish and simple. It’s perfect for street photography cameras. And that’s why everyone needs one in their camera backpack.
5. USA Gear Professional Camera Grip
| Brand |
Brand
USA Gear
|
| Strap Type |
Strap Type
Hand grip strap
|
| Material |
Material
Nylon, neoprene
|
| Other Key Features |
Other Key Features
Wrist support strap, quick-release buckle
|
| Best For |
Best For
Photographers with tight budgets and heavy cameras
|
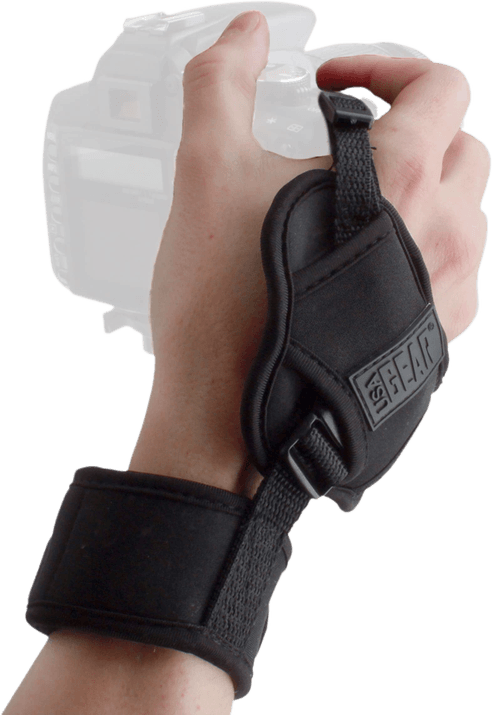
The USA Gear Professional Camera Grip gives you the extra security you need. It prevents nightmare situations with your camera gear. And it comes with a bargain price tag. It certainly isn’t the most stylish. But it gives you fantastic camera support at a fantastic price.
This USA Gear hand strap uses a two-point connection system that hooks onto the top and bottom of your camera. The bottom connection screws into the tripod mount so there’s no risk of it slipping off.
The hand strap pad ensures comfort, allowing you to adjust for a tight fit. And there’s the wrist strap that gives you added security. It also provides wrist support, helping you shoot longer without pain or fatigue. And it helps distribute the weight of the camera in your hand.
The USA Gear Professional Camera Grip can support heavy cameras. It’s a great choice if you’re still using DSLR cameras. And it can deal with heavy full frame mirrorless cameras. You get excellent support at a fair price.
6. JJC Pro Hand Grip Strap
| Brand |
Brand
Fotasy / JJC
|
| Strap Type |
Strap Type
Hand grip strap
|
| Material |
Material
Microfiber leather, nylon
|
| Other Key Features |
Other Key Features
Wrist support strap, Arca-Swiss plate, tripod compatible
|
| Best For |
Best For
Mirrorless camera users
|
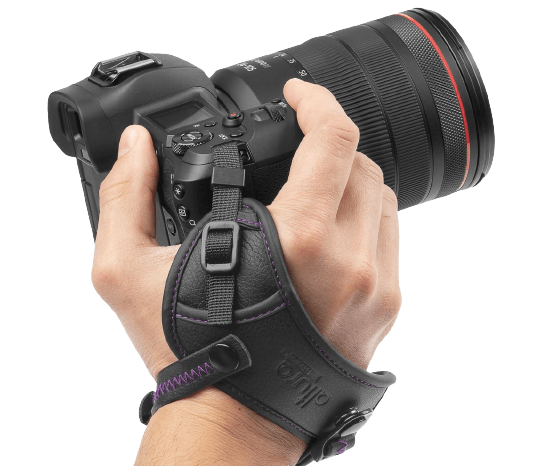
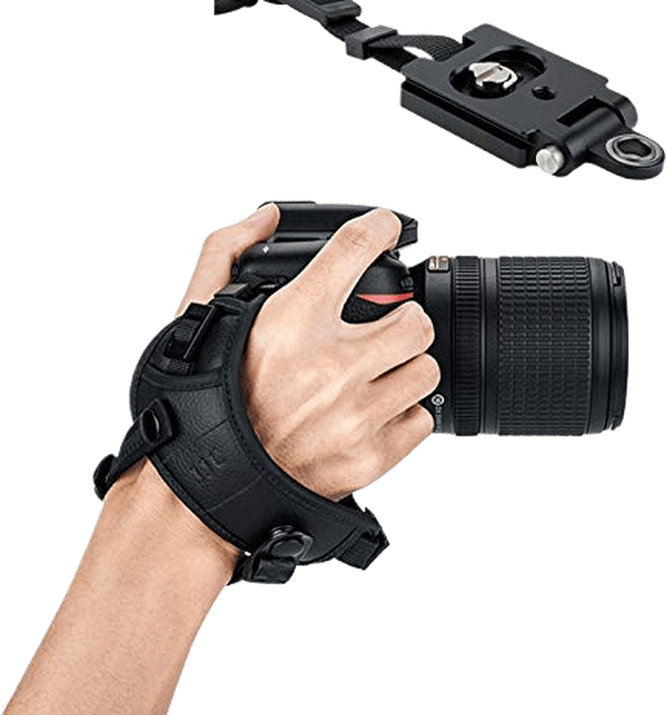
The JJC Pro Hand Grip Strap is a fantastic option for mirrorless cameras. It’s a hand grip strap that puts function before fashion. And it offers excellent security, allowing you to take pictures without worry.
The hand straps have cushioned padding, giving you a comfortable hold even with heavy cameras and lenses. And the adjustable wrist straps provide added security when shooting by hand.
The wrist straps are also padded, so you won’t experience any irritation. The Arca-Swiss quick-release base plate also keeps your camera securely attached. You can also use it with heavy-duty or travel tripods.
The JJC Pro Hand Grip Strap is one of the best camera hand straps for mirrorless cameras. It works well with any Sony camera. And it’s a perfect fit with all the best Panasonic cameras. And that’s true with Fujifilm and Olympus cameras, too.
7. AQAREA Camera Wrist Strap
| Brand |
Brand
AQAREA
|
| Strap Type |
Strap Type
Wrist strap
|
| Material |
Material
Parachute rope, leather
|
| Other Key Features |
Other Key Features
Metal ring, leather loop
|
| Best For |
Best For
Casual Photographers
|
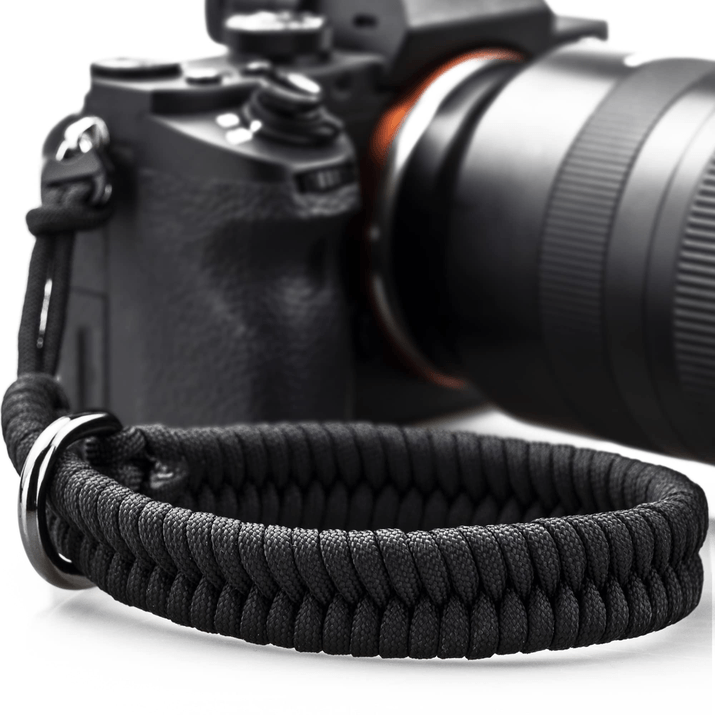
The AQAREA Camera Wrist Strap is perfect for casual photographers. Whether you’re taking pictures in your local neighborhood or down at the skatepark, it’s a great choice for your camera. It’s simple, stylish, and affordable.
The design and functionality couldn’t be more simple. The strap is made from real parachute rope. That means it’s super strong. And the end has a metal ring that you loop back on itself. It slides up and down the rope, tightening around your wrist.
The design also means the camera’s weight is used to make it more secure. If you drop the camera, the weight pulls the rope and tightens around your wrist. This makes dropping the camera close to impossible.
The rope is exceptionally strong while being very lightweight. You can use it with the best full frame cameras. But it’s better suited to smaller, more compact cameras.
You can’t go wrong with the AQAREA Camera Wrist Strap. It’s a simple and stylish way to keep your camera secure and in your hand. It comes in different colors. And it has a unique design that delivers security.
8. Altura Photo Wrist Strap
| Brand |
Brand
Altura Photo
|
| Strap Type |
Strap Type
Wrist strap
|
| Material |
Material
Neoprene
|
| Other Key Features |
Other Key Features
Quick-release connector, tightening hoop, quick-release camera system
|
| Best For |
Best For
Photographers looking for a secure wrist strap that can handle large cameras
|
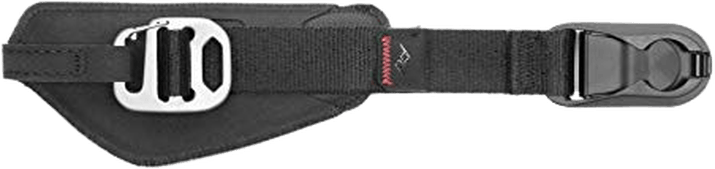
The Altura Photo Wrist Strap is the best wrist strap for heavy cameras. It’s strong and durable. And it has an ultra-secure design that keeps your camera safe. It’s ideal for DSLRs of all sizes. And it’s a good option for mirrorless cameras too. It also offers excellent value for money.
The main wrist strap is thick and made of strong material. There’s a hoop you can pull down to tighten the strap around your wrist. And it has a quick-release connector, so you can easily connect and disconnect.
The loop-type connection is compatible with cameras of all kinds. That includes compact and GoPro cameras. It’s easy to attach. And it gives you fantastic support when it is attached. You don’t need to worry about the camera coming loose.
9. Spider Holster V2 Camera Strap
| Brand |
Brand
Spider Holster
|
| Strap Type |
Strap Type
Hand grip strap
|
| Material |
Material
Hypalon
|
| Other Key Features |
Other Key Features
Three snap connection for added security
|
| Best For |
Best For
Photographers wanting a compact hand grip strap
|
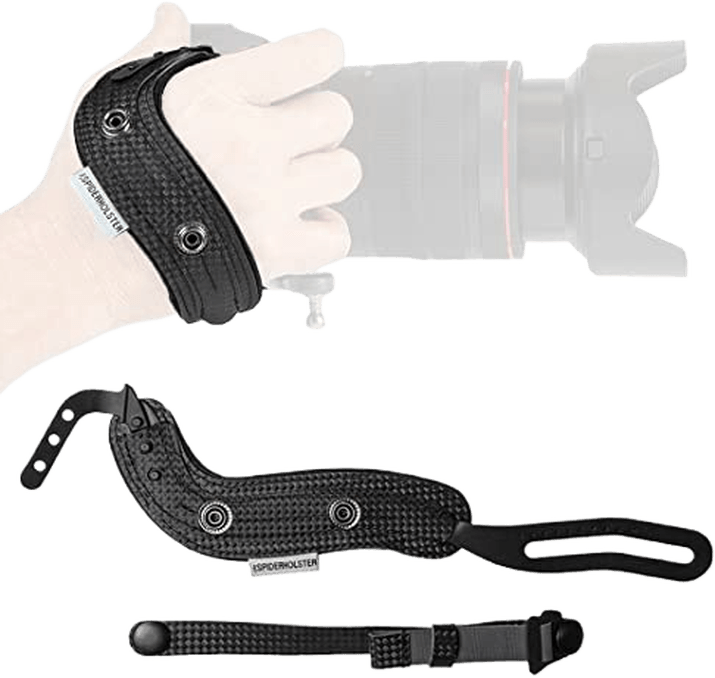
The Spider Holster V2 Camera Strap is excellent if you want something secure but slim. Many hand grip camera straps can be bulky. But the Spider Holster V2 doesn’t have that problem. It has a discreet graphite-effect design. But it can support the heaviest of heavy cameras.
There’s no doubt about the quality of the attachments, straps, and buckles. Your camera is safe with this strap. And the hand strap has foam padding covered in a soft material. The comfort allows you to shoot for hours. And the added security gives you total control of your camera.
The Spider Holster V2 Camera Strap is the perfect blend of comfort and security. It isn’t the cheapest camera strap on the list. But it’s a quality product photographers love to use.
FAQs on the Best Hand Grip Camera Straps
We’ve answered some frequently asked questions to help you make the right decision. Finding the perfect hand grip camera strap isn’t always easy. But this extra information will help you find what you need.
Is a Hand Grip Camera Strap Better Than a Neck Strap?
The camera hand strap is one of the most underrated pieces of photography equipment. Many photographers opt for a neck strap when shooting. But once you try a hand strap, you may never look back.
A neck strap may seem convenient enough for most photographers. But the more you think about it, the more issues you find. First, there’s the fatigue in your neck. DSLR and mirrorless cameras can be heavy, especially with large lenses attached. We’ve all had a pain in the neck after a long day shooting with a neck strap. Then there’s the rubbing and chafing too.
Camera neck straps can also be clumsy and insecure. Neck straps let the camera hang against your body when you’re standing upright. But if you lean forward or turn quickly, the camera can swing and sway. This can cause knocks that can damage your camera. And the camera has a long way to fall if there’s a strap malfunction.
A hand grip camera strap has none of these problems. It holds your camera close to your hand so you’re always in control. The strap combines with the grip of your hand to keep the camera secure. And there’s no uncontrolled swinging to put the camera at risk.
A good wrist strap distributes the camera’s weight across the hand and arm. This stops chafing of the wrist and helps avoid fatigue in your hands, wrists, and arms. A camera wrist strap is a safe and secure option for all photographers. And when you find the right hand strap, it could revolutionize your photography practice.
Do Professional Photographers Use Hand Grip Camera Straps?
Many professional photographers use hand grip camera straps. They are popular with fashion photographers working in photography studios. And you even see sports photographers using hand straps at sporting events.
The extra security and control make them more popular than neck straps in the professional community. While neck straps are perfectly fine for casual shooters, hand grip straps help pros reach higher levels of performance.
Which Hand Grip Camera Strap Is Best for DSLR Cameras?
The Peak Design CL-3 Clutch Camera Hand Strap is a top option no matter what camera you have. But the Altura Photo Rapid Fire Grip is the best strap for heavy DSLR cameras. It’s strong and robust. And it keeps heavy cameras secure in your grasp. There’s very little risk of dropping it.
The Altura Photo Wrist Strap is the strongest wrist strap. It gives you incredible support for a wrist strap. And it can hold full frame mirrorless and DSLR cameras.
Conclusion: The Best Hand Grip Camera Strap
A hand grip camera strap will transform the way you work. They are far more secure than a neck strap. And they give you extra levels of camera control. Once you’ve tried a hand grip strap, there’s no going back.
The Peak Design CL-3 Clutch Camera Hand Strap is the best hand strap around. It gives you fantastic security when using your camera. You have excellent control while shooting. And it offers a great blend of build quality and value for money.