Knowing something about picture frame sizes is surprisingly important. And it’s not as simple as it might seem. We might live in a digital world. But there’s nothing like having your beautiful photos printed out. And they’re even better if they are displayed in picture frames. But it’s not always easy to know what’s the best picture frame size for your beautiful prints. Don’t worry. This guide will explain everything you need to know.
Once you’ve chosen your printer paper, you’ll want to frame those photos. This isn’t always as easy as you think. It’s not always simple to get the perfect picture frame size for your wall art. This is partly because the aspect ratio of our photos is not always the same as the paper we want to use. Paper sizing can be surprisingly confusing. So here’s a quick explanation…
Understanding Picture Frame Sizes and Paper Size: What You Need to Know
Photo printer paper is largely the same across the globe, apart from standard “office” size paper. In North America, the standard is US letter size (8.5 x 11″ / 215.9 x 279.4 mm). Almost everywhere else, it is A4 (8.27 x 11.69″ / 210 x 297 mm). They are very similar in size. Your average home printer or dedicated photo printer will happily default to this size.
But the aspect ratio of the paper is even more important than raw size. This is usually given as the ratio of one side to the other. So 6 x 4″ (15 x 10 cm) paper has an aspect ratio of 3:2. US letter has a ratio of 1:1.29 (roughly 13:10). A4 (and in fact every ‘A’ size paper) is 1:1.41 (roughly 7:5). For the math lovers out there, the ratio is actually 1:√2.
If you’ve ever even briefly looked into this, you’ll know there’s a problem. The pictures your camera produces do not neatly fit these larger paper formats. This table shows the aspect ratio of the most common camera formats and papers.
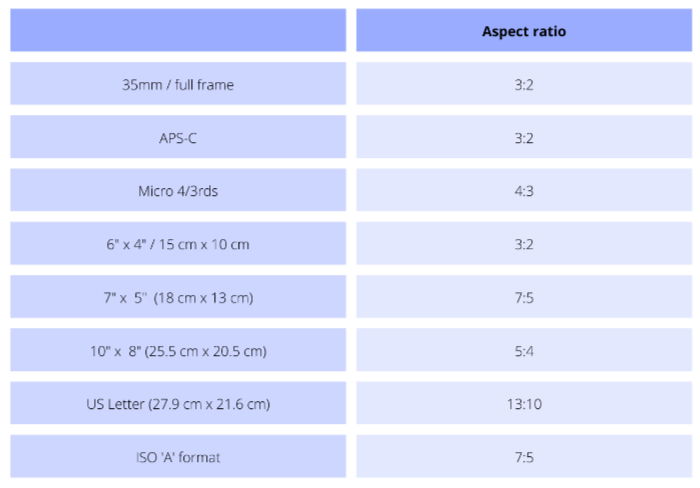
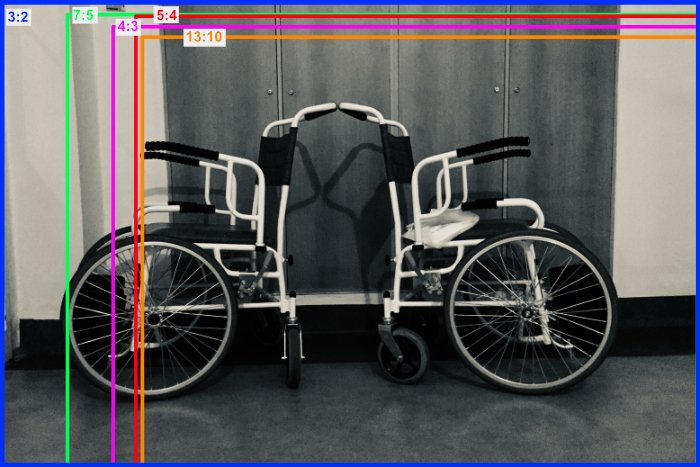
As you can see, there are some easy formats. The most popular print size, 6 x 4″, matches the aspect ratio of full frame and APS-C cameras. With other print sizes and other camera formats, you will need to crop your photos. It’s important to know this before you print. That way you can match your photos to the available picture frame sizes. You can see how the various formats relate to each other here.
Things to Consider When Choosing Picture Frames
You have some choices to make once you’ve chosen your photo and cropped it as necessary. It’s important to think of choosing picture frames as part of the whole creative process.
There are considerations such as the frame color. And you’ll need to decide if the picture is going on the wall or a table or shelf. If it’s on the wall, decide if it will take pride of place as a talking point. Or you might want a collection of small photos framed together.
It’s worth thinking about where you want to put your photos. Few of us have large, gallery-like spaces. So you can be creative. Use the stairs, perhaps. And don’t forget the littlest room in the house! If it’s going on the wall, make sure the fixing is safe. A picture might be worth a thousand words, but it’s not worth a burst pipe.
What Picture Frame Material do You Want?
The possibilities are almost endless. At the most basic are frameless picture frames. Personally, I think that unless you’re a student or living in the ’80s, these probably don’t work anymore.
But there are wood frames of every kind—metal of all sorts, plastic, reclaimed material, and others. Then you need to think about how wide you want the frame material to be. And how deep. Some photos look really good with a deep picture frame.
What Size do You Want?

This seems like a simple question. But the array of frame sizes can be bewildering. Probably the most popular print size is 6 x 4″ (15 x 10 cm). It’s a great size for passing around, and it fits nicely on a table or bookshelf. But on the wall, it can get a little lost.
If you have a bit more space, then 7 x 5″ (18 x 13 cm) prints make more of an impression. In a small room, they won’t look too lost on the wall. In most cases, you need a larger print for hanging on the wall. This would most likely mean US letter or A4. Although 10 x 8″ (25.5 x 20.5 cm) is still popular for darkroom papers. Inkjet printer paper tends to be standard office paper size.
For more impact, you can go bigger. Some keen photographers might have an inkjet printer that will handle larger paper. If so, then you’re probably going to use 19 x 13″ (32.9 x 48.3 cm, also called A3). This is roughly a 3:2 ratio. Any larger than this and you will probably be using a specialist printing service.

Look for inspiration in magazines or on the internet. If you have a striking photo that you can enlarge, make it the focal point of a wall. If you have a number of pictures you want to display, then consider a collection of smaller picture frames.
Do You Want a Mat?
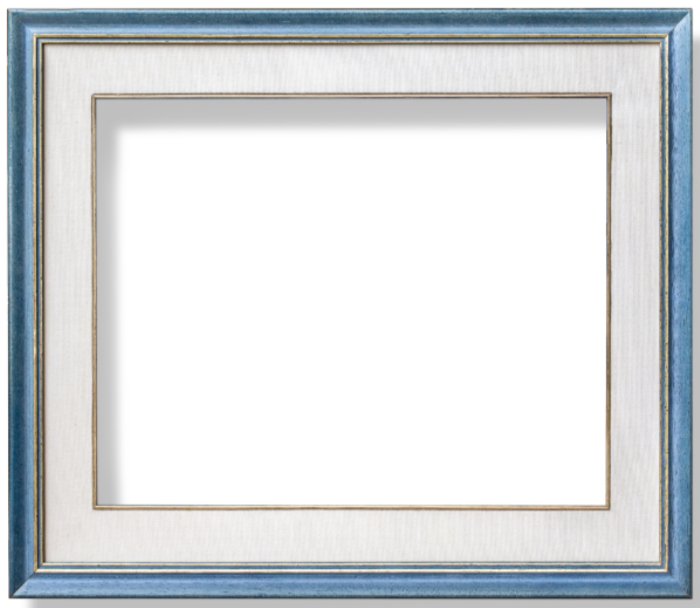
A mat (or mount in the UK) is a frame within a frame. It can add style and class to the framed photo. A dark mat can bring out a light photo. It can also contrast nicely with the picture frame. Many off-the-shelf picture frames will come with a mat. This often means that one frame size offers you two possible photo sizes. A 10 x 8″ (25.5 x 20.5 cm) frame can display a print that size. Or it will often come with a mat for a 7 x 5″ (18 x 13 cm) photo.
In general, I’d say a mat is essential to setting off your photo. My wife, an artist, thinks everything should be triple-mounted. The frame and mat count as 2. Triple-mounting certainly makes an impact, but is probably unnecessary for everyday needs.
Finally, there are some mats available for displaying multiple photos in one picture frame. This can be a great choice for the right subject.
What About Glass?
Glass is great for protecting your prints. It’s also great at reflecting light, which can be a problem. If you can stretch to it, buy a picture frame with non-reflective glass. The same problem of reflections should influence your choice of paper.
This choice also depends on where the frame will be. If it is in direct sunlight for some of the day, you will need to think about that. Or if it’s a dark corner, then think about some accent lighting. Again, magazines or Pinterest can be useful sources of inspiration and ideas.
What are the Best Picture Frame Sizes for Your Photos?

Let’s start with some common picture frame sizes. Nothing is more common than the 6 x 4″ (15 x 10 cm) photo. If space is tight, then pick simple photo frames that fit the photos exactly. An 8 x 6″ (20 x 15 cm) photo frame with a mat will display a 6 x 4″ photo perfectly. Don’t be afraid to go big with the frame and mat. A stylish frame and an eccentric mat can have a great impact.
It’s curious, given its 5:4 aspect ratio but 10 x 8″ (25.5 x 20.5 cm) size, that photographic paper was always very popular with photographers. And it remains a very popular frame size for graduation photos, wedding shots, and other causes for celebration.
A picture frame size that allows a decent mat for a 10 x 8″ (25.5 x 20.5 cm) photo would be something like a 17 x 15″ (43.5 x 38.5 cm). This would be a great size picture frame to show off your work.

A medium-sized picture frame will fit the bill for the most common size for US letter (27.9 x 21.6 cm) size photos. And an 11 x 14″ (28 x 35.5 cm) frame gives plenty of room for a tasteful mat. For A4, you’ll need something like 14 x 11″ (35.6 x 27.9 cm) to allow enough room for a mat.
For a bolder statement, there are some A3 (18 x 12″ / 29.7 x 42 cm) frame sizes with a mat for an A4 photo. This gives a very generous surrounding to the photo.
Likewise, you can find A2 (24 x 18″ / 60 x 42 cm) picture frames with an A3 mat if you really want to show off your A3 prints. If you’re using North American frame sizes, then something like 17 x 22″ (43 x 56 cm) photo frames should work well.

Remember, you don’t have to stick to rectangular or square picture frames. Circles or ovals also make a great choice. A final option, whatever size your photo, would be having a custom frame made.
Custom frames allow you to choose from a wide range of mats and frames. And it means you definitely have the optimum choice of picture frame sizes. This is especially attractive if you’re investing money into a big statement photo. Get it printed on gallery paper, and give it the gallery treatment in the frame.
Conclusion
It’s a pity that so many great photos never make it off the hard drive or out of the cloud. I have never had better camera equipment, and I have never printed so few photos.
Printing and framing your pictures isn’t cheap. But well-chosen, beautifully-framed photos can be a real feature in your home. Knowing what picture frame sizes are available to you locally before you print your photos is a handy tip.
